Last active
December 30, 2025 13:29
-
-
Save carljdp/e6a3f5a11edea63c2c14312b534f4e53 to your computer and use it in GitHub Desktop.
Revisions
-
carljdp revised this gist
Oct 28, 2017 . 1 changed file with 1 addition and 0 deletions.There are no files selected for viewing
This file contains hidden or bidirectional Unicode text that may be interpreted or compiled differently than what appears below. To review, open the file in an editor that reveals hidden Unicode characters. Learn more about bidirectional Unicode charactersOriginal file line number Diff line number Diff line change @@ -47,6 +47,7 @@ Note the different in console output before and after these commands: - [D1 Mini (Wemos product page)](https://wiki.wemos.cc/products:d1:d1_mini) - [Getting Started (Wemos)](https://wiki.wemos.cc/tutorials:get_started:get_started_in_arduino) - [v2.2 Pin assignments (Wemos schematic)](https://wiki.wemos.cc/_media/products:d1:mini_new_v2_2_0.pdf) - **[pin assignments (Wemos product page)](https://wiki.wemos.cc/products:d1:d1_mini)** - [read analog (wemos github)](https://github.com/wemos/D1_mini_Examples/blob/master/examples/01.Basics/ReadAnalogVoltage/ReadAnalogVoltage.ino) #### NodeMCU (variant of Wemos) -
Oct 28, 2017 . 1 changed file with 1 addition and 1 deletion.There are no files selected for viewing
This file contains hidden or bidirectional Unicode text that may be interpreted or compiled differently than what appears below. To review, open the file in an editor that reveals hidden Unicode characters. Learn more about bidirectional Unicode charactersOriginal file line number Diff line number Diff line change @@ -26,7 +26,7 @@ The LED on the device should blink! ### 1.5 Troubleshooting #### Linux - if access /dev/ttyUSB is denied, [try editing the *.desktop* launcher file](https://askubuntu.com/questions/769080/run-sudo-arduino-with-desktop-file) #### If you don't know the COM port you are connected on: Note the different in console output before and after these commands: -
Oct 28, 2017 . 1 changed file with 1 addition and 1 deletion.There are no files selected for viewing
This file contains hidden or bidirectional Unicode text that may be interpreted or compiled differently than what appears below. To review, open the file in an editor that reveals hidden Unicode characters. Learn more about bidirectional Unicode charactersOriginal file line number Diff line number Diff line change @@ -26,7 +26,7 @@ The LED on the device should blink! ### 1.5 Troubleshooting #### Linux - if access /dev/ttyUSB is denied, add the user to the *dialout* group `sudo adduser $USER dialout` #### If you don't know the COM port you are connected on: Note the different in console output before and after these commands: -
Oct 28, 2017 . 1 changed file with 0 additions and 2 deletions.There are no files selected for viewing
This file contains hidden or bidirectional Unicode text that may be interpreted or compiled differently than what appears below. To review, open the file in an editor that reveals hidden Unicode characters. Learn more about bidirectional Unicode charactersOriginal file line number Diff line number Diff line change @@ -34,8 +34,6 @@ Note the different in console output before and after these commands: - Mac `ls /dev/tty.* && ls /dev/cu.*` or `ls /dev/*` - Linux `ls /dev/tty.* && ls /dev/cu.` or `dmesg | grep tty*` ## 2. The D1 Mini module ### Specifications -
Oct 28, 2017 . 1 changed file with 13 additions and 7 deletions.There are no files selected for viewing
This file contains hidden or bidirectional Unicode text that may be interpreted or compiled differently than what appears below. To review, open the file in an editor that reveals hidden Unicode characters. Learn more about bidirectional Unicode charactersOriginal file line number Diff line number Diff line change @@ -14,12 +14,6 @@ In the Arduino IDE: [(original instructions)](https://github.com/esp8266/Arduino 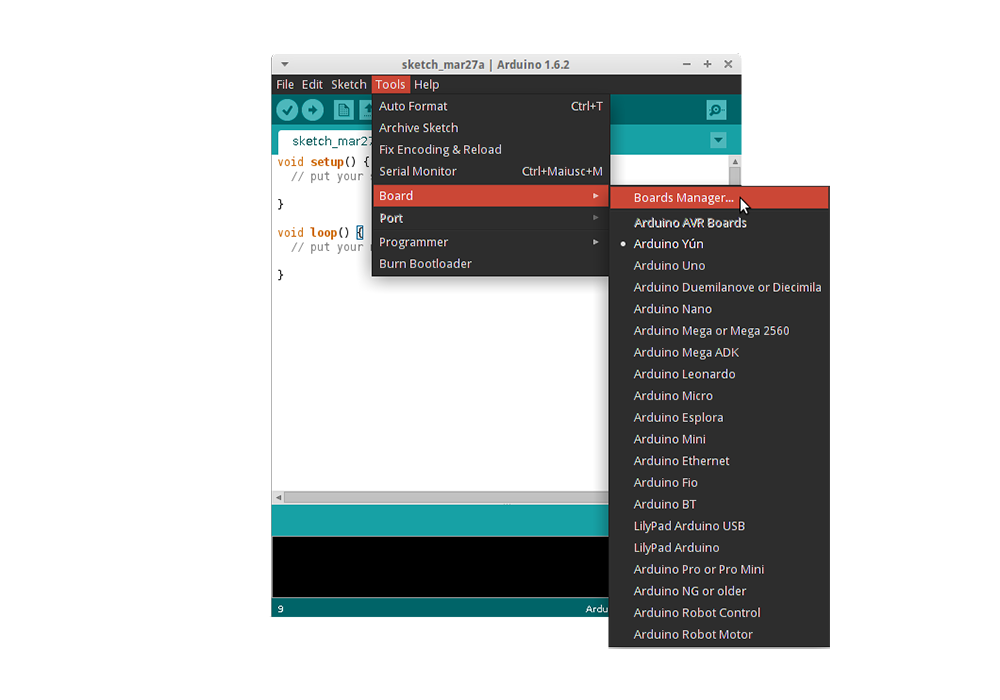 ### 1.3. Connecting: - From *Tools > Port* select the correct COM port# as assigned to the device. ### 1.4. Testing: @@ -30,6 +24,18 @@ In the Arduino IDE: [(original instructions)](https://github.com/esp8266/Arduino The LED on the device should blink! 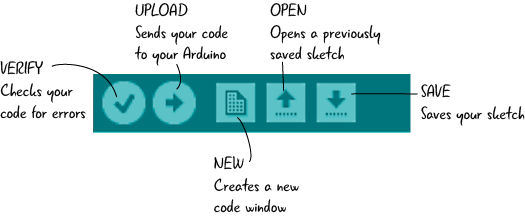 ### 1.5 Troubleshooting #### Linux - if access /dev/ttyUSB is denied, add the user to the *dialout* group #### If you don't know the COM port you are connected on: Note the different in console output before and after these commands: - Windows: `mode` or goto *Device Manager > Ports* - Mac `ls /dev/tty.* && ls /dev/cu.*` or `ls /dev/*` - Linux `ls /dev/tty.* && ls /dev/cu.` or `dmesg | grep tty*` **After** connecting the D1 Mini, recheck the COM port assignments to identify the port# assigned to the device. ## 2. The D1 Mini module ### Specifications @@ -57,7 +63,7 @@ The LED on the device should blink! ### USB Drivers - [Win|Mac Drivers](https://wiki.wemos.cc/downloads) - [Linux Drivers]() search for one compatible with your linux kernel version - if it doesn't work out of the box. ## 3. The ESP8266 Chip  -
Oct 28, 2017 . 1 changed file with 1 addition and 1 deletion.There are no files selected for viewing
This file contains hidden or bidirectional Unicode text that may be interpreted or compiled differently than what appears below. To review, open the file in an editor that reveals hidden Unicode characters. Learn more about bidirectional Unicode charactersOriginal file line number Diff line number Diff line change @@ -57,7 +57,7 @@ The LED on the device should blink! ### USB Drivers - [Win|Mac Drivers](https://wiki.wemos.cc/downloads) - [Linux Drivers (updated community driver)](https://github.com/skyrocknroll/CH341SER_LINUX) ## 3. The ESP8266 Chip  -
Oct 28, 2017 . 1 changed file with 1 addition and 1 deletion.There are no files selected for viewing
This file contains hidden or bidirectional Unicode text that may be interpreted or compiled differently than what appears below. To review, open the file in an editor that reveals hidden Unicode characters. Learn more about bidirectional Unicode charactersOriginal file line number Diff line number Diff line change @@ -57,7 +57,7 @@ The LED on the device should blink! ### USB Drivers - [Win|Mac Drivers](https://wiki.wemos.cc/downloads) - [Linux Drivers (chip manufacturer site)](http://www.wch.cn/download/CH341SER_ZIP.html) ## 3. The ESP8266 Chip  -
Oct 28, 2017 . 1 changed file with 3 additions and 3 deletions.There are no files selected for viewing
This file contains hidden or bidirectional Unicode text that may be interpreted or compiled differently than what appears below. To review, open the file in an editor that reveals hidden Unicode characters. Learn more about bidirectional Unicode charactersOriginal file line number Diff line number Diff line change @@ -33,7 +33,7 @@ The LED on the device should blink! ## 2. The D1 Mini module ### Specifications - Fortunately the module includes a onboard 3.3V regulator [(4A2D]() - [Analog input 0-1V (esp8266 github docs)](http://esp8266.github.io/Arduino/versions/2.0.0/doc/reference.html#analog-input) - [Analog input 3.2V max (Wemos product page](https://wiki.wemos.cc/products:d1:d1_mini) - [Output level conversion to drive relays]() @@ -51,9 +51,9 @@ The LED on the device should blink! #### Other *Like the **'D1 Mini Node MCU'** illegitimate-love-child from [Micro Robotics](https://www.robotics.org.za/MINI-D1-4M?search=D1%20mini) - probably imported from AliExpress.com* - Original Wemos: Wemos Logo & version no, HC-340 USB chip, ESP8266-12**S** - NodeMCU: (NodeMCU Logo) - Fakes: No logo, no version, DOIT ESP-12**N**, square corners ### USB Drivers - [Win|Mac Drivers](https://wiki.wemos.cc/downloads) -
Oct 28, 2017 . 1 changed file with 12 additions and 10 deletions.There are no files selected for viewing
This file contains hidden or bidirectional Unicode text that may be interpreted or compiled differently than what appears below. To review, open the file in an editor that reveals hidden Unicode characters. Learn more about bidirectional Unicode charactersOriginal file line number Diff line number Diff line change @@ -35,23 +35,25 @@ The LED on the device should blink! ### Specifications - Fortunately the module includes a onboard 3.3V regulator. - [Analog input 0-1V (esp8266 github docs)](http://esp8266.github.io/Arduino/versions/2.0.0/doc/reference.html#analog-input) - [Analog input 3.2V max (Wemos product page](https://wiki.wemos.cc/products:d1:d1_mini) - [Output level conversion to drive relays]() - [3V3 | 5V Tips & Tricks (Microchip)](https://www.newark.com/pdfs/techarticles/microchip/3_3vto5vAnalogTipsnTricksBrchr.pdf) ### Variants #### Wemos (the original) - [D1 Mini (Wemos product page)](https://wiki.wemos.cc/products:d1:d1_mini) - [Getting Started (Wemos)](https://wiki.wemos.cc/tutorials:get_started:get_started_in_arduino) - [v2.2 Pin assignments (Wemos schematic)](https://wiki.wemos.cc/_media/products:d1:mini_new_v2_2_0.pdf) - [read analog (wemos github)](https://github.com/wemos/D1_mini_Examples/blob/master/examples/01.Basics/ReadAnalogVoltage/ReadAnalogVoltage.ino) #### NodeMCU (variant of Wemos) - [Website (no docs)](http://www.nodemcu.com/index_en.html) - [Pin assignments (esp8266 github docs)](http://esp8266.github.io/Arduino/versions/2.0.0/doc/boards.html#nodemcu-1-0) #### Other *Like the **'D1 Mini Node MCU'** illegitimate-love-child from [Micro Robotics](https://www.robotics.org.za/MINI-D1-4M?search=D1%20mini) - probably imported from AliExpress.com* - Original Wemos: Wemos Logo & version no, **HC**-340 USB chip, ESP8266-12**S** - NodeMCU: (NodeMCU Logo) - Fakes: No logo, no version no, **HL**-340 USB chip, ESP8266-12**N**, square corners ### USB Drivers - [Win|Mac Drivers](https://wiki.wemos.cc/downloads) @@ -63,8 +65,8 @@ The LED on the device should blink! - [Data Sheet v5.5 (Espressif Systems)](https://cdn-shop.adafruit.com/product-files/2471/0A-ESP8266__Datasheet__EN_v4.3.pdf) - [Data Sheet v4.3 (Adafruit)](https://cdn-shop.adafruit.com/product-files/2471/0A-ESP8266__Datasheet__EN_v4.3.pdf) ### Electrical Characteristics (from datasheet) - I/O Imax per pin: **12mA source** | sink not specified - Working voltage: **3.0 - 3.6V** - Typical consumpsion at full on: **140mA** -
Oct 28, 2017 . 1 changed file with 5 additions and 1 deletion.There are no files selected for viewing
This file contains hidden or bidirectional Unicode text that may be interpreted or compiled differently than what appears below. To review, open the file in an editor that reveals hidden Unicode characters. Learn more about bidirectional Unicode charactersOriginal file line number Diff line number Diff line change @@ -36,7 +36,6 @@ The LED on the device should blink! - Fortunately the module includes a onboard 3.3V regulator. - [Analog input 0-1V (esp8266 github docs)](http://esp8266.github.io/Arduino/versions/2.0.0/doc/reference.html#analog-input) - [Analog input 3.2V max (Wesmos product page](https://wiki.wemos.cc/products:d1:d1_mini) - [Output level conversion to drive relays]() - [3V3 | 5V Tips & Tricks (Microchip)](https://www.newark.com/pdfs/techarticles/microchip/3_3vto5vAnalogTipsnTricksBrchr.pdf) ### Variants @@ -64,6 +63,11 @@ The LED on the device should blink! - [Data Sheet v5.5 (Espressif Systems)](https://cdn-shop.adafruit.com/product-files/2471/0A-ESP8266__Datasheet__EN_v4.3.pdf) - [Data Sheet v4.3 (Adafruit)](https://cdn-shop.adafruit.com/product-files/2471/0A-ESP8266__Datasheet__EN_v4.3.pdf) ### Electrical Specifications - I/O Imax: **12mA** - Working voltage: **3.0 - 3.6V** - Typical consumpsion at full on: **140mA** ## 4. Other Links **Youtube** -
Oct 28, 2017 . 1 changed file with 4 additions and 4 deletions.There are no files selected for viewing
This file contains hidden or bidirectional Unicode text that may be interpreted or compiled differently than what appears below. To review, open the file in an editor that reveals hidden Unicode characters. Learn more about bidirectional Unicode charactersOriginal file line number Diff line number Diff line change @@ -39,16 +39,16 @@ The LED on the device should blink! - [[Pin source/sink specs]] - [Output level conversion to drive relays]() - [3V3 | 5V Tips & Tricks (Microchip)](https://www.newark.com/pdfs/techarticles/microchip/3_3vto5vAnalogTipsnTricksBrchr.pdf) ### Variants #### Wesmos (the original) - [D1 Mini (Wesmos product page)](https://wiki.wemos.cc/products:d1:d1_mini) - [Getting Started (Wesmos)](https://wiki.wemos.cc/tutorials:get_started:get_started_in_arduino) #### NodeMCU (variant of Wesmos) - [Website (no docs)](http://www.nodemcu.com/index_en.html) - [Pin assignments (esp8266 github docs)](http://esp8266.github.io/Arduino/versions/2.0.0/doc/boards.html#nodemcu-1-0) #### Other *Like the **'D1 Mini Node MCU'** illegitimate-love-child from [Micro Robotics](https://www.robotics.org.za/MINI-D1-4M?search=D1%20mini) - probably imported from AliExpress.com* - Original Wesmos: Wesmos Logo, **HC**-340 USB chip, ESP8266-12**S** - NodeMCU: () -
Oct 28, 2017 . 1 changed file with 6 additions and 5 deletions.There are no files selected for viewing
This file contains hidden or bidirectional Unicode text that may be interpreted or compiled differently than what appears below. To review, open the file in an editor that reveals hidden Unicode characters. Learn more about bidirectional Unicode charactersOriginal file line number Diff line number Diff line change @@ -32,11 +32,12 @@ The LED on the device should blink! ## 2. The D1 Mini module ### Specifications - Fortunately the module includes a onboard 3.3V regulator. - [Analog input 0-1V (esp8266 github docs)](http://esp8266.github.io/Arduino/versions/2.0.0/doc/reference.html#analog-input) - [Analog input 3.2V max (Wesmos product page](https://wiki.wemos.cc/products:d1:d1_mini) - [[Pin source/sink specs]] - [Output level conversion to drive relays]() - [3V3 | 5V Tips & Tricks (Microchip)](https://www.newark.com/pdfs/techarticles/microchip/3_3vto5vAnalogTipsnTricksBrchr.pdf) ### Wesmos (the original) @@ -48,7 +49,7 @@ The LED on the device should blink! - [Pin assignments (esp8266 github docs)](http://esp8266.github.io/Arduino/versions/2.0.0/doc/boards.html#nodemcu-1-0) ### Module Variants *Like the **'D1 Mini Node MCU'** illegitimate-love-child from [Micro Robotics](https://www.robotics.org.za/MINI-D1-4M?search=D1%20mini) - probably imported from AliExpress.com* - Original Wesmos: Wesmos Logo, **HC**-340 USB chip, ESP8266-12**S** - NodeMCU: () - Fakes: No Wesmos or NodeMCU logo, **HL**-340 USB chip, ESP8266-12**N** -
Oct 28, 2017 . 1 changed file with 19 additions and 13 deletions.There are no files selected for viewing
This file contains hidden or bidirectional Unicode text that may be interpreted or compiled differently than what appears below. To review, open the file in an editor that reveals hidden Unicode characters. Learn more about bidirectional Unicode charactersOriginal file line number Diff line number Diff line change @@ -31,26 +31,32 @@ The LED on the device should blink!  ## 2. The D1 Mini module ### NB! - The module runs at 3.3V - Fortunately the module includes a onboard 3.3V regulator. - [Analog input 0-1V (esp8266 github docs)](http://esp8266.github.io/Arduino/versions/2.0.0/doc/reference.html#analog-input) - [[Pin source/sink specs]] - [Output level conversion to drive relays]() - [3V3 | 5V Tips & Tricks (Microchip)](https://www.newark.com/pdfs/techarticles/microchip/3_3vto5vAnalogTipsnTricksBrchr.pdf) ### Wesmos (the original) - [D1 Mini (Wesmos product page)](https://wiki.wemos.cc/products:d1:d1_mini) - [Getting Started (Wesmos)](https://wiki.wemos.cc/tutorials:get_started:get_started_in_arduino) ### NodeMCU (variant of Wesmos) - [Website (no docs)](http://www.nodemcu.com/index_en.html) - [Pin assignments (esp8266 github docs)](http://esp8266.github.io/Arduino/versions/2.0.0/doc/boards.html#nodemcu-1-0) ### Module Variants *Like the **'D1 Mini Node MCU'** illegitimate-love-child from [Micro Robotics](https://www.robotics.org.za/MINI-D1-4M?search=D1%20mini) - probably imported from AliExpress.com - Original Wesmos: Wesmos Logo, **HC**-340 USB chip, ESP8266-12**S** - NodeMCU: () - Fakes: No Wesmos or NodeMCU logo, **HL**-340 USB chip, ESP8266-12**N** ### USB Drivers - [Win|Mac Drivers](https://wiki.wemos.cc/downloads) - [[Linux Drivers ?]] ## 3. The ESP8266 Chip  - **ESP8266** - A WiFi enabled microcontroller, not an officially supported Arduino chip. The ESP8266 Arduino project has implemented an Arduino Core library for the ESP8266 Chip -
Oct 28, 2017 . 1 changed file with 1 addition and 1 deletion.There are no files selected for viewing
This file contains hidden or bidirectional Unicode text that may be interpreted or compiled differently than what appears below. To review, open the file in an editor that reveals hidden Unicode characters. Learn more about bidirectional Unicode charactersOriginal file line number Diff line number Diff line change @@ -37,7 +37,7 @@ The LED on the device should blink! [here](http://esp8266.github.io/Arduino/versions/2.0.0/doc/boards.html#nodemcu-1-0) ### NodeMCU (similar) - [website](http://www.nodemcu.com/index_en.html) ### Wesmos (the original) - [D1 Mini (Product page)](https://wiki.wemos.cc/products:d1:d1_mini) -
Oct 28, 2017 . 1 changed file with 3 additions and 0 deletions.There are no files selected for viewing
This file contains hidden or bidirectional Unicode text that may be interpreted or compiled differently than what appears below. To review, open the file in an editor that reveals hidden Unicode characters. Learn more about bidirectional Unicode charactersOriginal file line number Diff line number Diff line change @@ -33,6 +33,9 @@ The LED on the device should blink! ## 2. The D1 Mini module **NB - Runs at 3.3V!** - fortunately the module includes a onboard 3.3V regulator. ### Pin Assignments [here](http://esp8266.github.io/Arduino/versions/2.0.0/doc/boards.html#nodemcu-1-0) ### NodeMCU (similar) - [website](www.nodemcu.com/index_en.html) -
Oct 27, 2017 . 1 changed file with 1 addition and 1 deletion.There are no files selected for viewing
This file contains hidden or bidirectional Unicode text that may be interpreted or compiled differently than what appears below. To review, open the file in an editor that reveals hidden Unicode characters. Learn more about bidirectional Unicode charactersOriginal file line number Diff line number Diff line change @@ -56,7 +56,7 @@ The LED on the device should blink! ## 4. Other Links **Youtube** [EEVblog #998 - How To Program ESP8266 WiFi With Arduino (Video)](https://www.youtube.com/watch?v=Q6NBnPfPhWE) **ESP8266 Arduino Project** -
Oct 27, 2017 . 1 changed file with 1 addition and 0 deletions.There are no files selected for viewing
This file contains hidden or bidirectional Unicode text that may be interpreted or compiled differently than what appears below. To review, open the file in an editor that reveals hidden Unicode characters. Learn more about bidirectional Unicode charactersOriginal file line number Diff line number Diff line change @@ -56,6 +56,7 @@ The LED on the device should blink! ## 4. Other Links **Youtube** [EEVblog #998 - How To Program ESP8266 WiFi With Arduino (Video)](https://www.youtube.com/watch?v=Q6NBnPfPhWE) **ESP8266 Arduino Project** -
Oct 27, 2017 . 1 changed file with 10 additions and 11 deletions.There are no files selected for viewing
This file contains hidden or bidirectional Unicode text that may be interpreted or compiled differently than what appears below. To review, open the file in an editor that reveals hidden Unicode characters. Learn more about bidirectional Unicode charactersOriginal file line number Diff line number Diff line change @@ -50,15 +50,11 @@ The LED on the device should blink! ## 3. The ESP8266 Chip  - **ESP8266** - A WiFi enabled microcontroller, not an officially supported Arduino chip. The ESP8266 Arduino project has implemented an Arduino Core library for the ESP8266 Chip - [Data Sheet v5.5 (Espressif Systems)](https://cdn-shop.adafruit.com/product-files/2471/0A-ESP8266__Datasheet__EN_v4.3.pdf) - [Data Sheet v4.3 (Adafruit)](https://cdn-shop.adafruit.com/product-files/2471/0A-ESP8266__Datasheet__EN_v4.3.pdf) ## 4. Other Links [EEVblog #998 - How To Program ESP8266 WiFi With Arduino (Video)](https://www.youtube.com/watch?v=Q6NBnPfPhWE) @@ -68,10 +64,13 @@ The LED on the device should blink! **ESP8266 Community Forums** - [ESP8266 Community Forum](http://www.esp8266.com/) **NodeMCU** - [Code Examples](http://www.nodemcu.com/index_en.html#fr_5475f7667976d8501100000f) ## Definitions (in the world of Arduino) - **sketch** - A complete Arduino program - **setup** - The setup routine run before the main loop (runs once) - **loop** - The main program that runs continuously -
Oct 27, 2017 . 1 changed file with 2 additions and 1 deletion.There are no files selected for viewing
This file contains hidden or bidirectional Unicode text that may be interpreted or compiled differently than what appears below. To review, open the file in an editor that reveals hidden Unicode characters. Learn more about bidirectional Unicode charactersOriginal file line number Diff line number Diff line change @@ -48,7 +48,8 @@ The LED on the device should blink! - NodeMCU: (see website) - Fakes: No Wesmos or NodeMCU logo, **HL**-340 USB chip, ESP8266-12**N** ## 3. The ESP8266 Chip  - [Data Sheet v5.5 (Espressif Systems)](https://cdn-shop.adafruit.com/product-files/2471/0A-ESP8266__Datasheet__EN_v4.3.pdf) - [Data Sheet v4.3 (Adafruit)](https://cdn-shop.adafruit.com/product-files/2471/0A-ESP8266__Datasheet__EN_v4.3.pdf) -
Oct 27, 2017 . 1 changed file with 1 addition and 1 deletion.There are no files selected for viewing
This file contains hidden or bidirectional Unicode text that may be interpreted or compiled differently than what appears below. To review, open the file in an editor that reveals hidden Unicode characters. Learn more about bidirectional Unicode charactersOriginal file line number Diff line number Diff line change @@ -43,7 +43,7 @@ The LED on the device should blink! - [Win|Mac Drivers](https://wiki.wemos.cc/downloads) - [[Linux Drivers ?]] ### Module Variants (Like the illegitimate *[D1 Mini Node MCU](https://www.robotics.org.za/MINI-D1-4M?search=D1%20mini)* look-alike from robotics.org.za) - Original Wesmos: Wesmos Logo, **HC**-340 USB chip, ESP8266-12**S** - NodeMCU: (see website) - Fakes: No Wesmos or NodeMCU logo, **HL**-340 USB chip, ESP8266-12**N** -
Oct 27, 2017 . 1 changed file with 10 additions and 11 deletions.There are no files selected for viewing
This file contains hidden or bidirectional Unicode text that may be interpreted or compiled differently than what appears below. To review, open the file in an editor that reveals hidden Unicode characters. Learn more about bidirectional Unicode charactersOriginal file line number Diff line number Diff line change @@ -1,4 +1,4 @@ # D1 Mini (ESP8266)  ## 1. Getting Started @@ -33,21 +33,20 @@ The LED on the device should blink! ## 2. The D1 Mini module **NB - Runs at 3.3V!** - fortunately the module includes a onboard 3.3V regulator. ### NodeMCU (similar) - [website](www.nodemcu.com/index_en.html) ### Wesmos (the original) - [D1 Mini (Product page)](https://wiki.wemos.cc/products:d1:d1_mini) - [Arduino Getting Started](https://wiki.wemos.cc/tutorials:get_started:get_started_in_arduino) **USB Drivers** - [Win|Mac Drivers](https://wiki.wemos.cc/downloads) - [[Linux Drivers ?]] ### Module Variants (Like the *[D1 Mini Node MCU](https://www.robotics.org.za/MINI-D1-4M?search=D1%20mini) 'bastard' module* from robotics.org.za) - Original Wesmos: Wesmos Logo, **HC**-340 USB chip, ESP8266-12**S** - NodeMCU: (see website) - Fakes: No Wesmos or NodeMCU logo, **HL**-340 USB chip, ESP8266-12**N** ## 3. The ESP8266 - [Data Sheet v5.5 (Espressif Systems)](https://cdn-shop.adafruit.com/product-files/2471/0A-ESP8266__Datasheet__EN_v4.3.pdf) -
Oct 27, 2017 . 1 changed file with 5 additions and 5 deletions.There are no files selected for viewing
This file contains hidden or bidirectional Unicode text that may be interpreted or compiled differently than what appears below. To review, open the file in an editor that reveals hidden Unicode characters. Learn more about bidirectional Unicode charactersOriginal file line number Diff line number Diff line change @@ -8,7 +8,7 @@ In any web browser: - From the Arduino website, [**download**](https://www.arduino.cc/en/Main/OldSoftwareReleases) & install the latest Arduino IDE (v1.8 or later). Available for Windows, Mac, Linux & ARM. ### 1.2. Add the ESP8266 module libraries: In the Arduino IDE: [(original instructions)](https://github.com/esp8266/Arduino#installing-with-boards-manager) or [docs here](http://esp8266.github.io/Arduino/versions/2.0.0/doc/installing.html) - From *File > Preferences*, add a *Boards Manager URL* `http://arduino.esp8266.com/stable/package_esp8266com_index.json` - From *Tools > Board > Board Manager*, search for *D1 mini* and install (+/- 150MB)  @@ -33,8 +33,8 @@ The LED on the device should blink! ## 2. The D1 Mini module **NB - Runs at 3.3V!** - fortunately the module includes a onboard 3.3V regulator. ### NodeMCU - ### Wesmos - [D1 Mini (Product page)](https://wiki.wemos.cc/products:d1:d1_mini) @@ -55,8 +55,8 @@ The LED on the device should blink! ## 4. Coode Examples **NodeMCU** - [Examples](http://www.nodemcu.com/index_en.html#fr_5475f7667976d8501100000f) ## 5. Other Links -
Oct 27, 2017 . 1 changed file with 1 addition and 0 deletions.There are no files selected for viewing
This file contains hidden or bidirectional Unicode text that may be interpreted or compiled differently than what appears below. To review, open the file in an editor that reveals hidden Unicode characters. Learn more about bidirectional Unicode charactersOriginal file line number Diff line number Diff line change @@ -11,6 +11,7 @@ In any web browser: In the Arduino IDE: [(original instructions)](https://github.com/esp8266/Arduino#installing-with-boards-manager) - From *File > Preferences*, add a *Boards Manager URL* `http://arduino.esp8266.com/stable/package_esp8266com_index.json` - From *Tools > Board > Board Manager*, search for *D1 mini* and install (+/- 150MB)  ### 1.3. Connecting: **Before** connecting the D1 Mini, make a note of the currently connected *COM* devices. In your terminal run: -
Oct 27, 2017 . 1 changed file with 8 additions and 3 deletions.There are no files selected for viewing
This file contains hidden or bidirectional Unicode text that may be interpreted or compiled differently than what appears below. To review, open the file in an editor that reveals hidden Unicode characters. Learn more about bidirectional Unicode charactersOriginal file line number Diff line number Diff line change @@ -52,17 +52,22 @@ The LED on the device should blink! - [Data Sheet v5.5 (Espressif Systems)](https://cdn-shop.adafruit.com/product-files/2471/0A-ESP8266__Datasheet__EN_v4.3.pdf) - [Data Sheet v4.3 (Adafruit)](https://cdn-shop.adafruit.com/product-files/2471/0A-ESP8266__Datasheet__EN_v4.3.pdf) ## 4. Coode Examples **NodeMCU** [Examples](http://www.nodemcu.com/index_en.html#fr_5475f7667976d8501100000f) ## 5. Other Links [EEVblog #998 - How To Program ESP8266 WiFi With Arduino (Video)](https://www.youtube.com/watch?v=Q6NBnPfPhWE) **ESP8266 Arduino Project** - [Github Documentation](http://esp8266.github.io/Arduino/versions/2.0.0/doc/reference.html) **ESP8266 Community Forums** - [ESP8266 Community Forum](http://www.esp8266.com/) ## 6. Definitions in the world of Arduino - **sketch** - A complete Arduino solution - **setup** - Setup before the main loop (runs once) -
Oct 27, 2017 . 1 changed file with 1 addition and 1 deletion.There are no files selected for viewing
This file contains hidden or bidirectional Unicode text that may be interpreted or compiled differently than what appears below. To review, open the file in an editor that reveals hidden Unicode characters. Learn more about bidirectional Unicode charactersOriginal file line number Diff line number Diff line change @@ -54,7 +54,7 @@ The LED on the device should blink! ## 4. Other Links [ EEVblog #998 - How To Program ESP8266 WiFi With Arduino](https://www.youtube.com/watch?v=Q6NBnPfPhWE) **ESP8266 Arduino Project** - [Github Documentation](http://esp8266.github.io/Arduino/versions/2.0.0/doc/reference.html) -
Oct 27, 2017 . 1 changed file with 1 addition and 1 deletion.There are no files selected for viewing
This file contains hidden or bidirectional Unicode text that may be interpreted or compiled differently than what appears below. To review, open the file in an editor that reveals hidden Unicode characters. Learn more about bidirectional Unicode charactersOriginal file line number Diff line number Diff line change @@ -54,7 +54,7 @@ The LED on the device should blink! ## 4. Other Links  **ESP8266 Arduino Project** - [Github Documentation](http://esp8266.github.io/Arduino/versions/2.0.0/doc/reference.html) -
Oct 27, 2017 . 1 changed file with 9 additions and 3 deletions.There are no files selected for viewing
This file contains hidden or bidirectional Unicode text that may be interpreted or compiled differently than what appears below. To review, open the file in an editor that reveals hidden Unicode characters. Learn more about bidirectional Unicode charactersOriginal file line number Diff line number Diff line change @@ -24,14 +24,17 @@ In the Arduino IDE: [(original instructions)](https://github.com/esp8266/Arduino ### 1.4. Testing: - From *File > Examples > ESP8266* open the *Blink* Sketch - Double check the pin asignment (For the D1 mini it should be <pin# here>) - Verify the Sketch (check mark) - Upload the code to the module (right arrow) The LED on the device should blink!  ## 2. The D1 Mini module **NB - Runs at 3.3V!** - fortunately the module includes a onboard 3.3V regulator. ### NodeMCU ### Wesmos - [D1 Mini (Product page)](https://wiki.wemos.cc/products:d1:d1_mini) - [Arduino Getting Started](https://wiki.wemos.cc/tutorials:get_started:get_started_in_arduino) @@ -41,7 +44,8 @@ The LED on the device should blink! - [[Linux Drivers ?]]() ### Module Variants - Original Wesmos: Wesmos Logo, **HC**-340 USB chip, ESP8266-12**S** - NodeMCU: - Fakes: No Wesmos logo, **HL**-340 USB chip, ESP8266-12**N** ## 3. The ESP8266 @@ -50,6 +54,8 @@ The LED on the device should blink! ## 4. Other Links #### [EEVblog #998 - How To Program ESP8266 WiFi With Arduino (Video)](https://www.youtube.com/watch?v=Q6NBnPfPhWE) **ESP8266 Arduino Project** - [Github Documentation](http://esp8266.github.io/Arduino/versions/2.0.0/doc/reference.html) -
Oct 27, 2017 . 1 changed file with 2 additions and 1 deletion.There are no files selected for viewing
This file contains hidden or bidirectional Unicode text that may be interpreted or compiled differently than what appears below. To review, open the file in an editor that reveals hidden Unicode characters. Learn more about bidirectional Unicode charactersOriginal file line number Diff line number Diff line change @@ -26,7 +26,8 @@ In the Arduino IDE: [(original instructions)](https://github.com/esp8266/Arduino - Double check the pin asignment (For the D1 mini it should be <pin# here>) - Compile the Sketch (check mark) - Burn code to the module (right arrow) The LED on the device should blink!  ## 2. The D1 Mini module **NB - Runs at 3.3V!** - fortunately the module includes a onboard 3.3V regulator. -
Oct 27, 2017 . 1 changed file with 1 addition and 0 deletions.There are no files selected for viewing
This file contains hidden or bidirectional Unicode text that may be interpreted or compiled differently than what appears below. To review, open the file in an editor that reveals hidden Unicode characters. Learn more about bidirectional Unicode charactersOriginal file line number Diff line number Diff line change @@ -1,4 +1,5 @@ # Wesmos D1 Mini (ESP8266)  ## 1. Getting Started -
Oct 27, 2017 . 1 changed file with 9 additions and 9 deletions.There are no files selected for viewing
This file contains hidden or bidirectional Unicode text that may be interpreted or compiled differently than what appears below. To review, open the file in an editor that reveals hidden Unicode characters. Learn more about bidirectional Unicode charactersOriginal file line number Diff line number Diff line change @@ -1,17 +1,17 @@ # Wesmos D1 Mini (ESP8266) ## 1. Getting Started ### 1.1. Install the IDE: In any web browser: - From the Arduino website, [**download**](https://www.arduino.cc/en/Main/OldSoftwareReleases) & install the latest Arduino IDE (v1.8 or later). Available for Windows, Mac, Linux & ARM. ### 1.2. Add the ESP8266 module libraries: In the Arduino IDE: [(original instructions)](https://github.com/esp8266/Arduino#installing-with-boards-manager) - From *File > Preferences*, add a *Boards Manager URL* `http://arduino.esp8266.com/stable/package_esp8266com_index.json` - From *Tools > Board > Board Manager*, search for *D1 mini* and install (+/- 150MB) ### 1.3. Connecting: **Before** connecting the D1 Mini, make a note of the currently connected *COM* devices. In your terminal run: - Windows: `mode` or goto *Device Manager > Ports* - Mac `ls /dev/tty.* && ls /dev/cu.*` or `ls /dev/*` @@ -20,14 +20,14 @@ In the Arduino IDE: [(original instructions)](https://github.com/esp8266/Arduino **After** connecting the D1 Mini, recheck the COM port assignments to identify the port# assigned to the device. - From *Tools > Port* select the correct COM port# as assigned to the device. ### 1.4. Testing: - From *File > Examples > ESP8266* open the *Blink* Sketch - Double check the pin asignment (For the D1 mini it should be <pin# here>) - Compile the Sketch (check mark) - Burn code to the module (right arrow) The LED on the device should blink! ## 2. The D1 Mini module **NB - Runs at 3.3V!** - fortunately the module includes a onboard 3.3V regulator. ### Wesmos @@ -42,19 +42,19 @@ The LED on the device should blink! - Originals: Wesmos Logo, **HC**-340 USB chip, ESP8266-12**S** - Fakes: No Wesmos logo, **HL**-340 USB chip, ESP8266-12**N** ## 3. The ESP8266 - [Data Sheet v5.5 (Espressif Systems)](https://cdn-shop.adafruit.com/product-files/2471/0A-ESP8266__Datasheet__EN_v4.3.pdf) - [Data Sheet v4.3 (Adafruit)](https://cdn-shop.adafruit.com/product-files/2471/0A-ESP8266__Datasheet__EN_v4.3.pdf) ## 4. Other Links **ESP8266 Arduino Project** - [Github Documentation](http://esp8266.github.io/Arduino/versions/2.0.0/doc/reference.html) **ESP8266 Community Forums** - [ESP8266 Community Forum](http://www.esp8266.com/) ## 5. Definitions in the world of Arduino - **sketch** - A complete Arduino solution - **setup** - Setup before the main loop (runs once)
NewerOlder