
In any web browser:
- From the Arduino website, download & install the latest Arduino IDE (v1.8 or later). Available for Windows, Mac, Linux & ARM.
In the Arduino IDE: (original instructions) or docs here
- From File > Preferences, add a Boards Manager URL
http://arduino.esp8266.com/stable/package_esp8266com_index.json - From Tools > Board > Board Manager, search for D1 mini and install (+/- 150MB)
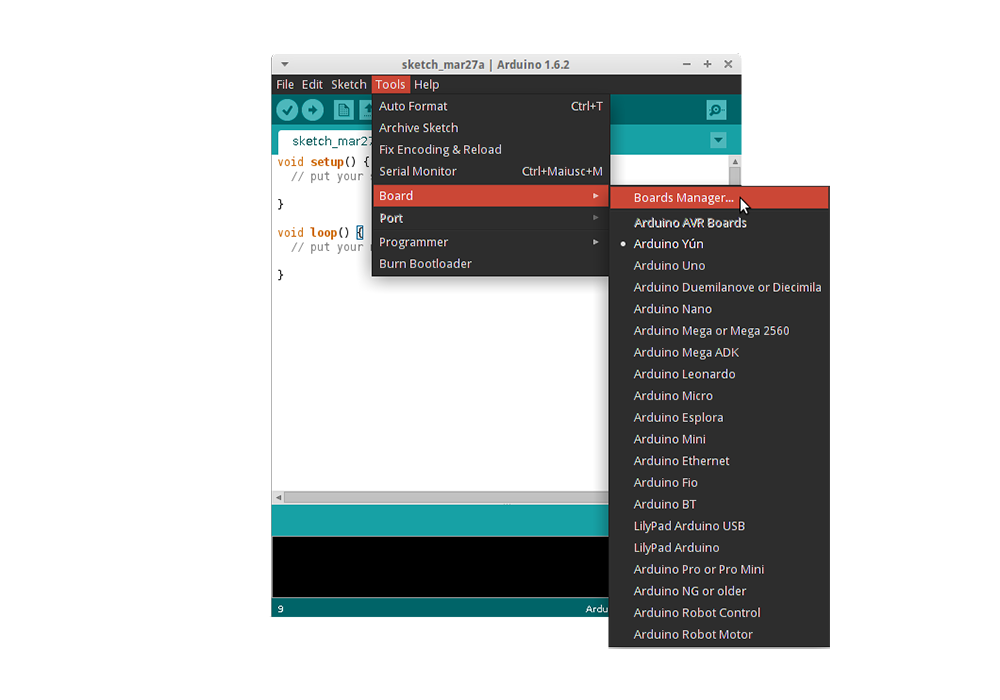
- From Tools > Port select the correct COM port# as assigned to the device.
- From File > Examples > ESP8266 open the Blink Sketch
- Double check the pin asignment (For the D1 mini it should be <pin# here>)
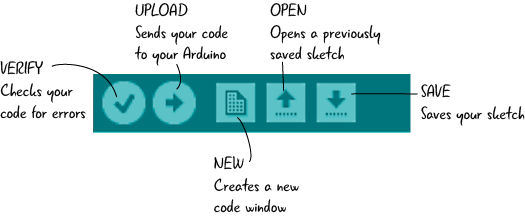
- Verify the Sketch (check mark)
- Upload the code to the module (right arrow)
The LED on the device should blink!
- if access /dev/ttyUSB is denied, add the user to the dialout group
Note the different in console output before and after these commands:
- Windows:
modeor goto Device Manager > Ports - Mac
ls /dev/tty.* && ls /dev/cu.*orls /dev/* - Linux
ls /dev/tty.* && ls /dev/cu.ordmesg | grep tty*
- Fortunately the module includes a onboard 3.3V regulator (4A2D
- Analog input 0-1V (esp8266 github docs)
- Analog input 3.2V max (Wemos product page
- Output level conversion to drive relays
- 3V3 | 5V Tips & Tricks (Microchip)
- D1 Mini (Wemos product page)
- Getting Started (Wemos)
- v2.2 Pin assignments (Wemos schematic)
- read analog (wemos github)
Like the 'D1 Mini Node MCU' illegitimate-love-child from Micro Robotics - probably imported from AliExpress.com
- Original Wemos: Wemos Logo & version no, HC-340 USB chip, ESP8266-12S
- NodeMCU: (NodeMCU Logo)
- Fakes: No logo, no version, DOIT ESP-12N, square corners
- Win|Mac Drivers
- Linux Drivers search for one compatible with your linux kernel version - if it doesn't work out of the box.

- ESP8266 - A WiFi enabled microcontroller, not an officially supported Arduino chip. The ESP8266 Arduino project has implemented an Arduino Core library for the ESP8266 Chip
- Data Sheet v5.5 (Espressif Systems)
- Data Sheet v4.3 (Adafruit)
- I/O Imax per pin: 12mA source | sink not specified
- Working voltage: 3.0 - 3.6V
- Typical consumpsion at full on: 140mA
Youtube
EEVblog #998 - How To Program ESP8266 WiFi With Arduino (Video)
ESP8266 Arduino Project
ESP8266 Community Forums
NodeMCU
(in the world of Arduino)
- sketch - A complete Arduino program
- setup - The setup routine run before the main loop (runs once)
- loop - The main program that runs continuously