Last active
August 29, 2015 14:15
-
-
Save kseta/5eac7f6237b2e106871b to your computer and use it in GitHub Desktop.
This file contains hidden or bidirectional Unicode text that may be interpreted or compiled differently than what appears below. To review, open the file in an editor that reveals hidden Unicode characters.
Learn more about bidirectional Unicode characters
| # はじめに | |
| Symfony もくもく会第四回用にカキカキ | |
| # 前提となる環境 | |
| - プロダクション環境(本番環境) | |
| - ステージング環境(検証環境) | |
| - Jenkins 稼働環境 | |
| - 開発環境 | |
| - GitHub | |
| Jenkins はこれじゃなくても でも でもいいと思います。 | |
| # はじめのプロジェクト | |
| まず、Symfony のプロジェクトを GitHub のレポジトリで管理するようにします。新規の Symfony のプロジェクト作成は Symfony の公式のインストーラである [Symfony/symfony-installer](https://github.com/symfony/symfony-installer) がおすすめです。 | |
| ```bash | |
| $ cd /path/to/workspace | |
| $ curl -LsS http://symfony.com/installer > symfony.phar | |
| $ php symfony.phar new symfony-demo | |
| Downloading Symfony... | |
| 4.89 MB/4.89 MB ▓▓▓▓▓▓▓▓▓▓▓▓▓▓▓▓▓▓▓▓▓▓▓▓▓▓▓▓▓▓▓▓▓▓▓▓▓▓▓▓▓▓▓▓▓▓▓▓▓▓▓▓▓▓▓▓▓▓▓▓ 100% | |
| Preparing project... | |
| ✔ Symfony 2.6.4 was successfully installed. Now you can: | |
| * Change your current directory to /Users/seta/tmp/SymfonyDemoAppForCI | |
| * Configure your application in app/config/parameters.yml file. | |
| * Run your application: | |
| 1. Execute the php app/console server:run command. | |
| 2. Browse to the http://localhost:8000 URL. | |
| * Read the documentation at http://symfony.com/doc | |
| ``` | |
| インストールが終わったら記念すべき一回目のコミットをして GitHub のレポジトリに Push しましょう。 | |
| まず、バージョン管理不要なファイルを無視するために `.gitignore` ファイルも作成します。ここでは [github/gitignore](github/gitignore) の [Symfony.gitignore](https://github.com/github/gitignore/blob/master/Symfony.gitignore) を使用することにします。バージョン管理から外したいファイルはプロジェクトやチームによってことなりますのでプロジェクト進行に合わせてお好みでチューニングしてください。 | |
| ```bash | |
| $ cd SymfonyDemoAppForCI | |
| $ git init | |
| $ wget https://raw.githubusercontent.com/github/gitignore/master/Symfony.gitignore -O .gitignore | |
| ``` | |
| では、コミットして GitHub に Push しましょう。なお、GitHub のレポジトリは予めつくっておいてください。 | |
| ```bash | |
| $ git init | |
| $ git add . | |
| $ git commit -m "Initial commit" | |
| $ git remote add origin git@github.com:<USER>/SymfonyDemoAppForCI | |
| $ git push origin master | |
| ``` | |
| # Symfony の環境をセットアップする | |
| これは CI とは直接関係がないので後回しにしても大丈夫です。Symfony には必要(または推奨する)PHP のライブラリ(拡張)を確認するチェックスクリプトがあります。これを実行することで Symfony を動作させるための適切な環境をセットアップしましょう。 | |
| ```bash | |
| $ php app/check.php | |
| Symfony2 Requirements Checker | |
| \~~~~~~~~~~~~~~~~~~~~~~~~~~~~~ | |
| > PHP is using the following php.ini file: | |
| /Users/seta/.phpbrew/php/php-5.6.4/etc/php.ini | |
| > Checking Symfony requirements: | |
| ...................................... | |
| [OK] | |
| Your system is ready to run Symfony2 projects | |
| Note The command console could use a different php.ini file | |
| ~~~~ than the one used with your web server. To be on the | |
| safe side, please check the requirements from your web | |
| server using the web/config.php script. | |
| ``` | |
| # Composer で必要なライブラリをインストールする | |
| [Composer] で Symfony に必要なライブラリをインストールします。インストールを実行することで `vendor/` に必要なライブラリがインストールされます。 | |
| ```bash | |
| $ curl -sS https://getcomposer.org/installer | php | |
| $ php composer.phar install | |
| ``` | |
| # PHPUnit でテストを実行する | |
| PHPUnit でテストを実行してみましょう。symfony-installer でインストールしたプロジェクトには AcmeDemoBundle というデモ用のコードが作成されていてひとつのテストが用意されていますのでそれを実行しテストが成功するところまで確認します。PHPUnit のインストールは [Composer](https://getcomposer.org/) で行います。 | |
| ```bash | |
| $ php composer.phar require --dev phpunit/phpunit | |
| ``` | |
| デフォルトの composer.json に `"bin-dir": "bin"` が設定されていることにより `bin/phpunit` で PHPUnit が実行できるはずです。 | |
| ```bash | |
| $ bin/phpunit --version | |
| PHPUnit 4.5.0 by Sebastian Bergmann and contributors. | |
| ``` | |
| では、テストを実行してみます。Symfony アプリケーションの場合、テスト対象は基本的に `src/` 以下となります。テストの設定ファイルは `app/phpunit.xml.dist` が予め作成されていますのでまずはこれを利用しましょう。PHPUnit は `-c` オプションで指定したディレクトリの phpunit.xml(ない場合は phpunit.xml.dist) を読み込みます。 | |
| ```bash | |
| $ bin/phpunit -c app | |
| ``` | |
| ``` | |
| PHPUnit 4.5.0 by Sebastian Bergmann and contributors. | |
| Configuration read from /Users/seta/tmp/SymfonyDemoAppForCI/app/phpunit.xml.dist | |
| ... | |
| Time: 870 ms, Memory: 30.50Mb | |
| OK (3 tests, 5 assertions) | |
| ``` | |
| どうでしょう?テストはパスできたでしょうか? | |
| テストをパスできたら composer.json の変更をコミットしておきます。 | |
| ``` | |
| $ git add composer.json composer.lock | |
| $ git commit -m "[Composer] Add phpunit/phpunit" | |
| ``` | |
| # 静的コード解析ツールをインストールする | |
| 静的コード解析ツールを Composer でインストールします。様々なツールがあるなかで幾つかピックアップしてみました。 | |
| ```bash | |
| $ php composer.phar require --dev leaphub/phpcs-symfony2-standard="~2.0.0" | |
| $ php composer.phar require --dev phploc/phploc | |
| $ php composer.phar require --dev pdepend/pdepend | |
| $ php composer.phar require --dev phpmd/phpmd | |
| $ php composer.phar require --dev sebastian/phpcpd | |
| $ php composer.phar require --dev phpdocumentor/phpdocumentor | |
| ``` | |
| これでツールの導入ができました。 | |
| # テスト+静的コード解析のビルドファイルを作成する | |
| テストと静的コード解析ツールをビルドするための XML ファイルを作成します。`build.xml` というファイル名で作成してください。 | |
| ```xml:build.xml | |
| <?xml version="1.0" encoding="UTF-8"?> | |
| <project name="PhotocreateSites" default="build"> | |
| <property name="workspace" value="${basedir}" /> | |
| <property name="sourcedir" value="${basedir}/src" /> | |
| <property name="builddir" value="${workspace}/build" /> | |
| <property name="bindir" value="${workspace}/bin" /> | |
| <target name="build" | |
| depends="prepare,vendors,parameters,lint,phploc,pdepend,phpcpd,phpmd-ci,phpcs-ci,phpdoc,phpunit"/> | |
| <target name="build-parallel" depends="prepare,lint,tools-parallel,phpunit"/> | |
| <target name="tools-parallel" description="Run tools in parallel"> | |
| <parallel threadCount="2"> | |
| <sequential> | |
| <antcall target="pdepend"/> | |
| <antcall target="phpmd-ci"/> | |
| </sequential> | |
| <antcall target="phpcpd"/> | |
| <antcall target="phpcs-ci"/> | |
| <antcall target="phploc"/> | |
| <antcall target="phpdoc"/> | |
| </parallel> | |
| </target> | |
| <target name="clean" description="Cleanup build artifacts"> | |
| <delete dir="${builddir}/api"/> | |
| <delete dir="${builddir}/code-browser"/> | |
| <delete dir="${builddir}/coverage"/> | |
| <delete dir="${builddir}/logs"/> | |
| <delete dir="${builddir}/pdepend"/> | |
| <delete dir="${builddir}/docs/*"/> | |
| </target> | |
| <target name="prepare" depends="clean" description="Prepare for build"> | |
| <mkdir dir="${builddir}/api"/> | |
| <mkdir dir="${builddir}/code-browser"/> | |
| <mkdir dir="${builddir}/coverage"/> | |
| <mkdir dir="${builddir}/logs"/> | |
| <mkdir dir="${builddir}/pdepend"/> | |
| </target> | |
| <target name="lint" description="Perform syntax check of sourcecode files"> | |
| <apply executable="php" failonerror="true"> | |
| <arg value="-l" /> | |
| <fileset dir="${sourcedir}"> | |
| <include name="**/*.php" /> | |
| <modified /> | |
| </fileset> | |
| <fileset dir="${basedir}/src/"> | |
| <include name="**/*Test.php" /> | |
| <modified /> | |
| </fileset> | |
| </apply> | |
| </target> | |
| <target name="phploc" description="Measure project size using PHPLOC"> | |
| <exec executable="${bindir}/phploc"> | |
| <arg value="--log-csv" /> | |
| <arg value="${builddir}/logs/phploc.csv" /> | |
| <arg path="${sourcedir}" /> | |
| </exec> | |
| </target> | |
| <target name="pdepend" description="Calculate software metrics using PHP_Depend"> | |
| <exec executable="${bindir}/pdepend"> | |
| <arg value="--jdepend-xml=${builddir}/logs/jdepend.xml" /> | |
| <arg value="--jdepend-chart=${builddir}/pdepend/dependencies.svg" /> | |
| <arg value="--overview-pyramid=${builddir}/pdepend/overview-pyramid.svg" /> | |
| <arg path="${sourcedir}" /> | |
| </exec> | |
| </target> | |
| <target name="phpmd" description="Perform project mess detection using PHPMD and print human readable output. Intended for usage on the command line before committing."> | |
| <exec executable="${bindir}/phpmd"> | |
| <arg path="${basedir}/src" /> | |
| <arg value="text" /> | |
| <arg value="${workspace}/app/phpmd.xml" /> | |
| </exec> | |
| </target> | |
| <target name="phpmd-ci" description="Perform project mess detection using PHPMD creating a log file for the continuous integration server"> | |
| <exec executable="${bindir}/phpmd"> | |
| <arg path="${sourcedir}" /> | |
| <arg value="xml" /> | |
| <arg value="${workspace}/app/phpmd.xml" /> | |
| <arg value="--reportfile" /> | |
| <arg value="${builddir}/logs/pmd.xml" /> | |
| </exec> | |
| </target> | |
| <target name="phpcs" description="Find coding standard violations using PHP_CodeSniffer and print human readable output. Intended for usage on the command line before committing."> | |
| <exec executable="${bindir}/phpcs"> | |
| <arg value="--standard=vendor/leaphub/phpcs-symfony2-standard/leaphub/phpcs/Symfony2/" /> | |
| <arg path="${sourcedir}" /> | |
| </exec> | |
| </target> | |
| <target name="phpcs-ci" description="Find coding standard violations using PHP_CodeSniffer creating a log file for the continuous integration server"> | |
| <exec executable="${bindir}/phpcs"> | |
| <arg value="--report=checkstyle" /> | |
| <arg value="--report-file=${builddir}/logs/checkstyle.xml" /> | |
| <arg value="--standard=vendor/leaphub/phpcs-symfony2-standard/leaphub/phpcs/Symfony2/" /> | |
| <arg path="${sourcedir}" /> | |
| </exec> | |
| </target> | |
| <target name="phpcpd" description="Find duplicate code using PHPCPD"> | |
| <exec executable="${bindir}/phpcpd"> | |
| <arg value="--log-pmd" /> | |
| <arg value="${builddir}/logs/pmd-cpd.xml" /> | |
| <arg path="${sourcedir}" /> | |
| </exec> | |
| </target> | |
| <target name="phpdoc" description="Generate API documentation using phpDox"> | |
| <exec executable="${bindir}/phpdoc"> | |
| <arg line="-d '${sourcedir}' -t '${builddir}/docs'" /> | |
| </exec> | |
| </target> | |
| <target name="phpunit" description="Run unit tests with PHPUnit"> | |
| <exec executable="${bindir}/phpunit" failonerror="true"> | |
| <arg value="-c" /> | |
| <arg path="${basedir}/app" /> | |
| <arg value="--log-junit" /> | |
| <arg path="${builddir}/logs/junit.xml" /> | |
| <arg value="--coverage-html" /> | |
| <arg value="${builddir}/clover/" /> | |
| <arg value="--coverage-clover" /> | |
| <arg value="${builddir}/clover/clover.xml" /> | |
| </exec> | |
| </target> | |
| <target name="vendors" description="Install vendors"> | |
| <exec executable="php" failonerror="true"> | |
| <arg value="composer.phar" /> | |
| <arg value="install" /> | |
| </exec> | |
| </target> | |
| <target name="parameters" description="Copy parameters"> | |
| <exec executable="cp" failonerror="true"> | |
| <arg path="app/config/parameters.yml.dist" /> | |
| <arg path="app/config/parameters.yml" /> | |
| </exec> | |
| </target> | |
| </project> | |
| ``` | |
| 次に `phpmd` 用の設定ファイルを作成します。 | |
| ```xml:app/phpmd.xml | |
| <?xml version="1.0"?> | |
| <ruleset name="Symfony2 ruleset" xmlns="http://pmd.sf.net/ruleset/1.0.0" xmlns:xsi="http://www.w3.org/2001/XMLSchema-instance" | |
| xsi:schemaLocation="http://pmd.sf.net/ruleset/1.0.0 http://pmd.sf.net/ruleset_xml_schema.xsd" xsi:noNamespaceSchemaLocation="http://pmd.sf.net/ruleset_xml_schema.xsd"> | |
| <description> | |
| Custom ruleset. | |
| </description> | |
| <rule ref="rulesets/design.xml" /> | |
| <rule ref="rulesets/unusedcode.xml" /> | |
| <rule ref="rulesets/codesize.xml" /> | |
| <rule ref="rulesets/naming.xml" /> | |
| </ruleset> | |
| ``` | |
| 実行は ant で行います。 | |
| ```bash | |
| $ ant | |
| ``` | |
| > Mac の場合は `$ brew install ant` などでインストールできるはず。 | |
| 実行すると `cache.properties` というキャッシュファイルができるのでこれは `.gitignore` に追加して無視ファイルに設定してください。 | |
| それぞれのタスクは `$ ant phpunit` などのようにタスク名を指定することで実行してチューニングしてください。 | |
| ここまででテスト+静的コード解析の準備は完了です。 | |
| # Capifony でデプロイを自動化する | |
| 次にデプロイの自動化を行うためにコマンドラインから [Capifony] を使ってワンライナーでデプロイできるようにします。どんなアプリケーションでもデプロイする際にはいくつかのステップを正しく踏む必要があり、デプロイ手順の変更も慎重に行う必要があると思います。Symfony でもデプロイするときには複数の手順を踏む必要があり、__手作業でやっていると必ず失敗する__と思います。デプロイ担当者がデプロイに失敗し、作業のダブルチェック・トリプルチェック化、作業者の限定、マニュアルの作り込み・・・などイケてない事態になる前に必ず自動化することをオススメします。Symfony の公式でもオススメされている Capifony を使うことでスタンダートなデプロイをさくっと実現できます。細やかな手順・設定変更もスクリプトで管理できるので継続的なデプロイ手順の改善が期待できます。ただし、内部で何をやっているかを正しく理解しておかないと万が一の障害時に大変なことになりかねないので Capifony が何をやっているのかは事前に調べておくとよいと思います。 | |
| まず Capfiony をインストールします。 | |
| ```bash | |
| $ gem install capifony | |
| ``` | |
| これで `cap` コマンドから capifony を実行できるようになりました。Capifony のセットアップを行います。 | |
| ```bash | |
| $ capifony . | |
| [add] writing './Capfile' | |
| [add] writing './app/config/deploy.rb' | |
| [done] symfony 2 project capifonied! | |
| ``` | |
| まずはステージング環境にデプロイすることを想定して設定します。 | |
| ```rb:app/config/deploy.rb | |
| # Application | |
| set :application, "SymfonyDemoAppForCI" | |
| set :domain, "192.168.50.10" | |
| set :app_path, "app" | |
| set :model_manager, "doctrine" | |
| # Application Reposiroty | |
| set :repository, "git@github.com:kseta/SymfonyDemoAppForCI.git" | |
| set :scm, :git | |
| # Deploy role | |
| role :web, domain | |
| role :app, domain, :primary => true | |
| # Deploy User | |
| set :user, "vagrant" | |
| # Deploy Server | |
| set :deploy_to, "/var/www/symfony-demo.com" | |
| set :deploy_via, :copy | |
| set :use_sudo, false | |
| # Assetic | |
| set :dump_assetic_assets, true | |
| # Shared | |
| set :shared_files, ["composer.phar", "app/config/parameters.yml"] | |
| set :shared_children, [app_path + "/logs", web_path + "/uploads", "vendor"] | |
| # Dependencies | |
| set :use_composer, true | |
| set :update_vendors, false | |
| # Ignore | |
| set :copy_exclude, [".git/*", ".gitignore"] | |
| # Be more verbose by uncommenting the following line | |
| # logger.level = Logger::MAX_LEVEL | |
| ``` | |
| これでステージング環境にセットアップができるようになりました。 | |
| ```bash | |
| $ cap deploy:setup | |
| ``` | |
| デプロイしてみましょう。初回のみ `app/config/parameters.yml` の設定が行われます。 | |
| ```bash | |
| $ cap deploy | |
| --> Updating code base with copy strategy | |
| --> Creating cache directory................................✔ | |
| --> Creating symlinks for shared directories................✔ | |
| --> Creating symlinks for shared files......................✔ | |
| --> Normalizing asset timestamps............................✔ | |
| --> Updating Composer.......................................✔ | |
| --> Installing Composer dependencies........................✔ | |
| --> Updating parameters..................................... | |
| Some parameters are missing. Please provide them. | |
| database_driver (pdo_mysql): | |
| database_host (127.0.0.1): | |
| database_port (null): | |
| database_name (symfony): | |
| database_user (root): | |
| database_password (null): | |
| mailer_transport (smtp): | |
| mailer_host (127.0.0.1): | |
| mailer_user (null): | |
| mailer_password (null): | |
| locale (en): | |
| secret (ThisTokenIsNotSoSecretChangeIt): | |
| --> Parameters updated......................................✔ | |
| --> Dumping all assets to the filesystem....................✔ | |
| --> Warming up cache........................................✔ | |
| --> Clear controllers.......................................✔ | |
| --> Successfully deployed! | |
| ``` | |
| 次にプロダクション環境にもデプロイできるように設定します。 | |
| # Jenkins を稼働させる | |
| Jenkins を稼働させます。環境はローカルマシンに立ち上げてもいいですし、どこかのサーバでもよいです。デモ用の CI サーバを起動するための VagrantFile を用意したのでそれを利用します。[Vagrant](https://www.vagrantup.com/) が無い方は[ダウンロードページ](https://www.vagrantup.com/downloads.html) からインストールしてみてください。私の環境は [v1.7.1](https://www.vagrantup.com/download-archive/v1.7.1.html) で動作しています。 | |
| ``` | |
| $ vagrant up symfony-demo-ci --provision | |
| ``` | |
| 完了後にブラウザから http://192.168.50.100:8080/ にアクセスすれば Jenkins のダッシュボードが表示されることを確認してください。 | |
| 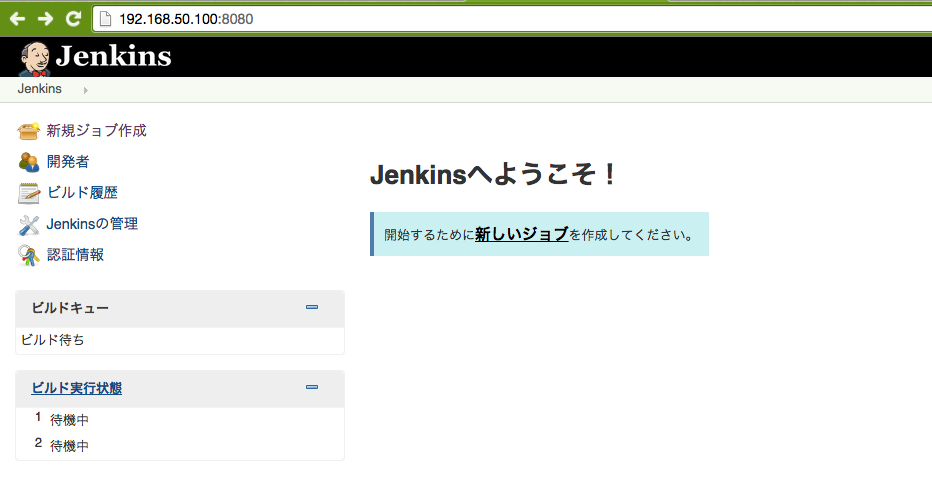 | |
| # Jenkins によるテスト+静的コード解析の自動実行ジョブの作成 | |
| Jenkins によるテスト+静的コード解析の自動実行ジョブを作成します。まずは GitHub のレポジトリを CI サーバから落として用意した build.xml によるビルドを実行するジョブを作成します。 | |
| ダッシュボードの新規ジョブ作成からジョブを作成します。ジョブ名は適当で「フリースタイル・プロジェクトのビルド」を選択して OK です。 | |
| 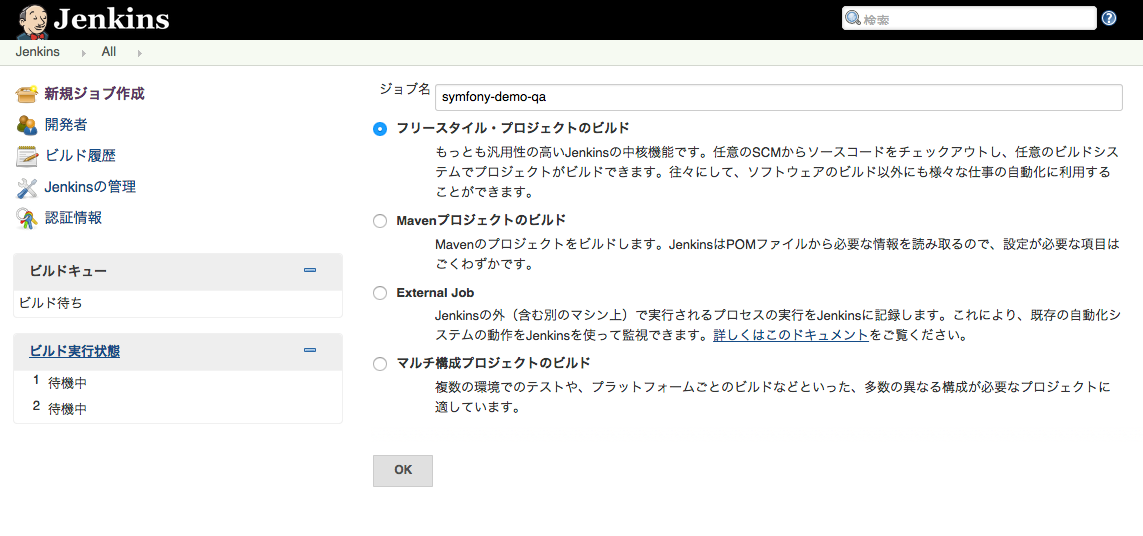 | |
| # ジョブの設定 | |
| では、続いてジョブの設定を行います。 | |
| ## プロジェクトの説明 | |
| 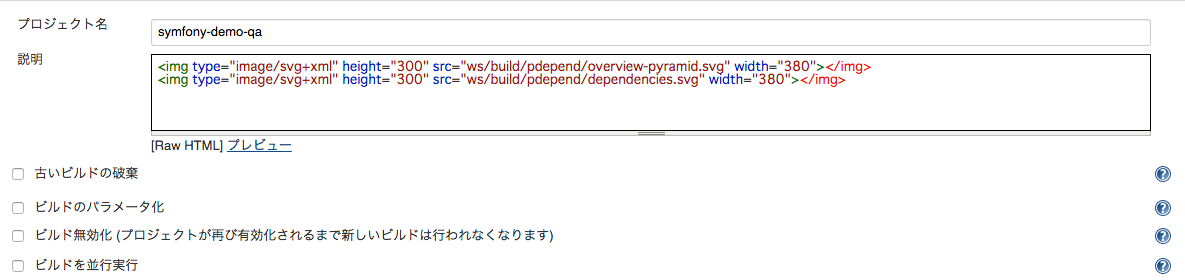 | |
| ## ソースコードの管理 | |
|  | |
| ## ビルド手順の追加 | |
| ### ant の呼び出し | |
| 「ビルド手順の追加」から ant の呼び出しを追加します。パラメータは空で大丈夫です。 | |
|  | |
| ## ビルド後の処理 | |
| ビルド後の処理の追加をしていきます。 | |
| ### Checkstyle 警告の集計 | |
| 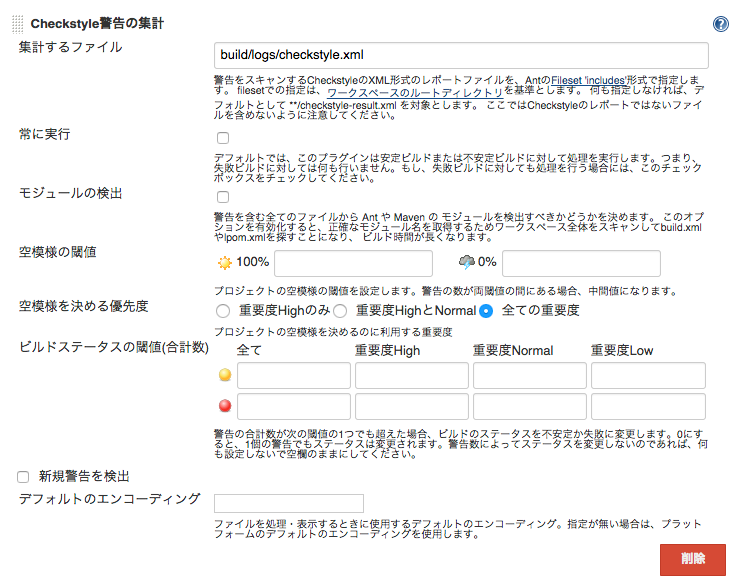 | |
| ### PMD 警告の集計 | |
| 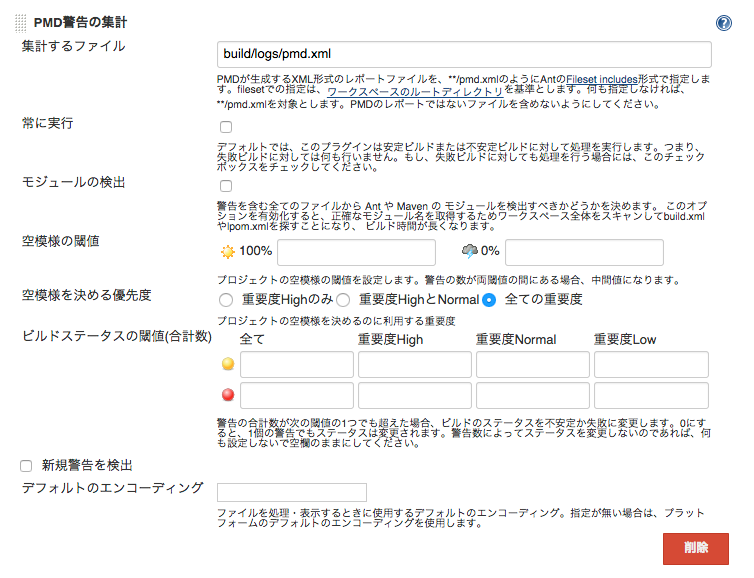 | |
| ### 重複コード分析の集計 | |
|  | |
| ### Clover カバレッジレポートを集計 | |
|  | |
| ### ビルドデータをプロット (phploc) | |
| 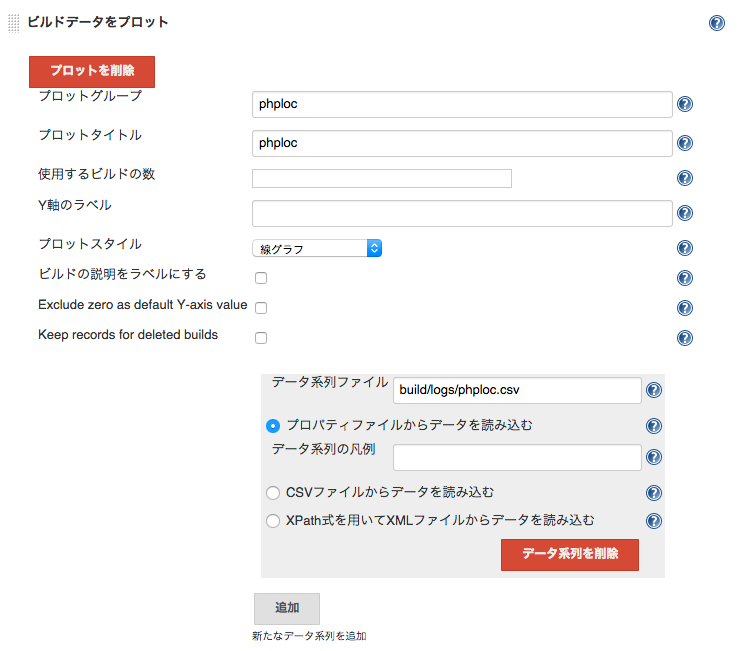 | |
| ### Report JDepend | |
| 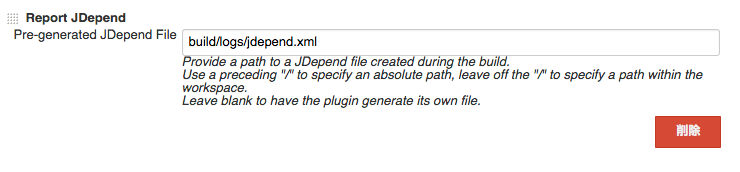 | |
| ### Javadoc の保存 | |
| 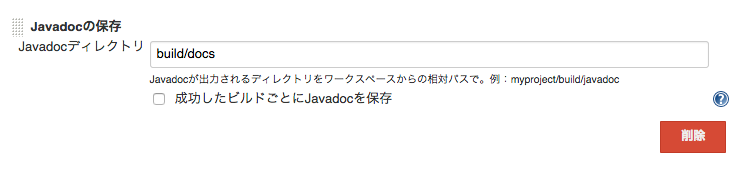 | |
| ### Publish xUnit test report | |
| 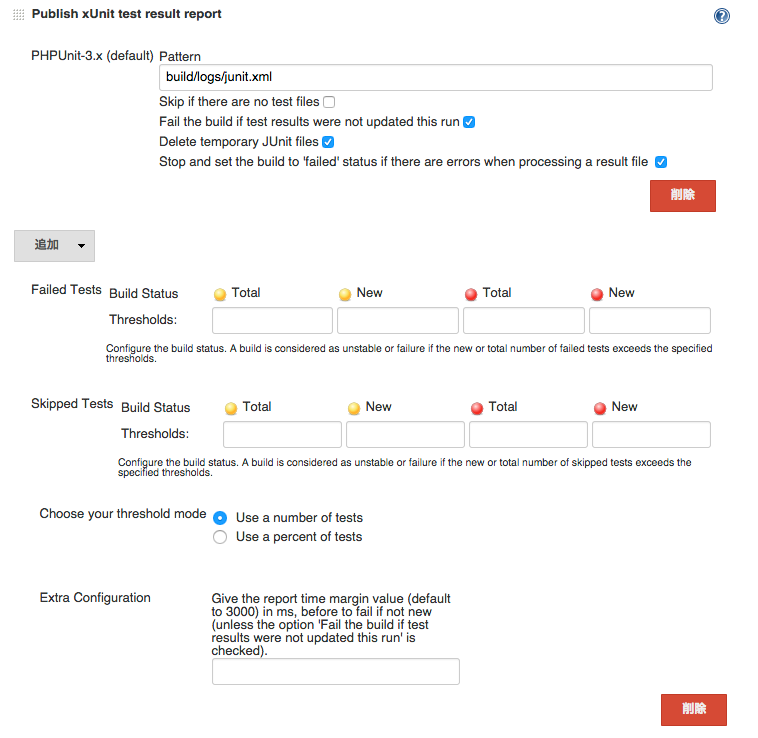 | |
| ## はじめてのビルド | |
| 設定が終わったらジョブのダッシュボードに戻って「ビルドの実行」をしてみましょう。初回のビルドではまっさらなワークスペース(/var/lib/jenkins/workspace/symfony-demo)に GitHub からソースコードをダウンロードして `composer install` を実行するところから始まるのでビルド完了まで10分くらい必要になるでしょう。コーヒーでも | |
| # GitHub | |
| # Jenkins によるコードの解析 | |
| 77 | |
| # Jenkins による Deploy フロー | |
| [Composer]: https://getcomposer.org/ | |
| [Capifony]: http://capifony.org/ | |
| [dekokun / jenkins_plugin_install.sh]: https://gist.github.com/dekokun/3656119 |
Sign up for free
to join this conversation on GitHub.
Already have an account?
Sign in to comment