Skip to content

Instantly share code, notes, and snippets.

Show Gist options
  • Select an option

  • Save HimDek/6edde284203a620745fad3f762be603b to your computer and use it in GitHub Desktop.

Select an option

Save HimDek/6edde284203a620745fad3f762be603b to your computer and use it in GitHub Desktop.
Hyper-V is supported in Pro, Enterprise and Education Edition of Windows 10 and Windows 11. This guide will show you how to enable Hyper-V in Home Editions of Windows 10 and Windows 11.

Hyper-V in Windows 10 and Windows 11 Home Edition

Hyper-V in Windows 10 and Windows 11 allows running Virtual Machine. It is supported only in Pro, Enterprise and Education Edition of Windows 10 and Windows 11 by default. But this guide will show you how to enable it in Home Editions of Windows 10 and Windows 11.

Check if virtualization is enabled:

  • Search for Command Prompt in Windows Start Menu and open it.
  • Type systeminfo and press Enter. Wait for the process to finish
  • Once the results appear, search for the Hyper-V Requirements section which is usually the last one. 11
    • If it says A hypervisor has been detected. Features required for Hyper-V will not be displayed. that means Hyper-V is already enabled and there is no reason following this guide anymore.
    • Otherwise, check for Virtualization Enabled in Firmware:.

Enable virtualization

The process of enabling virtualization can vary a lot depending on the motherboard manufacturer, but it can be summarized in a few steps:

  • Completely Shutdown you Computer.
  • Turn on the computer and while it is booting up, keep pressing the key to open the BIOS (usually it is Del, F1, F2, F4, F11, or F12). This key depends on the Motherboard manufacturer. You can easily google it out.
  • Once you get into the BIOS, it may look very scary or intimidating, but don't worry, you will get it right. Mouse may not work in BIOS so you might have to use the Directional or Arrow keys and the Enter key of the Keyboard to navigate.
    • Search for the CPU configuration section, it can be called CPU configuration, processor, Northbridge or Chipset and may be under an advanced or advanced mode tab or menu.
    • Now you need to look for the virtualization option and enable it, it can have different names such as Hyper-V, Vanderpool, SVM, AMD-V, Intel Virtualization Technology or VT-X.
  • Once its enabled, save and reboot your pc. If this part did not help you, you can specifically go the Website of the Mother Board Manufacturer of your Computer and ask for help there.

Enable Hyper-V

  • Open File Explorer on windows and Navigate to a folder.
  • Right click anywhere in a blank space inside the folder. Select New and then Click Text Document.
  • Open the file in Notepad and copy and paste the following text into it.
    pushd "%~dp0"
    dir /b %SystemRoot%\servicing\Packages\*Hyper-V*.mum >hyper-v.txt
    for /f %%i in ('findstr /i . hyper-v.txt 2^>nul') do dism /online /norestart /add-package:"%SystemRoot%\servicing\Packages\%%i"
    del hyper-v.txt
    Dism /online /enable-feature /featurename:Microsoft-Hyper-V -All /LimitAccess /ALL
    pause
    
  • Click File from the Menu bar in the top of Notepad, then click Save as.... In the Save as Window that appears, Change the File name to "Hyper-V.bat" and click save.
  • Now Double click Hyper-V.bat to run it. This will take some time but will install all features required for Hyper-V. A Restart might be required after it is done.
  • After Restarting Windows, search for Turn Windows features on or off in the Start Menu search bar and open it. 10
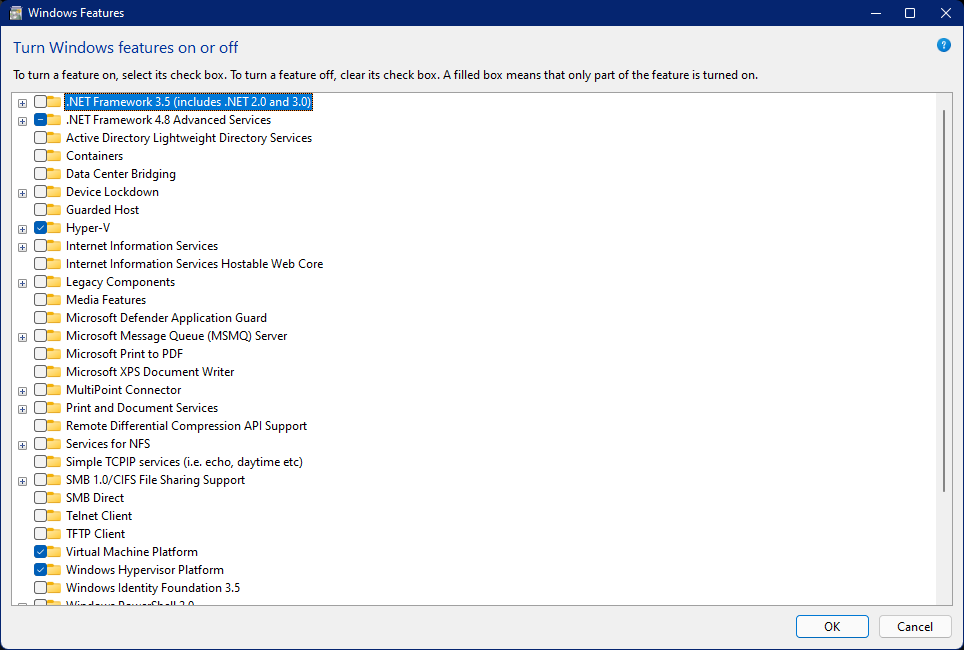
  • In the Window, lookout for Hyper-V, Virtual Machine Platform and Windows Hypervisor Platform. Then check the check boxes before them and click OK. This will also take some time and then a Restart is necessary.

Thats it Hyper-V is enabled.

@rtafinescheck-creator
Copy link
Copy Markdown

By visiting the official RTA Fine Check portal, users can seamlessly initiate the verification process.

@NanoPi
Copy link
Copy Markdown

NanoPi commented Apr 16, 2026

One-liner for dism add-package command:

for %A in (%SystemRoot%\servicing\Packages\*Hyper-V*.mum) do @dism /online /norestart /add-package:"%~fA"

previewing the command:

for %A in (%SystemRoot%\servicing\Packages\*Hyper-V*.mum) do @echo dism /online /norestart /add-package:"%~fA"

Hyper-V can then be enabled via OptionalFeatures.exe or another dism command.

dism /online /enable-feature /featurename:Microsoft-Hyper-V -All /LimitAccess /ALL

@AhmedTechAp
Copy link
Copy Markdown

AhmedTechAp commented Apr 19, 2026

Hyper-V can definitely affect gaming performance on Windows 10 and Windows 11, even on systems where no virtual machines are actively running. When it’s enabled, Windows operates on top of a hypervisor layer instead of directly on the hardware, which introduces a bit of overhead.

Because of that, some system resources like CPU and memory aren’t fully dedicated to games, and certain hardware features (especially related to virtualization-based security) can increase latency. This is why some players notice lower FPS, micro-stutters, or input lag after enabling Hyper-V or related features like Virtual Machine Platform.

For gaming-focused setups, it’s usually recommended to disable Hyper-V and any unnecessary virtualization features unless you specifically need them. It can make a noticeable difference in overall smoothness, especially in heavier or open-world games.

I came across a detailed explanation of this along with other Windows lag fixes here: https://gtasamodapk.net/

@thejuliaember-art
Copy link
Copy Markdown

If you're trying to use Hyper-V on Windows 10 or 11 Home, this guide is really helpful. It explains how a modified version can unlock virtualization features without upgrading to Pro. The steps are simple and easy to follow, even for beginners. Definitely useful for anyone who wants to run virtual machines on Home Edition. Thanks for sharing such a practical solution!

@sophie-rae
Copy link
Copy Markdown

The method explained here feels really practical for anyone using Windows Home who wants to try virtual machines without upgrading. It’s helpful for testing apps, learning new systems, or just experimenting safely. The steps seem straightforward and easy to follow even for beginners. I also like setups that include Chromecast support, as it makes multitasking and streaming more convenient. Overall, a useful and realistic guide.

@abdullah342-glitch
Copy link
Copy Markdown

Nice guide, really helpful for Home users who want to try virtualization without upgrading Windows.

Following these steps carefully can save a lot of time, especially checking virtualization first before jumping into setup. Just make sure to enable everything properly in BIOS to avoid issues later. https://descargargtasa.com/

@polarena34
Copy link
Copy Markdown

Really useful guide for Windows Home users who want to use virtualization without upgrading to Pro. The step-by-step explanation makes it much easier, especially the part about enabling virtualization in BIOS since that’s where most people get stuck.

The batch file method is also a nice workaround for enabling Hyper-V features manually. Just important to follow each step carefully and restart when needed.

And after setting everything up, tools like an electric bill checker https://kelectricduplicatebill.pk/ can also be useful to keep track of system or utility usage efficiently.

Sign up for free to join this conversation on GitHub. Already have an account? Sign in to comment