According to Donovan Brown, "DevOps is the union of people, process, and products to enable continuous delivery of value to our end users.
The idea is to create multidisciplinary teams that work together with shared and efficient practices and tools.
Essential DevOps practices include agile planning, continuous integration, continuous delivery, and monitoring of applications.
- Observing business, market, needs, current user behavior, and available telemetry data.
- Orient with the enumeration of options for what you can deliver, perhaps with experiments.
- Decide what to pursue
- Act by delivering working software to real users
Fail fast on effects that do not advance the business and double down on outcomes that support the business. Sometimes the approach is called pivot or persevere.
Your cycle time determines how quickly you can gather feedback to determine what happens in the next loop. The feedback that you collect with each cycle should be factual, actionable data.
When you adopt DevOps practices:
- You shorten your cycle time by working in smaller batches.
- Using more automation.
- Hardening your release pipeline.
- Improving your telemetry.
- Deploying more frequently.
- Optimize validated learning The more frequently you deploy, the more you can experiment.
The more opportunity you have to pivot or persevere and gain validated learning each cycle.
This acceleration in validated learning is the value of the improvement.
Think of it as the sum of progress that you achieve and the failures that you avoid.
Continuous Integration drives the ongoing merging and testing of code, leading to an early finding of defects.
Other benefits include:
- less time wasted fighting merge issues
- rapid feedback for development teams.
Continuous Delivery of software solutions to production and testing environments helps organizations:
- quickly fix bugs and
- respond to ever-changing business requirements.
Version Control, usually with a Git-based Repository, enables teams worldwide to communicate effectively during daily development activities. Integrate with software development tools for monitoring activities such as deployments.
Use Agile planning and lean project management techniques to:
- Plan and isolate work into sprints.
- Manage team capacity and help teams quickly adapt to changing business needs.
A DevOps Definition of Done is working software collecting telemetry against the intended business goals.
Monitoring and Logging of running applications.
Including production environments for:
- application health and
- customer usage.
It helps organizations create a hypothesis and quickly validate or disprove strategies. Rich data is captured and stored in various logging formats.
Public and Hybrid Clouds have made the impossible easy.
Use Infrastructure as a Service (IaaS) to lift and shift your existing apps or Platform as a Service (PaaS) to gain unprecedented productivity. The cloud gives you a data center without limits.
Infrastructure as Code (IaC): Enables the automation and validation of the creation and teardown of environments to help deliver secure and stable application hosting platforms.
Use Microservices architecture to isolate business use cases into small reusable services that communicate via interface contracts. This architecture enables:
- scalability and
- efficiency.
"Beyond the Idea: How to Execute Innovation,"
Measurable goals also need to have timelines. Every few weeks, the improvements should be clear and measurable. Ideally, evident to the organization or its customers.
- It is easier to change plans or priorities when necessary.
- The reduced delay between doing work and getting feedback helps ensure that the learnings and feedback are incorporated quickly.
- It is easier to keep organizational support when positive outcomes are clear.
This module helps organizations decide the projects to start applying the DevOps process and tools to minimize initial resistance.
A greenfield project is one done on a green field, undeveloped land. It can seem that a greenfield DevOps project would be easier to manage and to achieve success because: There was no existing codebase. No existing team dynamics of politics. Possibly no current, rigid processes. A blank slate offers the chance to implement everything the way that you want. better chance of avoiding existing business processes that do not align with your project plans. Suppose current IT policies do not allow the use of cloud-based infrastructure. In that case, the project might be qualified for entirely new applications designed for that environment from scratch. you can sidestep internal political issues that are well entrenched.
A brownfield project is done on the used ground for other purposes. Because of the land use that has once occurred, there could be challenges reusing the land. Like existing buildings, some would be obvious but less obvious, like polluted soil.
Usually, brownfield projects come with: The baggage of existing codebases. Existing teams. A significant amount of technical debt.
The beauty of these projects is that: there's often a large gap between customer expectations and delivery. The teams involved may well realize that the status quo needs to change. They've lived the challenges and the limitations associated with what they're currently doing. The limitations will have often worn down the existing team members. For example, they are working in the past and are keen to experiment with new ideas. The system is often crucial for organizations. It might also be easier to gain more robust management buy-in for these projects because of the potential benefits delivered.
Decide when to use systems of record versus systems of engagement When selecting systems as candidates for starting a DevOps transformation, it is necessary to consider the types of systems that you operate.
Some researchers suggest that organizations often use Bimodal IT, a practice of managing two separate, coherent modes of IT delivery - one focused on stability and predictability and the other on agility.
- they provide the truth about data elements
- have historically evolved slowly and carefully
- e.g. it is crucial that a banking system accurately reflects your bank balance
- they emphasize accuracy and security.
Many organizations have other systems that are more exploratory. often use experimentation to solve new problems. are modified regularly it is a priority to make quick changes over ensuring that the changes are correct.
There is a perception that DevOps suits systems of engagement more than systems of record. The lessons from high-performing companies show that is not the case.
Both types of systems are great. It might be easier to start with a system of engagement when first beginning a DevOps Transformation. DevOps practices apply to both types of systems. The most significant outcomes often come from transforming systems of record.
In discussions around continuous delivery, we usually categorize users into three general buckets:
- Canary users voluntarily test bleeding edge features as soon as they're available. Keen to see new features as soon as they're available and highly tolerant of issues
- Early adopters who voluntarily preview releases, considered more refined than the code that exposes canary users. Similar characteristics to the Canaries. Often have work requirements that make them less tolerant of issues and interruptions to work.
- Users who consume the products after passing through canary and early adopters.
Ideal target improvements Roll out changes incrementally. When starting, it is essential to find an improvement goal that: It can be used to gain early wins. It is small enough to be achievable in a reasonable timeframe. Has benefits that are significant enough to be evident to the organization. It allows constant learning from:
- rapid feedback and
- recovering from mistakes quickly.
The aim is to build a snowball effect where each new successful outcome adds to previous successful results.
Goals needed to be:
- specific,
- measurable, and
- time-bound. Establish appropriate metrics and Key Performance Indicators (KPIs) to ensure these goals are measurable.
Metrics and KPIs that are commonly used in DevOps Projects:
- Faster outcomes
- Deployment Frequency '' Speed
- Deployment Size: How many features, stories, and bug fixes are being deployed each time?
- Lead Time: How long does it take from the creation of a work item until it is completed?
- Efficiency
- Server to Admin Ratio. Are the projects reducing the number of administrators required for a given number of servers?
- Staff Member to Customers Ratio. Is it possible for fewer staff members to serve a given number of customers?
- Application Usage. How busy is the application?
- Application Performance. Is the application performance improving or dropping? (Based upon application metrics)?
- Quality and security
- Deployment failure rates. How often do deployments (or applications) fail?
- Application failure rates. How often do application failures occur, such as configuration failures, performance timeouts, and so on?
- Mean time to recover. How quickly can you recover from a failure?
- Bug report rates. You do not want customers finding bugs in your code. Is the amount they are seeing increasing or lowering?
- Test pass rates. How well is your automated testing working?
- Defect escape rate. What percentage of defects are being found in production?
- Availability. What percentage of time is the application truly available for customers?
- Service level agreement achievement. Are you meeting your service level agreements (SLAs)?
- Mean time to detection. If there is a failure, how long does it take for it to be detected?
- Culture
- Employee morale. Are employees happy with the transformation and where the organization is heading? Are they still willing to respond to further changes? This metric can be challenging to measure but is often done by periodic, anonymous employee surveys.
- Retention rates. Is the organization losing staff?
It is crucial to choose metrics that focus on :
- specific business outcomes and
- achieve a return on investment and increased business value.
This module explores agile development practices and helps to define and to configure teams and tools for collaboration.
- Determining a problem.
- Analyzing the requirements.
- Building and testing the required code.
- The delivery outcome to users.
The waterfall model follows a sequential order. A project development team only moves to the next development phase or testing if the previous step is completed successfully.
Drawbacks:
- Usually, the project takes a long time, and the outcome may no longer match the customer's needs.
- Customers often don't know what they want until they see it or can't explain what they need.
Agile methodology constantly emphasizes:
- adaptive planning and
- early delivery with continual improvement. It encourages rapid and flexible responses to changes as they occur.
Development needs to favor
- individuals and interactions over processes and tools.
- Working software over comprehensive documentation.
- Customer collaboration over contract negotiation.
- Respond to changes over following a plan.
Agile software development methods are based on releases and iterations:
One release might consist of several iterations. Each iteration is like a small independent project. After being estimated and prioritization: Features, bug fixes, enhancements, and refactoring width are assigned to a release. And then assigned again to a specific iteration within the release, generally on a priority basis. At the end of each iteration, there should be tested working code. In each iteration, the team must focus on the outcomes of the previous iteration and learn from them. Having teams focused on shorter-term outcomes is that teams are also less likely to waste time over-engineering features. Or allowing unnecessary scope creep to occur.
Agile software development helps teams keep focused on business outcomes.
| Waterfall | Agile |
|---|---|
| Divided into distinct phases. | Separates the project development lifecycle into sprints. |
| It can be rigid. | Known for flexibility. |
| All project development phases, such as design, development, and test, are completed once. | It follows an iterative development approach so that each phase may appear more than once. |
| Define requirements at the start of the project with little change expected. | Requirements are expected to change and evolve. |
| Focus on completing the project. | Focus on meeting customers' demands. |
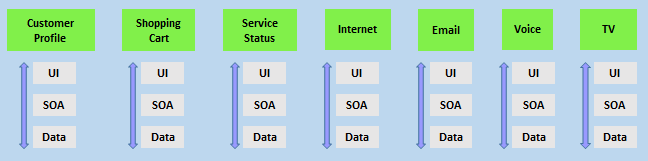
- divide teams according to the software architecture. In this example, the teams have been divided into the user interface, service-oriented architecture, and data teams:
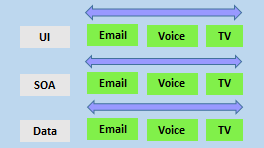
- span the architecture and
- are aligned with skillsets or disciplines
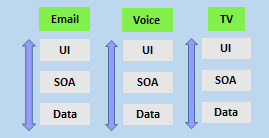
Vertical teams have been shown to provide more good outcomes in Agile projects. Each product must have an identified owner.
Another key benefit of the vertical team structure is that scaling can occur by adding teams. In this example, feature teams have been created rather than just project teams:
For a successful DevOps transformation, the aim is to find team members with the following characteristics:
- They:
- already think there is a need to change.
- have previously shown an ability to innovate.
- are already well respected within the organization.
- have a broad knowledge of the organization and how it operates.
- already believe that DevOps practices are what is needed.
When they first start an agile transformation, many teams hire external coaches or mentors.
Agile coaches help teams or individuals to adopt agile methods or to improve the current techniques and practices.
They must be agents of change by helping people understand how they work and encouraging them to adopt new approaches.
Agile coaches typically work with more than one team and remove any roadblocks from inside or outside the organization.
There is more than one type of agile coach.
- Some coaches are technical experts who aim to show staff members how to apply specific concepts—for example, test-driven development and continuous integration or deployment. These coaches might do peer programming sessions with staff members.
- Other coaches are focused on agile processes, determining requirements, and managing work activities. They might help how to run effective stand-up and review meetings. Some coaches may themselves act as scrum masters. They might mentor staff in how to fill these roles. Over time, though, team members need to develop an ability to mentor each other. Teams should aim to be self-organizing. Team members are often expected to learn as they work and to acquire skills from each other. To make it effective, though, the work itself needs to be done collaboratively, not by individuals working by themselves.
Collaboration tooling Agile teams commonly use the following collaboration tools:
Teams (Microsoft): A group chat application from Microsoft. It provides a combined location with workplace chat, meetings, notes, and storage of file attachments. A user can be a member of many teams.
Slack: A commonly used tool for collaboration in Agile and DevOps teams. From a single interface, it provides a series of separate communication channels that can be organized by project, team, or topic. Conversations are kept and are searchable. It is straightforward to add both internal and external team members. Slack integrates with many third-party tools like GitHub for source code and DropBox for document and file storage.
Jira: A commonly used tool for planning, tracking, releasing, and reporting.
Asana: A standard tool designed to keep team plans, progress, and discussions in a single place. It has strong capabilities around timelines and boards.
Glip: An offering from Ring Central that provides chat, video, and task management.
Other standard tools with collaboration offerings include ProofHub, RedBooth, Trello, DaPulse, and many others.
Not all tools need to be digital tools. Many teams use whiteboards to collaborate on ideas, index cards for recording stories, and sticky notes for moving around tasks.
Even when digital tools are available, it might be more convenient to use these physical tools during stand-up and other meetings.
These tools usually include:
- Project planning and execution monitoring abilities (including how to respond to impediments).
- Automation for stand-up meetings.
- Management and tracking of releases.
- A way to record and work with the outcomes of retrospectives.
Many include Kanban boards and detailed sprint planning options.
As a complete CI/CD system, we have Azure DevOps and GitHub that includes:
Flexibility in Kanban boards. Traceability through Backlogs. Customizability in dashboards. Built-in scrum boards. Integrability directly with code repositories. Code changes can be linked directly to tasks or bugs.
It might seem odd to add screen recording tools to this list. Still, they are beneficial when:
- Work with remote team members.
- Recording bugs in action.
- Building walkthroughs and tutorials that demonstrate actual or potential features.
A screen recorder is built into Windows, but other common ones include SnagIt, Camtasia, OBS, and Loom.
This module explores Azure DevOps and GitHub tools and helps organizations define their work management tool and licensing strategy.
Azure DevOps is a Software as a service (SaaS) platform from Microsoft that provides an end-to-end DevOps toolchain for developing and deploying software.
Azure DevOps includes a range of services covering the complete development life cycle.
- Azure Boards: agile planning, work item tracking, visualization, and reporting tool.
- Azure Pipelines: a language, platform, and cloud-agnostic CI/CD platform-supporting containers or Kubernetes.
- Azure Repos: provides cloud-hosted private git repos.
- Azure Artifacts: provides integrated package management with support for Maven, npm, Python, and NuGet package feeds from public or private sources.
- Azure Test Plans: provides an integrated planned and exploratory testing solution.
GitHub is a Software as a service (SaaS) platform from Microsoft that provides Git-based repositories and DevOps tooling for developing and deploying software.
GitHub provides a range of services for software development and deployment.
- Codespaces: Provides a cloud-hosted development environment (based on Visual Studio Code) that can be operated from within a browser or external tools. Eases cross-platform development.
- Repos: Public and private repositories based upon industry-standard Git commands.
- Actions: Allows for the creation of automation workflows. These workflows can include environment variables and customized scripts.
- Packages: The majority of the world's open-source projects are already contained in GitHub repositories. GitHub makes it easy to integrate with this code and with other third-party offerings.
- Security: Provides detailed code scanning and review features, including automated code review assignment.
To protect and secure your data, you can use:
Microsoft account. GitHub account. Azure Active Directory (Azure AD).
Use personal access tokens (PAT) for tools that don't directly support Microsoft accounts or Azure AD for authentication. You can use it if you want them to integrate with Azure DevOps.
Personal access tokens are also helpful when establishing access to command-line tools, external tools, and tasks in build pipelines.
Azure DevOps is pre-configured with default security groups.
Default permissions are assigned to the default security groups. You can also configure access at the organization, collection, and project or object levels.
In the organization settings in Azure DevOps, you can configure app access policies. Based on your security policies, you might allow alternate authentication methods, enable third-party applications to access via OAuth, or even allow anonymous access to some projects.
For even tighter control, you can use Conditional Access policies. These offer simple ways to help secure resources such as Azure DevOps when using Azure Active Directory for authentication.
Conditional Access policies such as multifactor authentication can help to minimize the risk of compromised credentials.
As part of a Conditional Access policy, you might require:
- Security group membership.
- A location or network identity.
- A specific operating system.
- A managed device or other criteria.
Third-party organizations offer commercial tooling to assist with migrating other work management tools like:
Aha. BugZilla. ClearQuest. And others to Azure DevOps.
Azure Test Plans track manual testing for sprints and milestones, allowing you to follow when that testing is complete.
Azure DevOps also has a Test Feedback extension available in the Visual Studio Marketplace. The extension is used to help teams do exploratory testing and provide feedback.
Other helpful testing tools: Apache JMeter is open-source software written in Java and designed to load test, and measure performance.
Pester is a tool that can automate the testing of PowerShell code.
SoapUI is another testing framework for SOAP and REST testing.
If you are using Microsoft Test Manager, you should plan to migrate to Azure Test Plans instead.
When designing a license management strategy, you first need to understand your progress in the DevOps implementation phase.
If you have a draft of the architecture, you're planning for the DevOps implementation; you already know part of the resources to consume.
For example, you started with a version control-implementing Git and created some pipelines to build and release your code.
If you have multiple teams building their solutions, you don't want to wait in the queue to start building yours.
Probably, you want to pay for parallel jobs and make your builds run in parallel without depending on the queue availability.
To consider:
What phase are you in? How many people are using the feature? How long are you willing to wait if in the queue for pipelines? Is this urgent? Is this a validation only? Should all users access all features? Are they Stakeholders? Basic users? Do they already have a Visual Studio license? Do you have an advanced Package Management strategy? Maybe you need more space for Artifacts.
This module introduces you to GitHub Projects, GitHub Project Boards and Azure Boards. It explores ways to link Azure Boards and GitHub, configure GitHub Projects and Project views, and manage work with GitHub Projects.
During the application or project lifecycle, it's crucial to plan and prioritize work. With Project boards, you can control specific feature work, roadmaps, release plans, etc.
Project boards are made up of issues, pull requests, and notes categorized as cards you can drag and drop into your chosen columns. The cards contain relevant metadata for issues and pull requests, like labels, assignees, the status, and who opened it.
There are different types of project boards:
User-owned project boards: Can contain issues and pull requests from any personal repository. Organization-wide project boards: Can contain issues and pull requests from any repository that belongs to an organization. Repository project boards: Are scoped to issues and pull requests within a single repository.
| Templates | Description |
|---|---|
| Basic kanban | Track your tasks with: To do, In progress, and Done columns. |
| Automated kanban | Cards automatically move between: To do, In progress, and Done columns. |
| Automated kanban with review | Cards automatically move between: To do, In progress, and Done columns, with extra triggers for pull request review status. |
| Bug triage | Triage and prioritize bugs with: To do, High priority, Low priority, and Closed columns. |
Projects are a new, customizable and flexible tool version of projects for planning and tracking work on GitHub.
A project is a customizable spreadsheet in which you can configure the layout by filtering, sorting, grouping your issues and PRs, and adding custom fields to track metadata.
You can use different views such as Board or spreadsheet/table.
You can use custom fields in your tasks. For example:
A date field to track target ship dates. A number field to track the complexity of a task. A single select field to track whether a task is Low, Medium, or High priority. A text field to add a quick note. An iteration field to plan work week-by-week, including support for breaks.
is a customizable tool to manage software projects supporting Agile, Scrum, and Kanban processes by default. Track work, issues, and code defects associated with your project. Also, you can create your custom process templates and use them to create a better and more customized experience for your company.
You have multiple features and configurations to support your teams, such as calendar views, configurable dashboards, and integrated reporting.
The Kanban board is one of several tools that allows you to add, update, and filter user stories, bugs, features, and epics.
You can track your work using the default work item types such as user stories, bugs, features, and epics. It's possible to customize these types or create your own. Each work item provides a standard set of system fields and controls, including Discussion for adding and tracking comments, History, Links, and Attachments.
If you need to create reports or a list of work with specific filters, you can use the queries hub to generate custom lists of work items.
Queries support the following tasks:
Find groups of work items with something in common. Triage work to assign to a team member or sprint and set priorities. Perform bulk updates. View dependencies or relationships between work items. Create status and trend charts that you can optionally add to dashboards.
It's possible to create another view with deliverables and track dependencies across several teams in a calendar view using Delivery Plans.
Delivery plans are fully interactive, supporting the following tasks:
View up to 15 team backlogs, including a mix of backlogs and teams from different projects. View custom portfolio backlogs and epics. View work that spans several iterations. Add backlog items from a plan. View rollup progress of features, epics, and other portfolio items. View dependencies that exist between work items.
Use GitHub, track work in Azure Boards Use Azure Boards to plan and track your work and GitHub as source control for software development.
Connect Azure Boards with GitHub repositories, enabling linking GitHub commits, pull requests, and issues to work items in Boards.
Use GitHub, track work in Azure Boards Use Azure Boards to plan and track your work and GitHub as source control for software development.
Connect Azure Boards with GitHub repositories, enabling linking GitHub commits, pull requests, and issues to work items in Boards.
GitHub Command Palette - GitHub Docs
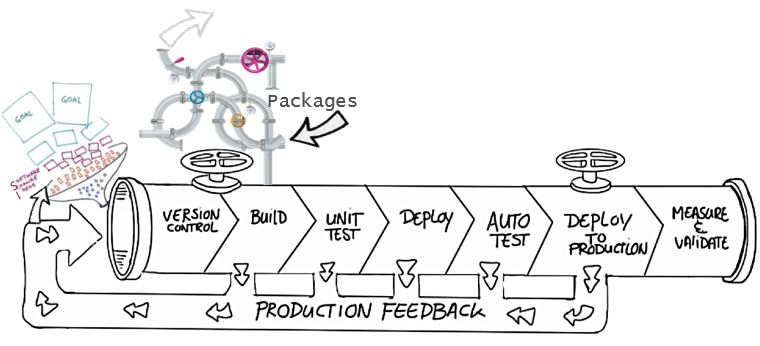
A Source control system (or version control system) allows developers to collaborate on code and track changes. Use version control to save your work and coordinate code changes across your team. Source control is an essential tool for multi-developer projects.
The version control system saves a snapshot of your files (history) so that you can review and even roll back to any version of your code with ease. Also, it helps to resolve conflicts when merging contributions from multiple sources.
For most software teams, the source code is a repository of invaluable knowledge and understanding about the problem domain that the developers have collected and refined through careful effort.
Source control protects source code from catastrophe and the casual degradation of human error and unintended consequences.
Version control is about keeping track of every change to software assets—tracking and managing the who, what, and when. Version control is the first step needed to assure quality at the source, ensure flow and pull value, and focus on the process. All of these create value not just for the software teams but ultimately for the customer.
Version control is a solution for managing and saving changes made to any manually created assets. If changes are made to the source code, you can go back in time and easily roll back to previous-working versions.
Version control also makes experimenting easy and, most importantly, makes collaboration possible. Without version control, collaborating over source code would be a painful operation.
There are several perspectives on version control.
For developers, it's a daily enabler for work and collaboration to happen. It's part of the daily job, one of the most-used tools.
For management, the critical value of version control is in:
IP security. Risk management. Time-to-market speed through Continuous Delivery, where version control is a fundamental enabler.
Source control is the fundamental enabler of continuous delivery."
Some of the advantages of using source control are,
Create workflows. Version control workflows prevent the chaos of everyone using their development process with different and incompatible tools. Version control systems provide process enforcement and permissions, so everyone stays on the same page. Work with versions. Every version has a description in the form of a comment. These descriptions help you follow changes in your code by version instead of by individual file changes. Code stored in versions can be viewed and restored from version control at any time as needed. It makes it easy to base new work on any version of code. Collaboration. Version control synchronizes versions and makes sure that your changes do not conflict with other changes from your team. Your team relies on version control to help resolve and prevent conflicts, even when people make changes simultaneously. Maintains history of changes. Version control keeps a record of changes as your team saves new versions of your code. This history can be reviewed to find out who, why, and when changes were made. The history gives you the confidence to experiment since you can roll back to a previous good version at any time. The history lets your base work from any code version, such as fixing a bug in an earlier release. Automate tasks. Version control automation features save your team time and generate consistent results. Automate testing, code analysis, and deployment when new versions are saved to version control.
Reusability – why do the same thing twice? Reuse of code is a common practice and makes building on existing assets simpler. Traceability – Audits are not just for fun; in many industries, it is a legal matter. All activities must be traced, and managers can produce reports when needed. Traceability also makes debugging and identifying root cause easier. Additionally, it helps with feature reuse as developers can link requirements to implementation. Manageability – Can team leaders define and enforce workflows, review rules, create quality gates and enforce QA throughout the lifecycle? Efficiency – are we using the right resources for the job, minimizing time and effort? This one is self-explanatory. Collaboration – When teams work together, quality tends to improve. We catch one another's mistakes and can build on each other's strengths. Learning – Organizations benefit when they invest in employees learning and growing. It is important for onboarding new team members, the lifelong learning of seasoned members, and the opportunity for workers to contribute to the bottom line and the industry.
- Make small changes. In other words, commit early and commit often. Be careful not to commit any unfinished work that could break the build.
- Do not commit personal files. It could include application settings or SSH keys. Often personal files are committed accidentally but cause problems later when other team members work on the same code.
- Update often and right before pushing to avoid merge conflicts.
- Verify your code change before pushing it to a repository; ensure it compiles and tests are passing.
- Pay close attention to commit messages, as it will tell you why a change was made. Consider committing messages as a mini form of documentation for the change.
- Link code changes to work items. It will concretely link what was created to why it was created—or modified by providing traceability across requirements and code changes.
- No matter your background or preferences, be a team player and follow agreed conventions and workflows. Consistency is essential and helps ensure quality, making it easier for team members to pick up where you left off, review your code, debug, and so on.
This module describes different source control systems, such as Git and Team Foundation Version Control (TFVC), and helps with the initial steps for Git utilization.
Centralized source control systems are based on the idea that there's a single "central" copy of your project somewhere (probably on a server). Programmers will check in (or commit) their changes to this central copy.
"Committing" a change means to record the difference in the central system. Other programmers can then see this change.
Also, it's possible to pull down the change. The version control tool will automatically update the contents of any files that were changed.
Most modern version control systems deal with "changesets," which are a group of changes (possibly too many files) that should be treated as a cohesive whole.
Programmers no longer must keep many copies of files on their hard drives manually. The version control tool can talk to the central copy and retrieve any version they need on the fly.
Some of the most common-centralized version control systems you may have heard of or used are Team Foundation Version Control (TFVC), CVS, Subversion (or SVN), and Perforce.
If working with a centralized source control system, your workflow for adding a new feature or fixing a bug in your project will usually look something like this:
- Get the latest changes other people have made from the central server.
- Make your changes, and make sure they work correctly.
- Check in your changes to the main server so that other programmers can see them.
"Distributed" source control or version control systems (DVCS for short) have become the most important.
The three most popular are:
- Git,
- Mercurial,
- and Bazaar.
These systems don't necessarily rely on a central server to store all the versions of a project's files. Instead, every developer clones a repository copy and has the project's complete history on their local storage. This copy (or "clone") has all the original metadata.
Getting new changes from a repository is called pulling. Moving your changes to a repository is called "pushing. You move changesets (changes to file groups as coherent wholes), not single-file diffs.
The act of cloning an entire repository gives distributed source control tools several advantages over centralized systems:
- Doing actions other than pushing and pulling changesets is fast because the tool only needs to access the local storage, not a remote server.
- Committing new changesets can be done locally without anyone else seeing them. Once you have a group of changesets ready, you can push all of them at once.
- Everything but pushing and pulling can be done without an internet connection. So, you can work on a plane, and you won't be forced to commit several bug fixes as one large changeset.
- Since each programmer has a full copy of the project repository, they can share changes with one, or two other people to get feedback before showing the changes to everyone.
There are only two major inherent disadvantages to using a distributed system:
- If your project contains many large, binary files that can't be efficiently compressed, the space needed to store all versions of these files can accumulate quickly.
- If your project has a long history (50,000 changesets or more), downloading the entire history can take an impractical amount of time and disk space.
Git is a distributed version control system. Each developer has a copy of the source repository on their development system. Developers can commit each set of changes on their dev machine.
Branches are lightweight. When you need to switch contexts, you can create a private local branch. You can quickly switch from one branch to another to pivot among different variations of your codebase. Later, you can merge, publish, or dispose of the branch.
Team Foundation Version Control (TFVC) is a centralized version control system.
Typically, team members have only one version of each file on their dev machines. Historical data is maintained only on the server. Branches are path-based and created on the server.
TFVC has two workflow models:
- Server workspaces - Before making changes, team members publicly check out files. Most operations require developers to be connected to the server. This system helps lock workflows. Other software that works this way includes Visual Source Safe, Perforce, and CVS. You can scale up to huge codebases with millions of files per branch—also, large binary files with server workspaces.
- Local workspaces - Each team member copies the latest codebase version with them and works offline as needed. Developers check in their changes and resolve conflicts as necessary. Another system that works this way is Subversion.
Developers would gain the following benefits by moving to Git:
- Community In many circles, Git has come to be the expected version control system for new projects.
If your team is using Git, odds are you will not have to train new hires on your workflow because they will already be familiar with distributed development.
-
Distributed development In TFVC, each developer gets a working copy that points back to a single central repository. Git, however, is a distributed version control system. Instead of a working copy, each developer gets their local repository, complete with an entire history of commits.
-
Trunk-based development One of the most significant advantages of Git is its branching capabilities. Unlike centralized version control systems, Git branches are cheap and easy to merge.
Trunk-based development provides an isolated environment for every change to your codebase. When developers want to start working on something—no matter how large or small—they create a new branch. It ensures that the main branch always contains production-quality code.
Using trunk-based development is more reliable than directly-editing production code, but it also provides organizational benefits.
They let you represent development work at the same granularity as your agile backlog.
For example, you might implement a policy where each work item is addressed in its feature branch.
-
Pull requests A pull request is a way to ask another developer to merge one of your branches into their repository.
It makes it easier for project leads to keep track of changes and lets developers start discussions around their work before integrating it with the rest of the codebase.
Since they are essentially a comment thread attached to a feature branch, pull requests are incredibly versatile.
When a developer gets stuck with a complex problem, they can open a pull request to ask for help from the rest of the team.
Instead, junior developers can be confident that they are not destroying the entire project by treating pull requests as a formal code review.
-
Faster release cycle A faster release cycle is the ultimate result of feature branches, distributed development, pull requests, and a stable community.
These capabilities promote an agile workflow where developers are encouraged to share more minor changes more frequently.
In turn, changes can get pushed down the deployment pipeline faster than the standard of the monolithic releases with centralized version control systems.
As you might expect, Git works well with continuous integration and continuous delivery environments.
Git hooks allow you to run scripts when certain events occur inside a repository, which lets you automate deployment to your heart’s content.
You can even build or deploy code from specific branches to different servers.
For example, you might want to configure Git to deploy the most recent commit from the develop branch to a test server whenever anyone merges a pull request into it.
Combining this kind of build automation with peer review means you have the highest possible confidence in your code as it moves from development to staging to production.
There are three common objections I often hear to migrating to Git:
-
I can overwrite history.
-
I have large files.
-
There is a steep learning curve.
-
Overwriting history Git technically does allow you to overwrite history - but like any helpful feature, if misused can cause conflicts.
If your teams are careful, they should never have to overwrite history.
If you are synchronizing to Azure Repos, you can also add a security rule that prevents developers from overwriting history by using the explicit "Force Push" permissions.
Every source control system works best when developers understand how it works and which conventions work.
While you cannot overwrite history with Team Foundation Version Control (TFVC), you can still overwrite code and do other painful things.
- Large files Git works best with repos that are small and do not contain large files (or binaries).
Every time you (or your build machines) clone the repo, they get the entire repo with its history from the first commit.
It is great for most situations but can be frustrating if you have large files.
Binary files are even worse because Git cannot optimize how they are stored.
That is why Git LFS was created.
It lets you separate large files of your repos and still has all the benefits of versioning and comparing.
Also, if you are used to storing compiled binaries in your source repos, stop!
Use Azure Artifacts or some other package management tool to store binaries for which you have source code.
However, teams with large files (like 3D models or other assets) can use Git LFS to keep the code repo slim and trimmed.
- Learning curve There is a learning curve. If you have never used source control before, you are probably better off when learning Git. I have found that users of centralized source control (TFVC or SubVersion) battle initially to make the mental shift, especially around branches and synchronizing.
Once developers understand how Git branches work and get over the fact that they must commit and then push, they have all the basics they need to succeed in Git.
Azure Repos is a set of version control tools that you can use to manage your code.
Azure Repos provides two types of version control:
- Git: distributed version control
- Team Foundation Version Control (TFVC): centralized version control
- Use free private Git repositories, pull requests, and code search: Get unlimited private Git repository hosting and support for TFVC that scales from a hobby project to the world’s largest repository.
- Support for any Git client: Securely connect with and push code into your Git repository from any IDE, editor, or Git client.
- Web hooks and API integration: Add validations and extensions from the marketplace or build your own-using web hooks and REST APIs.
- Semantic code search: Quickly find what you are looking for with a code-aware search that understands classes and variables.
- Collab to build better code: Do more effective Git code reviews with threaded discussion and continuous integration for each change. Use forks to promote collaboration with inner source workflows.
- Automation with built-in CI/CD: Set up continuous integration/continuous delivery (CI/CD) to automatically trigger builds, tests, and deployments. Including every completed pull request using Azure Pipelines or your tools.
- Protection of your code quality with branch policies: Keep code quality high by requiring code reviewer sign-out, successful builds, and passing tests before merging pull requests. Customize your branch policies to maintain your team’s high standards.
- Usage of your favorite tools: Use Git and TFVC repositories on Azure Repos with your favorite editor and IDE.
GitHub is a Git repository hosting service that adds many of its features.
GitHub is a Git repository hosting service that adds many of its features.
While Git is a command-line tool, GitHub provides a Web-based graphical interface.
It also provides access control and several collaboration features, such as wikis and essential task management tools for every project.
The process is simple:
- Create an empty Git repo (or multiple empty repos).
- Get-latest from TFS.
- Copy/reorganize the code into the empty Git repos.
- Commit and push, and you are there!
If you have shared code, you need to create builds of the shared code to publish to a package feed. And then consume those packages in downstream applications.
If you are on TFVC and in Azure DevOps, you have the option of a simple single-branch import.
- Click on the Import repository from the Azure Repos top-level drop-down menu to open the dialog. - Then enter the path to the branch you are migrating to (yes, you can only choose one branch).
- Select if you want history or not (up to 180 days).
- Add in a name for the repo, and the import will be triggered.
If you need to migrate more than a single branch and keep branch relationships
It's an open-source project built to synchronize Git and TFVC repositories.
GIT-TFS has the advantage that it can migrate multiple branches and preserve the relationships to merge branches in Git after you migrate.
You can quickly dry-run the migration locally, iron out any issues, and then do it for real. There are lots of flexibilities with this tool.
If you are on Subversion, you can use GIT-SVN to import your Subversion repo similarly to GIT-TFS.
If Chocolatey is already installed on your computer, run choco install gittfs
Add the GIT-TFS folder path to your PATH. You could also set it temporary (the time of your current terminal session) using: set PATH=%PATH%;%cd%\GitTfs\bin\Debug
You need .NET 4.5.2 and maybe the 2012 or 2013 version of Team Explorer (or Visual Studio). It depends on the version of Azure DevOps you want to target.
Clone the whole repository (wait for a while.) :
git tfs clone http://tfs:8080/tfs/DefaultCollection $/some_project
Codespaces is a cloud-based development environment that GitHub hosts. It is essentially an online implementation of Visual Studio Code.
Codespaces allows developers to work entirely in the cloud.
Codespaces even will enable developers to contribute from tablets and Chromebooks.
Because it is based on Visual Studio Code, the development environment is still rich with:
- Syntax highlighting.
- Autocomplete.
- Integrated debugging.
- Direct Git integration. Developers can create a codespace (or multiple codespaces) for a repository. Each codespace is associated with a specific branch of a repository.
A repository is simply a place where the history of your work is stored.
It often lives in a .git subdirectory of your working copy.
There are two philosophies on organizing your repos: Monorepo or multiple repos.
-
Monorepos is a source control pattern where all the source code is kept in a single repository. It's super simple to give all your employees access to everything in one shot. Just clone it down, and done.
-
Multiple repositories refer to organizing your projects into their separate repository.
The multiple repos view, in extreme form, is that if you let every subteam live in its repo. They have the flexibility to work in their area however they want, using whatever libraries, tools, development workflow, and so on, will maximize their productivity.
The cost is that anything not developed within a given repo must be consumed as if it was a third-party library or service. It would be the same even if it were written by someone sitting one desk over.
If you find a bug in your library, you must fix it in the appropriate repo. Get a new artifact published, and then return to your repo to change your code. In the other repo, you must deal with a different code base, various libraries, tools, or even a different workflow. Or maybe you must ask someone who owns that system to make the change for you and wait for them to get around to it.
In Azure DevOps, a project can contain multiple repositories. It's common to use one repository for each associated solution.
A changelog is a file that has a list of changes made to a project, usually in date order. The typical breakdown is to separate a list of versions, and then within each version, show:
- Added features
- Modified/Improved features
- Deleted features
Some teams will post changelogs as blog posts; others will create a CHANGELOG.md file in a GitHub repository.
The fundamental difference between the monorepo and multiple repos philosophies boils down to a difference about what will allow teams working together on a system to go fastest.
-
Using native GitHub commands The git log command can be useful for automatically creating content.
Example: create a new section per version:
git log [options] vX.X.X..vX.X.Y | helper-script > projectchangelogs/X.X.Ybash -
Git changelog - based on Python.
-
GitHub changelog generator - based on Gem.
When evaluating a workflow for your team, you must consider your team's culture. You want the workflow to:
-
enhance your team's effectiveness and
-
not be a burden that limits productivity. Some things to consider when evaluating a Git workflow are:
-
Does this workflow scale with team size?
-
Is it easy to undo mistakes and errors with this workflow?
-
Does this workflow impose any new unnecessary cognitive overhead on the team?
Most popular Git workflows will have some sort of centralized repo that individual developers will push and pull from.
Below is a list of some popular Git workflows
These comprehensive workflows offer more specialized patterns about managing branches for feature development, hotfixes, and eventual release.
-
Trunk-based development
Trunk-based development is a logical extension of Centralized Workflow.
The core idea behind the Feature Branch Workflow is that all feature development should take place in a dedicated branch instead of the main branch.
This encapsulation makes it easy for multiple developers to work on a particular feature without disturbing the main codebase.
It also means the main branch should never contain broken code, which is a huge advantage for continuous integration environments.
Encapsulating feature development also makes it possible to use pull requests, which are a way to start discussions around a branch. They allow other developers to sign out on a feature before it gets integrated into the official project. Or, if you get stuck in the middle of a feature, you can open a pull request asking for suggestions from your colleagues.
Pull requests make it incredibly easy for your team to comment on each other's work. Also, feature branches can (and should) be pushed to the central repository. It allows sharing a feature with other developers without touching any official code.
Since the main is the only "special" branch, storing several feature branches on the central repository doesn't pose any problems. It's also a convenient way to back up everybody's local commits.
The trunk-based development Workflow assumes a central repository, and the main represents the official project history.
Instead of committing directly to their local main branch, developers create a new branch every time they start work on a new feature.
Feature branches should have descriptive names, like new-banner-images or bug-91. The idea is to give each branch a clear, highly focused purpose.
Git makes no technical distinction between the main and feature branches, so developers can edit, stage, and commit changes to a feature branch.
-
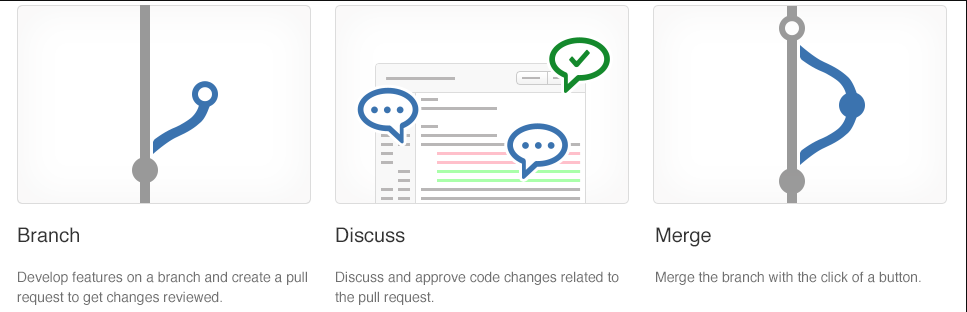
Create a branch When you create a branch in your project, you're creating an environment where you can try out new ideas.
Changes you make on a branch don't affect the main branch, so you're free to experiment and commit changes, safe in the knowledge that your branch won't be merged until it's ready to be reviewed by someone you're collaborating with.
Your branch name should be descriptive (for example, refactor-authentication, user-content-cache-key, make-retina-avatars) so that others can see what is being worked on.
-
Add commits Whenever you add, edit, or delete a file, you're making a commit and adding them to your branch.
This process of adding commits keeps track of your progress as you work on a feature branch.
Commits also create a transparent history of your work that others can follow to understand what you've done and why.
Each commit has an associated commit message, which explains why a particular change was made.
Furthermore, each commit is considered a separate unit of change. It lets you roll back changes if a bug is found or you decide to head in a different direction.
Commit messages are essential, especially since Git tracks your changes and then displays them as commits once pushed to the server.
By writing clear commit messages, you can make it easier for other people to follow along and provide feedback.
-
Open a pull request The Pull Requests start a discussion about your commits. Because they're tightly integrated with the underlying Git repository, anyone can see exactly what changes would be merged if they accept your request.
You can open a Pull Request at any point during the development process when:
- You've little or no code but want to share some screenshots or general ideas.
- You're stuck and need help or advice.
- You're ready for someone to review your work. Using the @mention system in your Pull Request message, you can ask for feedback from specific people or teams.
Pull Requests help contribute to projects and for managing changes to shared repositories.
If you're using a Fork & Pull Model, Pull Requests provide a way to notify project maintainers about the changes you'd like them to consider.
If you're using a Shared Repository Model, Pull Requests help start code review and conversation about proposed changes before they're merged into the main branch.
-
Discuss and review your code
-
Deploy With Git, you can deploy from a branch for final testing in an environment before merging to the main.
Once your pull request has been reviewed and the branch passes your tests, you can deploy your changes to verify them. You can roll it back if your branch causes issues by deploying the existing main.
-
Merge Once your changes have been verified, it's time to merge your code into the main branch.
Once merged, Pull Requests preserve a record of the historical changes to your code. Because they're searchable, they let anyone go back in time to understand why and how a decision was made.
By incorporating specific keywords into the text of your Pull Request, you can associate issues with code. When your Pull Request is merged, the related issues can also close.
This workflow helps organize and track branches focused on business domain feature sets.
Other Git workflows, like the Git Forking Workflow and the Gitflow Workflow, are repo-focused and can use the Git Feature Branch Workflow to manage their branching models.
-
-
Forking workflow The Forking Workflow is fundamentally different than the other workflows.
Instead of using a single server-side repository to act as the "central" codebase, it gives every developer a server-side repository.
It means that each contributor has two Git repositories:
- A private local one.
- A public server-side one
Let's cover the principles of what we suggest:
-
The main branch:
- The main branch is the only way to release anything to production.
- The main branch should always be in a ready-to-release state.
- Protect the main branch with branch policies.
- Any changes to the main branch flow through pull requests only.
- Tag all releases in the main branch with Git tags.
-
The feature branch:
- Use feature branches for all new features and bug fixes.
- Use feature flags to manage long-running feature branches.
- Changes from feature branches to the main only flow through pull requests.
- Name your feature to reflect its purpose.
bugfix/description
features/feature-name
features/feature-area/feature-name
hotfix/description
users/username/description
users/username/workitem-
Pull requests:
- Review and merge code with pull requests.
- Automate what you inspect and validate as part of pull requests.
- Tracks pull request completion duration and set goals to reduce the time it takes.
This module presents pull requests for collaboration and code reviews using Azure DevOps and GitHub mobile for pull request approvals.
It helps understand how pull requests work and how to configure them.
Pull requests let you tell others about changes you've pushed to a GitHub repository.
Once a pull request is sent, interested parties can review the set of changes, discuss potential modifications, and even push follow-up commits if necessary.
Pull requests are commonly used by teams and organizations collaborating using the Shared Repository Model.
Everyone shares a single repository, and topic branches are used to develop features and isolate changes.
Many open-source projects on GitHub use pull requests to manage changes from contributors.
They help provide a way to notify project maintainers about changes one has made.
Also, start code review and general discussion about a set of changes before being merged into the main branch.
Pull requests combine the review and merge of your code into a single collaborative process.
Once you're done fixing a bug or new feature in a branch, create a new pull request.
Add the team members to the pull request so they can review and vote on your changes.
Use pull requests to review works in progress and get early feedback on changes.
There's no commitment to merge the changes as the owner can abandon the pull request at any time.
The common benefits of collaborating with pull requests are:
- Get your code reviewed,
- Give great feedback, and
- Protect branches with policies.
Branch policies give you a set of out-of-the-box policies that can be applied to the branches on the server.
Any changes being pushed to the server branches need to follow these policies before the changes can be accepted.
Policies are a great way to enforce your team's code quality and change-management standards.
The out-of-the-box branch policies include several policies, such as:
- build validation and
- enforcing a merge strategy.
Only focus on the branch policies needed to set up a code-review workflow in this recipe.
-
Open the branches view for the myWebApp Git repository in the parts-unlimited team portal. Select the main branch, and from the pull-down, context menu choose Branch policies
-
In the policies view, It presents out-of-the-box policies. Set the minimum number of reviewers to 1.
The Allow requestors to approve their own changes option allows the submitter to self-approve their changes.
It's OK for mature teams, where branch policies are used as a reminder for the checks that need to be performed by the individual.
- Use the review policy with the comment-resolution policy. It allows you to enforce that the code review comments are resolved before the changes are accepted. The requester can take the feedback from the comment and create a new work item and resolve the changes. It at least guarantees that code review comments aren't lost with the acceptance of the code into the main branch:
This module examines technical debt, complexity, quality metrics, and plans for effective code reviews and code quality validation.
There are five key traits to measure for higher quality.
- Reliability
- measures the probability that a system will run without failure over a specific period of operation.
- It relates to the number of defects and availability of the software.
- Several defects can be measured by running a static analysis tool. Software availability can be measured using the mean time between failures (MTBF).
Low defect counts are crucial for developing a reliable codebase.
-
Maintainability
- measures how easily software can be maintained. It relates to the codebase's size, consistency, structure, and complexity. Ensuring maintainable source code relies on several factors, such as testability and understandability. Some metrics you may consider to improve maintainability are the number of stylistic warni ngs and Halstead complexity measures. Both automation and human reviewers are essential for developing maintainable codebases.
-
Testability
- Testability measures how well the software supports testing efforts.
- It relies on how well you can control, observe, isolate, and automate testing, among other factors.
- can be measured based on how many test cases you need to find potential faults in the system.
- The size and complexity of the software can impact testability.
- applying methods at the code level such as cyclomatic complexity can help you improve the testability of the component.
-
Portability
- measures how usable the same software is in different environments. It relates to platform independence.
- There are several ways you can ensure portable code.
- It's essential to regularly test code on different platforms rather than waiting until the end of development.
- It's also good to:
- set your compiler warning levels as high as possible and
- use at least two compilers.
- Enforcing a coding standard also helps with portability.
-
Reusability
- measures whether existing assets—such as code—can be used again.
- Assets are more easily reused if they have modularity or loose coupling characteristics.
- The number of interdependencies can measure reusability.
- Running a static analyzer can help you identify these interdependencies.
Complexity metrics can help in measuring quality.
Another way to understand quality is through calculating Halstead complexity measures.
Cyclomatic complexity measures the number of linearly independent paths through a program's source code.
This measure:
- Program vocabulary.
- Program length.
- Calculated program length.
- Volume.
- Difficulty.
- Effort.
The following is a list of metrics that directly relate to the quality of the code being produced and the build and deployment processes.
- Failed builds percentage - Overall, what percentage of builds are failing?
- Failed deployments percentage - Overall, what percentage of deployments are failing?
- Ticket volume - What is the overall volume of customer or bug tickets?
- Bug bounce percentage - What percentage of customer or bug tickets are reopened?
- Unplanned work percentage - What percentage of the overall work is unplanned?
Technical debt is a term that describes the future cost that will be incurred by choosing an easy solution today instead of using better practices because they would take longer to complete.
So, how does it happen?
The most common excuse is tight deadlines.
There are many causes. For example, there might be a lack of technical skills and maturity among the developers or no clear product ownership or direction.
The organization might not have coding standards at all. So, the developers didn't even know what they should be producing. The developers might not have precise requirements to target. They might be subject to last-minute requirement changes.
Necessary-refactoring work might be delayed. There might not be any code quality testing, manual or automated. In the end, it just makes it harder and harder to deliver value to customers in a reasonable time frame and at a reasonable cost.
- Lack of coding style and standards.
- Lack of or poor design of unit test cases.
- Ignoring or not understanding object oriented design principles.
- Monolithic classes and code libraries.
- Poorly envisioned the use of technology, architecture, and approach. (Forgetting that all system attributes, affecting maintenance, user experience, scalability, and others, need to be considered).
- Over-engineering code (adding or creating code that isn't required, adding custom code when existing libraries are sufficient, or creating layers or components that aren't needed).
- Insufficient comments and documentation.
- Not writing self-documenting code (including class, method, and variable names that are descriptive or indicate intent). Taking shortcuts to meet deadlines. Leaving dead code in place.
One key way to minimize the constant acquisition of technical debt is to use automated testing and assessment.
Look at one of the common tools used to assess the debt: SonarCloud.
-
For .NET developers, a common tool is NDepend. NDepend is a Visual Studio extension that assesses the amount of technical debt a developer has added during a recent development period, typically in the last hour.
-
NDepend lets you create code rules expressed as C# LINQ queries, but it has many built-in rules that detect a wide range of code smells.
-
Resharper Code Quality Analysis Resharper can make a code quality analysis from the command line. Also, be set to fail builds when code quality issues are found automatically.
Rules can be configured for enforcement across teams.
The organizational culture must let all involved feel that the code reviews are more like mentoring sessions where ideas about improving code are shared than interrogation sessions where the aim is to identify problems and blame the author.
The knowledge-sharing that can occur in mentoring-style sessions can be one of the most important outcomes of the code review process. It often happens best in small groups (even two people) rather than in large team meetings. And it's important to highlight what has been done well, not just what needs improvement.
This module describes Git hooks and their usage during the development process, implementation, and behavior.
Git hooks are a mechanism that allows code to be run before or after certain Git lifecycle events.
For example, one could hook into the commit-msg event to validate that the commit message structure follows the recommended format.
The hooks can be any executable code, including shell, PowerShell, Python, or other scripts. Or they may be a binary executable. Anything goes!
The only criteria are that hooks must be stored in the .git/hooks folder in the repo root. Also, they must be named to match the related events (Git 2.x):
- applypatch-msg
- pre-applypatch
- post-applypatch
- pre-commit
- prepare-commit-msg
- commit-msg
- post-commit
- pre-rebase
- post-checkout
- post-merge
- pre-receive
- update
- post-receive
- post-update
- pre-auto-gc
- post-rewrite
- pre-push
Some examples of where you can use hooks to enforce policies, ensure consistency, and control your environment:
- In Enforcing preconditions for merging
- Verifying work Item ID association in your commit message
- Preventing you & your team from committing faulty code
- Sending notifications to your team's chat room (Teams, Slack, HipChat, etc.)
Let's start by exploring client-side Git hooks. Navigate to the repo .git\hooks directory – you'll find that there are a bunch of samples, but they're disabled by default.
Note If you open that folder, you'll find a file called precommit.sample. To enable it, rename it to pre-commit by removing the .sample extension and making the script executable.
The script is found and executed when you attempt to commit using git commit. You commit successfully if your pre-commit script exits with a 0 (zero). Otherwise, the commit fails. If you're using Windows, simply renaming the file won't work.
Git will fail to find the shell in the chosen path specified in the script.
The problem is lurking in the first line of the script, the shebang declaration:
#!/bin/sh
On Unix-like OSs, the #! Tells the program loader that it's a script to be interpreted, and /bin/sh is the path to the interpreter you want to use, sh in this case.
Windows isn't a Unix-like OS. Git for Windows supports Bash commands and shell scripts via Cygwin.
By default, what does it find when it looks for sh.exe at /bin/sh?
Nothing, nothing at all. Fix it by providing the path to the sh executable on your system. It's using the 64-bit version of Git for Windows, so the baseline looks like this:
#!C:/Program\ Files/Git/usr/bin/sh.exe
How could Git hooks stop you from accidentally leaking Amazon AWS access keys to GitHub?
You can invoke a script at pre-commit.
Using Git hooks to scan the increment of code being committed into your local repository for specific keywords:
Replace the code in this pre-commit shell file with the following code.
#!C:/Program\ Files/Git/usr/bin/sh.exe
matches=$(git diff-index --patch HEAD | grep '^+' | grep -Pi 'password|keyword2|keyword3')
if [ ! -z "$matches" ]
then
cat <<\EOT
Error: Words from the blocked list were present in the diff:
EOT
echo $matches
exit 1
fi
You don't have to build the complete keyword scan list in this script.
You can branch off to a different file by referring to it here to encrypt or scramble if you want to.
The Git diff-index identifies the code increment committed in the script. This increment is then compared against the list of specified keywords. If any matches are found, an error is raised to block the commit; the script returns an error message with the list of matches. The pre-commit script doesn't return 0 (zero), which means the commit fails.
The repo .git\hooks folder isn't committed into source control. You may wonder how you share the goodness of the automated scripts you create with the team.
The good news is that, from Git version 2.9, you can now map Git hooks to a folder that can be committed into source control.
You could do that by updating the global settings configuration for your Git repository:
Git config --global core.hooksPath '~/.githooks'
If you ever need to overwrite the Git hooks you have set up on the client-side, you can do so by using the no-verify switch:
Git commit --no-verify
So far, we've looked at the client-side Git Hooks on Windows. Azure Repos also exposes server-side hooks. Azure DevOps uses the exact mechanism itself to create Pull requests. You can read more about it at the Server hooks event reference.
This module explains how to use Git to foster inner sources across the organization, implement Fork and its workflows.
The fork-based pull request workflow is popular with open-source projects because it allows anybody to contribute to a project.
You don't need to be an existing contributor or write access to a project to offer your changes.
This workflow isn't just for open source: forks also help support inner source workflows within your company.
Before forks, you could contribute to a project-using Pull Requests.
The workflow is simple enough:
- push a new branch up to your repository,
- open a pull request to get a code review from your team, and
- have Azure Repos evaluate your branch policies.
- You can click one button to merge your pull request into main and deploy when your code is approved.
This workflow is great for working on your projects with your team. But what if you notice a simple bug in a different project within your company and you want to fix it yourself?
What if you're going to add a feature to a project that you use, but another team develops?
It's where forks come in; forks are at the heart of inner source practices.
Inner source – sometimes called internal open source – brings all the benefits of open-source software development inside your firewall.
It opens your software development processes so that your developers can easily collaborate on projects across your company.
It uses the same processes that are popular throughout the open-source software communities.
But it keeps your code safe and secure within your organization.
Microsoft uses the inner source approach heavily.
As part of the efforts to standardize a one-engineering system throughout the company – backed by Azure Repos – Microsoft has also opened the source code to all our projects to everyone within the company.
Before the move to the inner source, Microsoft was "siloed": only engineers working on Windows could read the Windows source code.
Only developers working on Office could look at the Office source code.
So, if you're an engineer working on Visual Studio and you thought that you found a bug in Windows or Office – or wanted to add a new feature – you're out of luck.
But by moving to offer inner sources throughout the company, powered by Azure Repos, it's easy to fork a repository to contribute back.
As an individual making the change, you don't need to write access to the original repository, just the ability to read it and create a fork.
A fork is a complete copy of a repository, including all files, commits, and (optionally) branches. Fork
- allows you to experiment with changes without affecting the original project freely.
- are used to propose changes to someone else's project. Or use someone else's project as a starting point for your idea.
- are a great way to support an Inner Source workflow You can create a fork to suggest changes when you don't have permission to write to the original project directly. Once you're ready to share those changes, it's easy to contribute them back-using pull requests.
A fork starts with all the contents of its upstream (original) repository.
You can include all branches or limit them to only the default branch when you create a fork.
None of the permissions, policies, or build pipelines are applied.
The new fork acts as if someone cloned the original repository, then pushed it to a new, empty repository.
After a fork has been created, new files, folders, and branches aren't shared between the repositories unless a Pull Request (PR) carries them along.
You can create PRs in either direction:
- from fork to upstream or
- upstream to fork.
The most common approach will be from fork to upstream.
The destination repository's permissions, policies, builds, and work items will apply to the PR.
For a small team (2-5 developers), we recommend working in a single repo.
Everyone should work in a topic branch, and the main should be protected with branch policies.
As your team grows more significant, you may find yourself outgrowing this arrangement and prefer to switch to a forking workflow.
We recommend the forking workflow if your repository has many casual or infrequent committees (like an open-source project).
Typically, only core contributors to your project have direct commit rights into your repository.
It would help if you asked collaborators from outside this core set of people to work from a fork of the repository.
Also, it will isolate their changes from yours until you've had a chance to vet the work.
- Create a fork.
- Clone it locally.
- Make your changes locally and push them to a branch.
- Create and complete a PR to upstream. Sync your fork to the latest from upstream.
- Navigate to the repository to fork and choose fork.
- Specify a name and choose the project where you want the fork to be created. If the repository contains many topic branches, we recommend you fork only the default branch.
- Choose the ellipsis, then Fork to create the fork.
Note You must have the Create Repository permission in your chosen project to create a fork. We recommend you create a dedicated project for forks where all contributors have the Create Repository permission. For an example of granting this permission, see Set Git repository permissions.
Once your fork is ready, clone it using the command line or an IDE like Visual Studio. The fork will be your origin remote.
For convenience, after cloning, you'll want to add the upstream repository (where you forked from) as a remote named upstream.
git remote add upstream {upstream_url}
It's possible to work directly in main - after all, this fork is your copy of the repo.
We recommend you still work in a topic branch, though.
It allows you to maintain multiple independent workstreams simultaneously.
Also, it reduces confusion later when you want to sync changes into your fork.
Make and commit your changes as you normally would. When you're done with the changes, push them to origin (your fork).
Important Anyone with the Read permission can open a PR to upstream. If a PR build pipeline is configured, the build will run against the code introduced in the fork.
When you've gotten your PR accepted into upstream, you'll want to make sure your fork reflects the latest state of the repo.
We recommend rebasing on upstream's main branch (assuming main is the main development branch).
git fetch upstream main
git rebase upstream/main
git push origin
The forking workflow lets you isolate changes from the main repository until you're ready to integrate them. When you're ready, integrating code is as easy as completing a pull request.
People fork repositories when they want to change the code in a repository that they don't have write access to.
You may find a better way of implementing the solution or enhancing the functionality by contributing to or improving an existing feature.
You can fork repositories in the following situations:
- I want to make a change.
- I think the project is exciting and may want to use it in the future.
- I want to use some code in that repository as a starting point for my project. Software teams are encouraged to contribute to all projects internally, not just their software projects.
Forks are a great way to foster a culture of inner open source.
This module explores how to work with large repositories, purge repository data and manage and automate release notes using GitHub.
While having a local copy of repositories in a distributed version control system is functional, that can be a significant problem when large repositories are in place.
There are two primary causes for large repositories:
- Long history
- Large binary files
If developers don't need all the available history in their local repositories, a good option is to implement a shallow clone.
It saves both space on local development systems and the time it takes to sync.
You can specify the depth of the clone that you want to execute:
git clone --depth [depth] [clone-url]
You can also reduce clones by filtering branches or cloning only a single branch.
VFS for Git helps with large repositories. It requires a Git LFS client.
Typical Git commands are unaffected, but the Git LFS works with the standard filesystem to download necessary files in the background when you need files from the server.
The Git LFS client was released as open-source. The protocol is a straightforward one with four endpoints similar to REST endpoints.
Scalar is a .NET Core application available for Windows and macOS. With tools and extensions for Git to allow very large repositories to maximize your Git command performance. Microsoft uses it for Windows and Office repositories.
If Azure Repos hosts your repository, you can clone a repository using the GVFS protocol.
It achieves by enabling some advanced Git features, such as:
- Partial clone: reduces time to get a working repository by not downloading all Git objects right away.
- Background prefetch: downloads Git object data from all remotes every hour, reducing the time for foreground git fetch calls.
- Sparse-checkout: limits the size of your working directory.
- File system monitor: tracks the recently modified files and eliminates the need for Git to scan the entire work tree.
- Commit-graph: accelerates commit walks and reachability calculations, speeding up commands like git log.
- Multi-pack-index: enables fast object lookups across many pack files.
- Incremental repack: Repacks the packed Git data into fewer pack files without disrupting concurrent commands using the multi-pack-index.
While one of the benefits of Git is its ability to hold long histories for repositories efficiently, there are times when you need to purge data.
The most common situations are where you want to:
-
Significantly reduce the size of a repository by removing history.
-
Remove a large file that was accidentally uploaded.
-
Remove a sensitive file that shouldn't have been uploaded. If you commit sensitive data (for example, password, key) to Git, it can be removed from history. Two tools are commonly used:
-
git filter-repo tool The git filter-repo is a tool for rewriting history. Its core filter-repo contains a library for creating history rewriting tools. Users with specialized needs can quickly create entirely new history rewriting tools.
-
BFG Repo-Cleaner BFG Repo-Cleaner is a commonly used open-source tool for deleting or "fixing" content in repositories. It's easier to use than the git filter-branch command. For a single file or set of files, use the --delete-files option:
$ bfg --delete-files file_I_should_not_have_committedThe following bash shows how to find all the places that a file called passwords.txt exists in the repository. Also, to replace all the text in it, you can execute the --replace-text option:$ bfg --replace-text passwords.txt
In the following modules, you'll see details about deploying a piece of software after packaging your code, binary files, release notes, and related tasks.
Releases in GitHub are based on Git tags. You can think of a tag as a photo of your repository's current state. If you need to mark an essential phase of your code or your following deliverable code is done, you can create a tag and use it during the build and release process to package and deploy that specific version. For more information, see Viewing your repository's releases and tags.
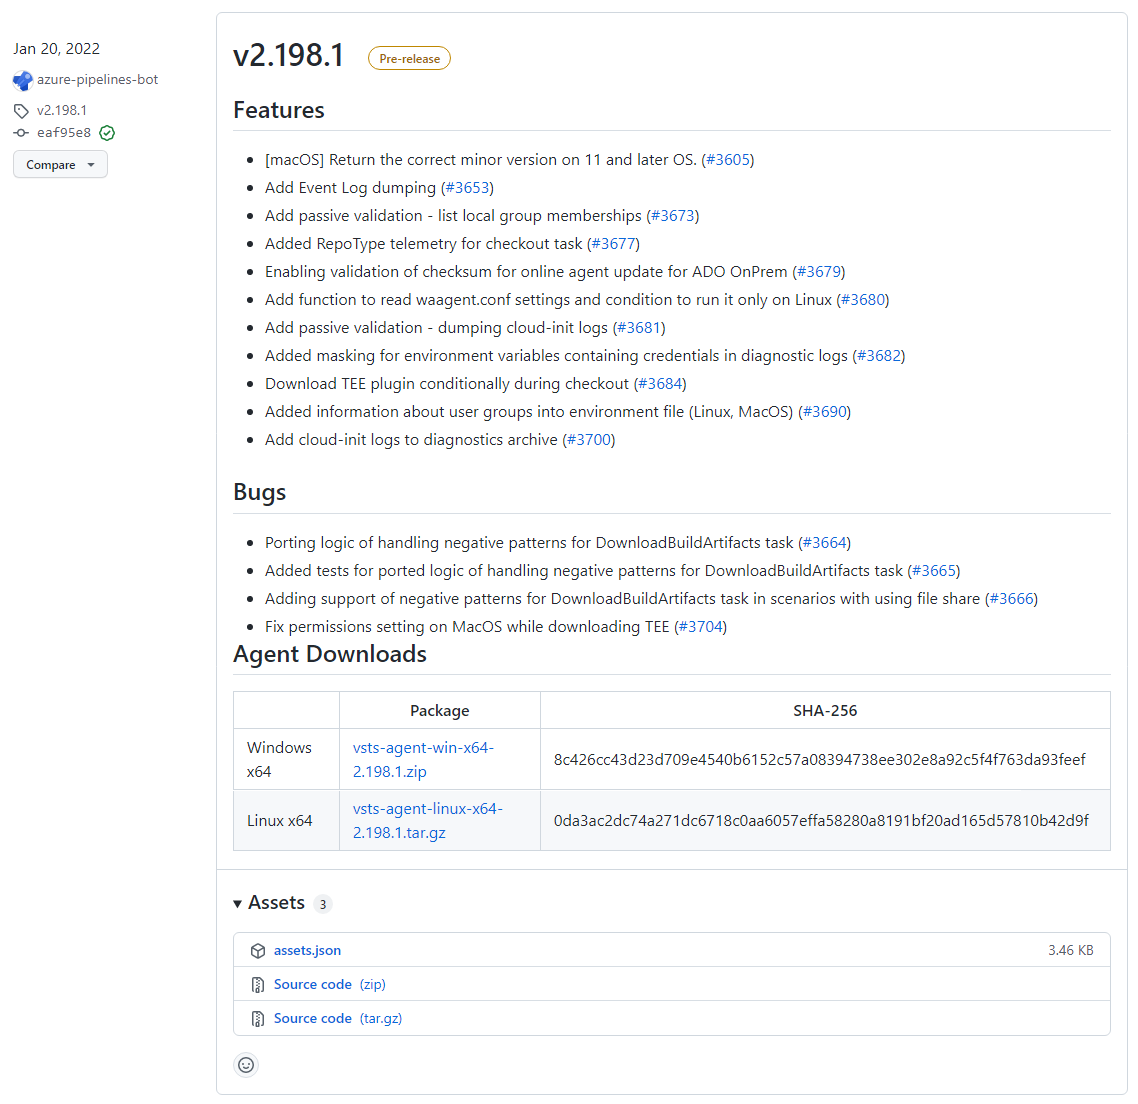
Also, you can:
- Publish an action from a specific release in GitHub Marketplace.
- Choose whether Git LFS objects are included in the ZIP files and tarballs GitHub creates for each release.
- Receive notifications when new releases are published in a repository.
To create a release, use the gh release create command.
Replace the tag with the desired tag name for the release and follow the interactive prompts.
gh release create tag
To create a prerelease with the specified title and notes
gh release create v1.2.1 --title
You can't edit Releases with GitHub CLI.
To edit, use the Web Browser:
- Navigate to the main repository page on GitHub.com.
- Click Releases to the right of the list of files.
- Click on the edit icon on the right side of the page, next to the release you want to edit.
- Edit the details for the release, then click Update release.
To delete a release, use the following command, replace the tag with the release tag to delete, and use the -y flag to skip confirmation.
gh release delete tag -y
After learning how to create and manage release tags in your repository, you'll learn how to configure the automatically generated release notes template from your GitHub releases.
You can generate an overview of the contents of a release, and you can also customize your automated release notes.
It's possible to use labels to create custom categories to organize pull requests you want to include or exclude specific labels and users from appearing in the output.
While configuring your release, you'll see the option Auto-generate release notes to include all changes between your tag and the last release. If you never created a release, it will consist of all changes from your repository.
Configuring automatically generated release notes template You can customize the auto-generate release notes template by using the following steps.
- Navigate to your repository and create a new file.
- You can use the name .github/release.yml to create the release.yml file in the .github directory.
- Specify in YAML the pull request labels and authors you want to exclude from this release. You can also create new categories and list the pull request labels in each. For more information about configuration options, see Automatically generated release notes - GitHub Docs.
Example configuration:
# .github/release.yml

changelog:
  exclude:
    labels:
    - ignore-for-release
    authors:
    - octocat
  categories:
    - title: Breaking Changes 🛠
      labels:
        - Semver-Major
        - breaking-change
    - title: Exciting New Features 🎉
      labels:
        - Semver-Minor
        - enhancement
    - title: Other Changes
      labels:
- *- Commit your new file.
- Try to create a new release and click + Auto-generate release notes to see the template structure.
Which of the following choices is the built-in Git command for removing files from the repository? Correct. git filter-branch command.
This module explored how to work with large repositories and purge repository data.
You learned how to describe the benefits and usage of:
- Understand large Git repositories.
- Explain Git Virtual File System (GVFS).
- Use Git Large File Storage (LFS).
- Purge repository data.
This module introduces Azure Pipelines concepts and explains key terms and components of the tool, helping you decide your pipeline strategy and responsibilities.
The core pipeline idea is to create a repeatable, reliable, and incrementally improving process.
Azure Pipelines is a fully featured service used to create cross-platform CI and CD
The core idea is to create a repeatable, reliable, and incrementally-improving process for taking software from concept to customer.
The goal is to enable a constant flow of changes into production via an automated software production line.
Think of it as a pipeline. The pipeline breaks down the software delivery process into stages.
Each stage aims to verify the quality of new features from a different angle to validate the new functionality and prevent errors from affecting your users.
The pipeline should provide feedback to the team. Also, visibility into the changes flows to everyone involved in delivering the new feature(s).
A delivery pipeline enables the flow of more minor changes more frequently, with a focus on flow.
Your teams can concentrate on optimizing the delivery of changes that bring quantifiable value to the business.
This approach leads teams to continuously monitor and learn where they're finding obstacles, resolve those issues, and gradually improve the pipeline's flow.
As the process continues, the feedback loop provides new insights into new issues and barriers to be resolved.
The pipeline is the focus of your continuous improvement loop.
A typical pipeline will include the following stages:
- build automation and continuous integration,
- test automation, and deployment automation.
The pipeline starts by building the binaries to create the deliverables passed to the following stages. New features implemented by the developers are integrated into the central code base, built, and unit tested. It's the most direct feedback cycle that informs the development team about the health of their application code.
The new version of an application is rigorously tested throughout this stage to ensure that it meets all wished system qualities. It's crucial that all relevant aspects—whether functionality, security, performance, or compliance—are verified by the pipeline. The stage may involve different types of automated or (initially, at least) manual activities.
A deployment is required every time the application is installed in an environment for testing, but the most critical moment for deployment automation is rollout time.
Since the preceding stages have verified the overall quality of the system, It's a low-risk step.
The deployment can be staged, with the new version being initially released to a subset of the production environment and monitored before being rolled out.
The deployment is automated, allowing for the reliable delivery of new functionality to users within minutes if needed.
The deployment pipeline is supported by platform provisioning and system configuration management. It allows teams to create, maintain, and tear down complete environments automatically or at the push of a button.
Automated platform provisioning ensures that your candidate applications are deployed to, and tests carried out against correctly configured and reproducible environments.
It also helps horizontal scalability and allows the business to try out new products in a sandbox environment at any time.
The multiple stages in a deployment pipeline involve different groups of people collaborating and supervising the release of the new version of your application.
Release and pipeline orchestration provide a top-level view of the entire pipeline, allowing you to define and control the stages and gain insight into the overall software delivery process.
By carrying out value stream mappings on your releases, you can
- highlight any remaining inefficiencies and hot spots and
- pinpoint opportunities to improve your pipeline.
These automated pipelines need infrastructure to run on. The efficiency of this infrastructure will have a direct impact on the effectiveness of the pipeline.
Azure Pipelines is a cloud service that automatically builds and tests your code project and makes it available to other users. It works with just about any language or project type.
Azure Pipelines combines continuous integration (CI) and continuous delivery (CD) to test and build your code and ship it to any target constantly and consistently.
Azure Pipelines is a fully featured cross-platform CI and CD service. It works with your preferred Git provider and can deploy to most major cloud services, including Azure services.
You can use many languages with Azure Pipelines, such as Python, Java, PHP, Ruby, C#, and Go.
Before you use continuous integration and continuous delivery practices for your applications, you must have your source code in a version control system. Azure Pipelines integrates with GitHub, GitLab, Azure Repos, Bitbucket, and Subversion.
You can use Azure Pipelines with most application types, such as Java, JavaScript, Python, .NET, PHP, Go, XCode, and C++.
Use Azure Pipelines to deploy your code to multiple targets. Targets including:
- Container registries.
- Virtual machines.
- Azure services, or any on-premises or cloud target such:
- Microsoft Azure.
- Google Cloud.
- Amazon Web Services (AWS).
To produce packages that others can consume, you can publish NuGet, npm, or Maven packages to the built-in package management repository in Azure Pipelines.
You also can use any other package management repository of your choice.
Implementing CI and CD pipelines help to ensure consistent and quality code that's readily available to users.
Azure Pipelines is a quick, easy, and safe way to automate building your projects and making them available to users.
Continuous integration is used to automate tests and builds for your project. It is the practice used by development teams to simplify the testing and building of code. CI helps to catch bugs or issues early in the development cycle when they're easier and faster to fix. Automated tests and builds are run as part of the CI process. The process can run on a schedule, whenever code is pushed, or both. Items known as artifacts are produced from CI systems. The continuous delivery release pipelines use them to drive automatic deployments.
Continuous delivery is used to automatically deploy and test code in multiple stages to help drive quality. It is a process by which code is built, tested, and deployed to one or more test and production stages. Deploying and testing in multiple stages helps drive quality. Continuous integration systems produce deployable artifacts, which include infrastructure and apps. Automated release pipelines consume these artifacts to release new versions and fixes to the target of your choice. Monitoring and alerting systems constantly run to drive visibility into the entire CD process. This process ensures that errors are caught often and early.
| Continuous integration (CI) | Continuous delivery (CD) |
|---|
Increase code coverage. | Automatically deploy code to production.
Build faster by splitting test and build runs. | Ensure deployment targets have the latest code.
Automatically ensure you don't ship broken code. | Use tested code from the CI process.
Run tests continually. | ''
There are several reasons to use Azure Pipelines for your CI and CD solution. You can use it to:
- Work with any language or platform.
- Deploy to different types of targets at the same time.
- Integrate with Azure deployments.
- Build on Windows, Linux, or macOS machines.
- Integrate with GitHub.
- Work with open-source projects.
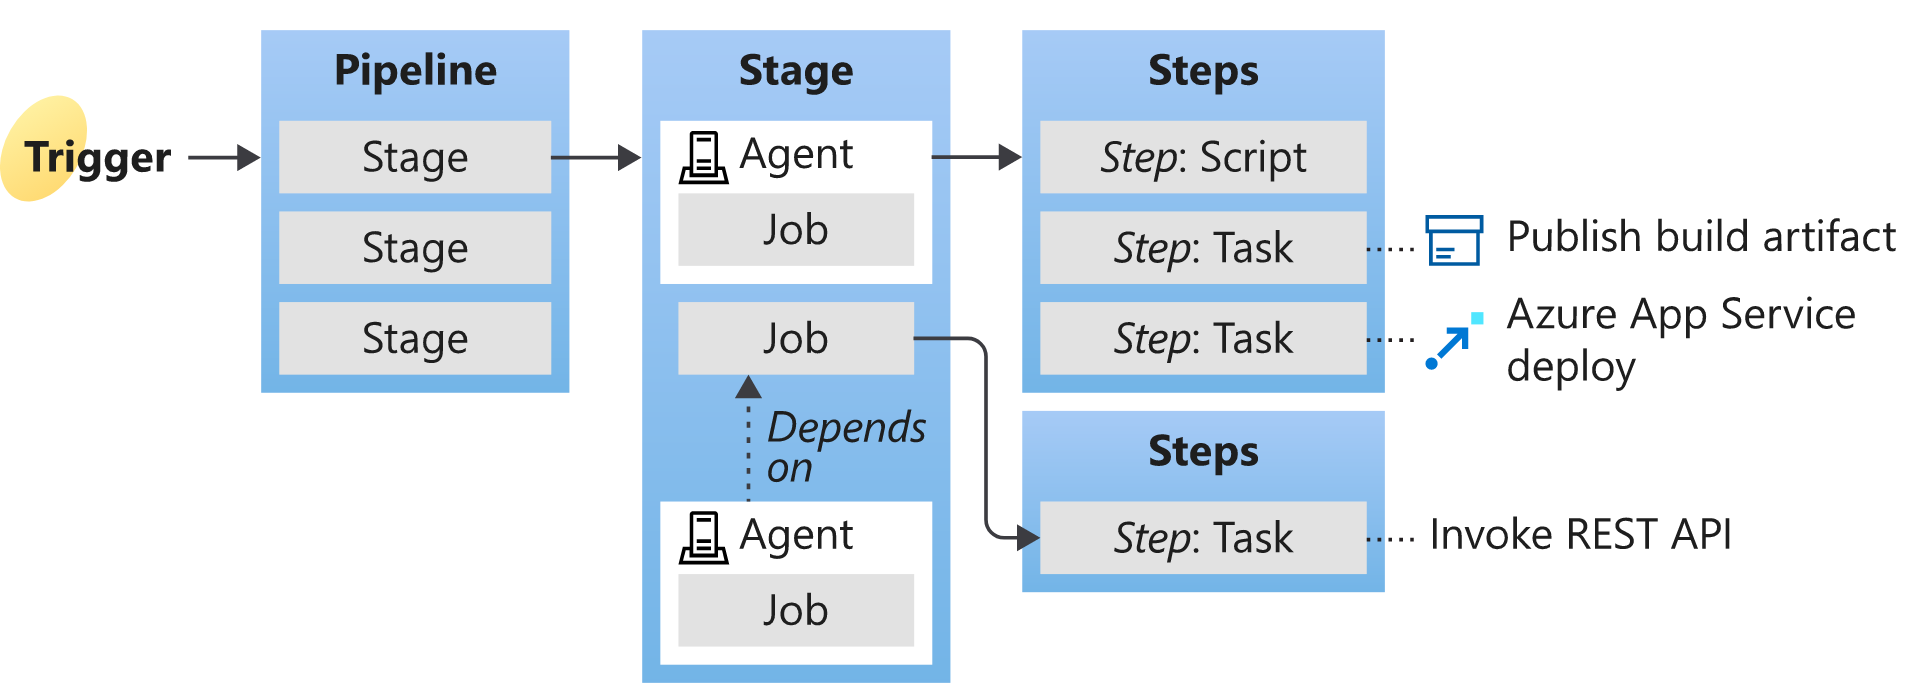
-
Agent When your build or deployment runs, the system begins one or more jobs. An agent is installable software that runs a build or deployment job.
-
Artifact An artifact is a collection of files or packages published by a build. Artifacts are made available for the tasks, such as distribution or deployment.
-
Build A build represents one execution of a pipeline. It collects the logs associated with running the steps and the test results.
-
Deployment target A deployment target is a virtual machine, container, web app, or any service used to host the developed application. A pipeline might deploy the app to one or more deployment targets after the build is completed and tests are run.
-
Job A build contains one or more jobs. Most jobs run on an agent. A job represents an execution boundary of a set of steps. All the steps run together on the same agent. For example, you might build two configurations - x86 and x64. In this case, you have one build and two jobs.
-
Pipeline A pipeline defines the continuous integration and deployment process for your app. It's made up of steps called tasks.
It can be thought of as a script that describes how your test, build, and deployment steps are run.
-
Release When you use the visual designer, you can create a release or a build pipeline. A release is a term used to describe one execution of a release pipeline. It's made up of deployments to multiple stages.
-
Stage Stages are the primary divisions in a pipeline: "build the app," "run integration tests," and "deploy to user acceptance testing" are good examples of stages.
-
Task A task is the building block of a pipeline. For example, a build pipeline might consist of
- build and
- test tasks. A release pipeline consists of deployment tasks. Each task runs a specific job in the pipeline.
-
Trigger A trigger is set up to tell the pipeline when to run. You can configure a pipeline to run upon:
- a push to a repository at scheduled times or,
- completing another build. All these actions are known as triggers.
This module explores differences between Microsoft-hosted and self-hosted agents, detail job types, and introduces agent pools configuration. You will understand typical situations to use agent pools and how to manage its security. Also, it explores communication to deploy using Azure Pipelines to target servers.
To build your code or deploy your software, you generally need at least one agent.
As you add more code and people, you'll eventually need more.
When your build or deployment runs, the system begins one or more jobs.
An agent is an installable software that runs one build or deployment job at a time.
If your pipelines are in Azure Pipelines, then you've got a convenient option to build and deploy using a Microsoft-hosted agent.
With a Microsoft-hosted agent, maintenance and upgrades are automatically done.
Each time a pipeline is run, a new virtual machine (instance) is provided. The virtual machine is discarded after one use.
For many teams, this is the simplest way to build and deploy.
You can try it first and see if it works for your build or deployment. If not, you can use a self-hosted agent.
A Microsoft-hosted agent has job time limits.
An agent that you set up and manage on your own to run build and deployment jobs is a self-hosted agent.
You can use a self-hosted agent in Azure Pipelines. A self-hosted agent gives you more control to install dependent software needed for your builds and deployments.
You can install the agent on:
- Linux.
- macOS.
- Windows.
- Linux Docker containers. After you've installed the agent on a machine, you can install any other software on that machine as required by your build or deployment jobs.
A self-hosted agent doesn't have job time limits.
In Azure DevOps, there are four types of jobs available:
- Agent pool jobs. The most common types of jobs. The jobs run on an agent that is part of an agent pool.
- Container jobs. Similar jobs to Agent Pool Jobs run in a container on an agent part of an agent pool.
- Deployment group jobs. Jobs that run on systems in a deployment group.
- Agentless jobs. Jobs that run directly on the Azure DevOps. They don't require an agent for execution. It's also-often-called Server Jobs.
Instead of managing each agent individually, you organize agents into agent pools. An agent pool defines the sharing boundary for all agents in that pool.
In Azure Pipelines, pools are scoped to the entire organization so that you can share the agent machines across projects.
If you create an Agent pool for a specific project, only that project can use the pool until you add the project pool into another project.
When creating a build or release pipeline, you can specify which pool it uses, organization, or project scope.
To share an agent pool with multiple projects, use an organization scope agent pool and add them in each of those projects, add an existing agent pool, and choose the organization agent pool. If you create a new agent pool, you can automatically grant access permission to all pipelines.
Azure Pipelines provides a pre-defined agent pool-named Azure Pipelines with Microsoft-hosted agents.
It will often be an easy way to run jobs without configuring build infrastructure.
The following virtual machine images are provided by default:
- Windows Server 2022 with Visual Studio 2022.
- Windows Server 2019 with Visual Studio 2019.
- Ubuntu 20.04.
- Ubuntu 18.04.
- macOS 11 Big Sur.
- macOS X Catalina 10.15. By default, all contributors in a project are members of the User role on each hosted pool.
It allows every contributor to the author and runs build and release pipelines using a Microsoft-hosted pool.
Pools are used to run jobs.
If you've got many agents intended for different teams or purposes, you might want to create more pools, as explained below.
Here are some typical situations when you might want to create agent pools:
-
You're a project member, and you want to use a set of machines your team owns for running build and deployment jobs.
- First, make sure you're a member of a group in All Pools with the Administrator role.
- Next, create a New project agent pool in your project settings and select the option to Create a new organization agent pool. As a result, both an organization and project-level agent pool will be created.
- Finally, install and configure agents to be part of that agent pool.
-
You're a member of the infrastructure team and would like to set up a pool of agents for use in all projects.
- First, make sure you're a member of a group in All Pools with the Administrator role.
- Next, create a New organization agent pool in your admin settings and select Autoprovision corresponding project agent pools in all projects while creating the pool. This setting ensures all projects have a pool pointing to the organization agent pool. The system creates a pool for existing projects, and in the future, it will do so whenever a new project is created.
- Finally, install and configure agents to be part of that agent pool.
-
You want to share a set of agent machines with multiple projects, but not all of them.
- First, create a project agent pool in one of the projects and select the option to Create a new organization agent pool while creating that pool.
- Next, go to each of the other projects, and create a pool in each of them while selecting the option to Use an existing organization agent pool.
- Finally, install and configure agents to be part of the shared agent pool.
The agent communicates with Azure Pipelines to determine which job it needs to run and report the logs and job status.
The agent always starts this communication. All the messages from the agent to Azure Pipelines over HTTPS, depending on how you configure the agent.
This pull model allows the agent to be configured in different topologies, as shown below.
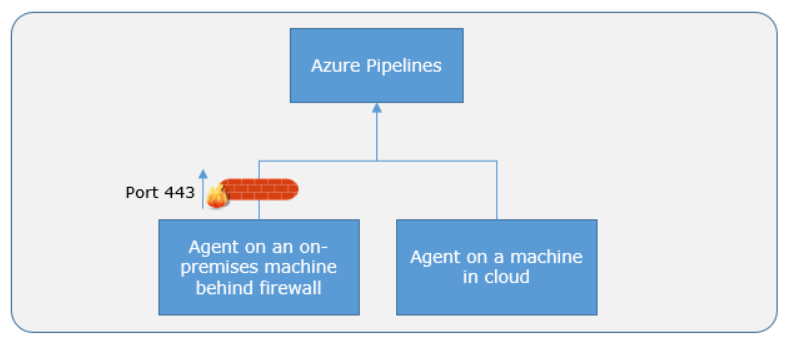
Here's a standard communication pattern between the agent and Azure Pipelines.
The user registers an agent with Azure Pipelines by adding it to an agent pool. You've to be an agent pool administrator to register an agent in that pool. The identity of the agent pool administrator is needed only at the time of registration. It isn't persisted on the agent, nor is it used to communicate further between the agent and Azure Pipelines.
Once the registration is complete, the agent downloads a listener OAuth token and uses it to listen to the job queue.
Periodically, the agent checks to see if a new job request has been posted in the job queue in Azure Pipelines. The agent downloads the job and a job-specific OAuth token when a job is available. This token is generated by Azure Pipelines for the scoped identity specified in the pipeline. That token is short-lived and is used by the agent to access resources (for example, source code) or modify resources (for example, upload test results) on Azure Pipelines within that job.
Once the job is completed, the agent discards the job-specific OAuth token and checks if there's a new job request using the listener OAuth token.
The payload of the messages exchanged between the agent, and Azure Pipelines are secured using asymmetric encryption. Each agent has a public-private key pair, and the public key is exchanged with the server during registration.
The server uses the public key to encrypt the job's payload before sending it to the agent. The agent decrypts the job content using its private key. Secrets stored in build pipelines, release pipelines, or variable groups are secured when exchanged with the agent.
When you use the agent to deploy artifacts to a set of servers, it must-have "line of sight" connectivity to those servers.
The Microsoft-hosted agent pools, by default, have connectivity to Azure websites and servers running in Azure.
Suppose your on-premises environments don't have connectivity to a Microsoft-hosted agent pool (because of intermediate firewalls). In that case, you'll need to manually configure a self-hosted agent on the on-premises computer(s).
The agents must have connectivity to the target on-premises environments and access to the Internet to connect to Azure Pipelines or Azure DevOps Server, as shown in the following diagram.
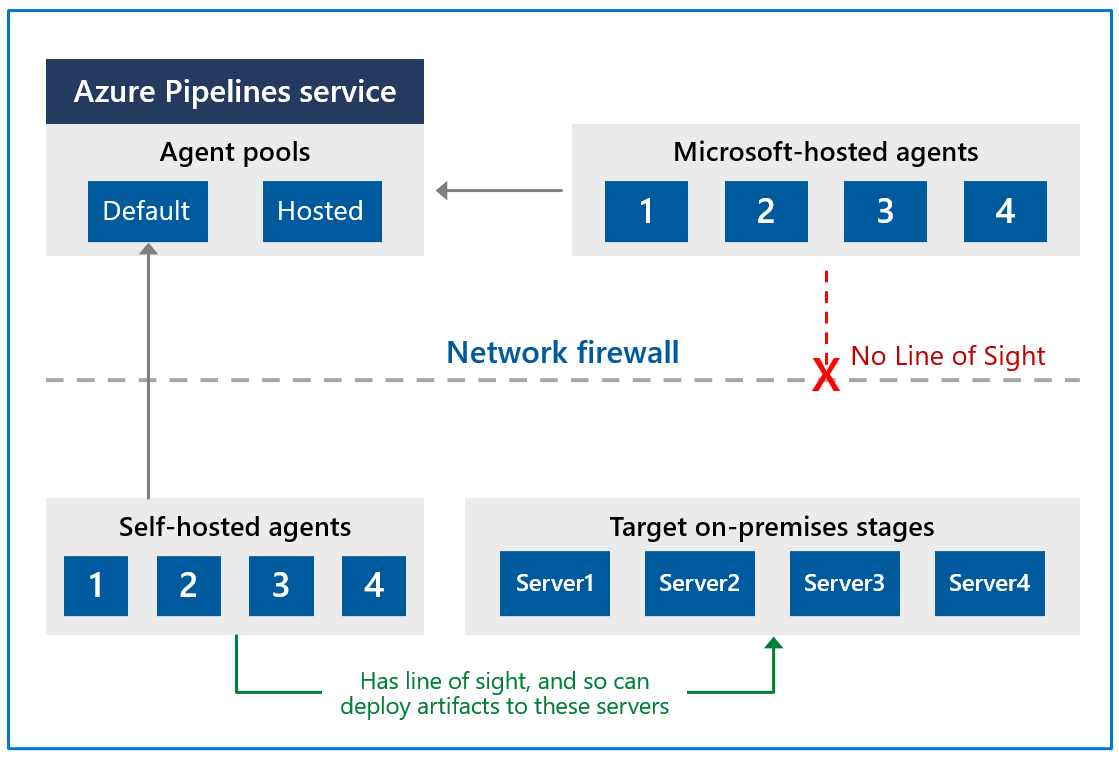
To register an agent, you need to be a member of the administrator role in the agent pool.
The identity of the agent pool administrator is only required at the time of registration. It's not persisted on the agent and isn't used in any following communication between the agent and Azure Pipelines.
Also, you must be a local administrator on the server to configure the agent.
Your agent can authenticate to Azure DevOps using one of the following methods:
- Personal access token (PAT)
Generate and use a PAT to connect an agent with Azure Pipelines. PAT is the only scheme that works with Azure Pipelines. Also, as explained above, this PAT is used only when registering the agent and not for succeeding communication.
-Interactive versus service You can run your agent as either a service or an interactive process. Whether you run an agent as a service or interactively, you can choose which account you use to run the agent.
It's different from your credentials when registering the agent with Azure Pipelines. The choice of agent account depends solely on:
- the needs of the tasks running in your build and deployment jobs.
For example, to run tasks that use Windows authentication to access an external service, you must run the agent using an account with access to that service.
However, if you're running UI tests such as Selenium or Coded UI tests that require a browser, the browser is launched in the context of the agent account.
After configuring the agent, we recommend you first try it in interactive mode to ensure it works. Then, we recommend running the agent in one of the following modes so that it reliably remains to run for production use. These modes also ensure that the agent starts automatically if the machine is restarted.
You can use the service manager of the operating system to manage the lifecycle of the agent. Also, the experience for auto-upgrading the agent is better when it's run as a service.
As an interactive process with autologon enabled. In some cases, you might need to run the agent interactively for production use, such as UI tests.
When the agent is configured to run in this mode, the screen saver is also disabled.
Some domain policies may prevent you from enabling autologon or disabling the screen saver.
In such cases, you may need to:
- seek an exemption from the domain policy or
- run the agent on a workgroup computer where the domain policies don't apply.
There are security risks when you enable automatic login or disable the screen saver. You allow other users to walk up to the computer and use the account that automatically logs on. If you configure the agent to run in this way, you must ensure the computer is physically protected; for example, located in a secure facility. If you use Remote Desktop to access the computer on which an agent is running with autologon, simply closing the Remote Desktop causes the computer to be locked, and any UI tests that run on this agent may fail. To avoid this, use the tscon command to disconnect from Remote Desktop.
Microsoft updates the agent software every few weeks in Azure Pipelines.
The agent version is indicated in the format {major}.{minor}. For instance, if the agent version is 2.1, the major version is 2, and the minor version is 1.
When a newer version of the agent is only different in minor versions, it's automatically upgraded by Azure Pipelines.
This upgrade happens when one of the tasks requires a newer version of the agent.
If you run the agent interactively or a newer major version of the agent is available, you must manually upgrade the agents. Also, you can do it from the agent pools tab under your project collection or organization.
You can view the version of an agent by navigating to Agent pools and selecting the Capabilities tab for the wanted agent.
Azure Pipelines: [https://dev.azure.com/{your_organization}/_admin/_AgentPool](https://dev.azure.com/{your_organization}/_admin/_AgentPool)
In many cases, yes. Specifically:
- If you use a self-hosted agent, you can run incremental builds.
For example, you define a CI build pipeline that doesn't clean the repo or do a clean build. Your builds will typically run faster.
- You don't get these benefits when using a Microsoft-hosted agent. The agent is destroyed after the build or release pipeline is completed.
- A Microsoft-hosted agent can take longer to start your build. While it often takes just a few seconds for your job to be assigned to a Microsoft-hosted agent, it can sometimes take several minutes for an agent to be allocated, depending on the load on our system.
Yes. This approach can work well for agents who run jobs that don't consume many shared resources. For example, you could try it for agents that run releases that mostly orchestrate deployments and don't do much work on the agent itself.
In other cases, you might find that you don't gain much efficiency by running multiple agents on the same machine.
For example, it might not be worthwhile for agents that run builds that consume many disks and I/O resources.
You might also have problems if parallel build jobs use the same singleton tool deployment, such as npm packages.
For example, one build might update a dependency while another build is in the middle of using it, which could cause unreliable results and errors.
Understanding how security works for agent pools helps you control sharing and use of agents.
In Azure Pipelines, roles are defined on each agent pool. Membership in these roles governs what operations you can do on an agent pool.
| Role on an organization agent pool | Purpose |
|---|
Reader | Members of this role can view the organization's agent pool and agents. You typically use it to add operators that are responsible for monitoring the agents and their health.
Service Account | Members of this role can use the organization agent pool to create a project agent pool in a project. If you follow the guidelines above for creating new project agent pools, you typically don't have to add any members here.
Administrator | Also, with all the above permissions, members of this role can register or unregister agents from the organization's agent pool. They can also refer to the organization agent pool when creating a project agent pool in a project. Finally, they can also manage membership for all roles of the organization agent pool. The user that made the organization agent pool is automatically added to the Administrator role for that pool.
The All agent pools node in the Agent Pools tab is used to control the security of all organization agent pools.
Role memberships for individual organization agent pools are automatically inherited from the 'All agent pools' node.
Roles are also defined on each organization's agent pool. Memberships in these roles govern what operations you can do on an agent pool.
| Role on a project agent pool | Purpose |
|---|---|
| Reader | Members of this role can view the project agent pool. You typically use it to add operators responsible for monitoring the build and deployment jobs in that project agent pool |
User | Members of this role can use the project agent pool when authoring build or release pipelines.
Administrator | Also, to all the above operations, members of this role can manage membership for all roles of the project agent pool. The user that created the pool is automatically added to the Administrator role for that pool.
The All agent pools node in the Agent pools tab controls the security of all project agent pools in a project.
Role memberships for individual project agent pools are automatically inherited from the 'All agent pools' node.
By default, the following groups are added to the Administrator role of 'All agent pools':
- Build Administrators,
- Release Administrators,
- Project Administrators.
According to Donovan Brown, "DevOps is the union of people, process, and products to enable continuous delivery of value to our end users.
The idea is to create multidisciplinary teams that work together with shared and efficient practices and tools.
Essential DevOps practices include agile planning, continuous integration, continuous delivery, and monitoring of applications.
- Observing business, market, needs, current user behavior, and available telemetry data.
- Orient with the enumeration of options for what you can deliver, perhaps with experiments.
- Decide what to pursue
- Act by delivering working software to real users
Fail fast on effects that do not advance the business and double down on outcomes that support the business. Sometimes the approach is called pivot or persevere.
Your cycle time determines how quickly you can gather feedback to determine what happens in the next loop. The feedback that you collect with each cycle should be factual, actionable data.
When you adopt DevOps practices:
- You shorten your cycle time by working in smaller batches.
- Using more automation.
- Hardening your release pipeline.
- Improving your telemetry.
- Deploying more frequently.
- Optimize validated learning The more frequently you deploy, the more you can experiment.
The more opportunity you have to pivot or persevere and gain validated learning each cycle.
This acceleration in validated learning is the value of the improvement.
Think of it as the sum of progress that you achieve and the failures that you avoid.
Continuous Integration drives the ongoing merging and testing of code, leading to an early finding of defects.
Other benefits include:
- less time wasted fighting merge issues
- rapid feedback for development teams.
Continuous Delivery of software solutions to production and testing environments helps organizations:
- quickly fix bugs and
- respond to ever-changing business requirements.
Version Control, usually with a Git-based Repository, enables teams worldwide to communicate effectively during daily development activities. Integrate with software development tools for monitoring activities such as deployments.
Use Agile planning and lean project management techniques to:
- Plan and isolate work into sprints.
- Manage team capacity and help teams quickly adapt to changing business needs.
A DevOps Definition of Done is working software collecting telemetry against the intended business goals.
Monitoring and Logging of running applications.
Including production environments for:
- application health and
- customer usage.
It helps organizations create a hypothesis and quickly validate or disprove strategies. Rich data is captured and stored in various logging formats.
Public and Hybrid Clouds have made the impossible easy.
Use Infrastructure as a Service (IaaS) to lift and shift your existing apps or Platform as a Service (PaaS) to gain unprecedented productivity. The cloud gives you a data center without limits.
Infrastructure as Code (IaC): Enables the automation and validation of the creation and teardown of environments to help deliver secure and stable application hosting platforms.
Use Microservices architecture to isolate business use cases into small reusable services that communicate via interface contracts. This architecture enables:
- scalability and
- efficiency.
"Beyond the Idea: How to Execute Innovation,"
Measurable goals also need to have timelines. Every few weeks, the improvements should be clear and measurable. Ideally, evident to the organization or its customers.
- It is easier to change plans or priorities when necessary.
- The reduced delay between doing work and getting feedback helps ensure that the learnings and feedback are incorporated quickly.
- It is easier to keep organizational support when positive outcomes are clear.
This module helps organizations decide the projects to start applying the DevOps process and tools to minimize initial resistance.
A greenfield project is one done on a green field, undeveloped land. It can seem that a greenfield DevOps project would be easier to manage and to achieve success because: There was no existing codebase. No existing team dynamics of politics. Possibly no current, rigid processes. A blank slate offers the chance to implement everything the way that you want. better chance of avoiding existing business processes that do not align with your project plans. Suppose current IT policies do not allow the use of cloud-based infrastructure. In that case, the project might be qualified for entirely new applications designed for that environment from scratch. you can sidestep internal political issues that are well entrenched.
A brownfield project is done on the used ground for other purposes. Because of the land use that has once occurred, there could be challenges reusing the land. Like existing buildings, some would be obvious but less obvious, like polluted soil.
Usually, brownfield projects come with: The baggage of existing codebases. Existing teams. A significant amount of technical debt.
The beauty of these projects is that: there's often a large gap between customer expectations and delivery. The teams involved may well realize that the status quo needs to change. They've lived the challenges and the limitations associated with what they're currently doing. The limitations will have often worn down the existing team members. For example, they are working in the past and are keen to experiment with new ideas. The system is often crucial for organizations. It might also be easier to gain more robust management buy-in for these projects because of the potential benefits delivered.
Decide when to use systems of record versus systems of engagement When selecting systems as candidates for starting a DevOps transformation, it is necessary to consider the types of systems that you operate.
Some researchers suggest that organizations often use Bimodal IT, a practice of managing two separate, coherent modes of IT delivery - one focused on stability and predictability and the other on agility.
- they provide the truth about data elements
- have historically evolved slowly and carefully
- e.g. it is crucial that a banking system accurately reflects your bank balance
- they emphasize accuracy and security.
Many organizations have other systems that are more exploratory. often use experimentation to solve new problems. are modified regularly it is a priority to make quick changes over ensuring that the changes are correct.
There is a perception that DevOps suits systems of engagement more than systems of record. The lessons from high-performing companies show that is not the case.
Both types of systems are great. It might be easier to start with a system of engagement when first beginning a DevOps Transformation. DevOps practices apply to both types of systems. The most significant outcomes often come from transforming systems of record.
In discussions around continuous delivery, we usually categorize users into three general buckets:
- Canary users voluntarily test bleeding edge features as soon as they're available. Keen to see new features as soon as they're available and highly tolerant of issues
- Early adopters who voluntarily preview releases, considered more refined than the code that exposes canary users. Similar characteristics to the Canaries. Often have work requirements that make them less tolerant of issues and interruptions to work.
- Users who consume the products after passing through canary and early adopters.
Ideal target improvements Roll out changes incrementally. When starting, it is essential to find an improvement goal that: It can be used to gain early wins. It is small enough to be achievable in a reasonable timeframe. Has benefits that are significant enough to be evident to the organization. It allows constant learning from:
- rapid feedback and
- recovering from mistakes quickly.
The aim is to build a snowball effect where each new successful outcome adds to previous successful results.
Goals needed to be:
- specific,
- measurable, and
- time-bound. Establish appropriate metrics and Key Performance Indicators (KPIs) to ensure these goals are measurable.
Metrics and KPIs that are commonly used in DevOps Projects:
- Faster outcomes
- Deployment Frequency '' Speed
- Deployment Size: How many features, stories, and bug fixes are being deployed each time?
- Lead Time: How long does it take from the creation of a work item until it is completed?
- Efficiency
- Server to Admin Ratio. Are the projects reducing the number of administrators required for a given number of servers?
- Staff Member to Customers Ratio. Is it possible for fewer staff members to serve a given number of customers?
- Application Usage. How busy is the application?
- Application Performance. Is the application performance improving or dropping? (Based upon application metrics)?
- Quality and security
- Deployment failure rates. How often do deployments (or applications) fail?
- Application failure rates. How often do application failures occur, such as configuration failures, performance timeouts, and so on?
- Mean time to recover. How quickly can you recover from a failure?
- Bug report rates. You do not want customers finding bugs in your code. Is the amount they are seeing increasing or lowering?
- Test pass rates. How well is your automated testing working?
- Defect escape rate. What percentage of defects are being found in production?
- Availability. What percentage of time is the application truly available for customers?
- Service level agreement achievement. Are you meeting your service level agreements (SLAs)?
- Mean time to detection. If there is a failure, how long does it take for it to be detected?
- Culture
- Employee morale. Are employees happy with the transformation and where the organization is heading? Are they still willing to respond to further changes? This metric can be challenging to measure but is often done by periodic, anonymous employee surveys.
- Retention rates. Is the organization losing staff?
It is crucial to choose metrics that focus on :
- specific business outcomes and
- achieve a return on investment and increased business value.
This module explores agile development practices and helps to define and to configure teams and tools for collaboration.
- Determining a problem.
- Analyzing the requirements.
- Building and testing the required code.
- The delivery outcome to users.
The waterfall model follows a sequential order. A project development team only moves to the next development phase or testing if the previous step is completed successfully.
Drawbacks:
- Usually, the project takes a long time, and the outcome may no longer match the customer's needs.
- Customers often don't know what they want until they see it or can't explain what they need.
Agile methodology constantly emphasizes:
- adaptive planning and
- early delivery with continual improvement. It encourages rapid and flexible responses to changes as they occur.
Development needs to favor
- individuals and interactions over processes and tools.
- Working software over comprehensive documentation.
- Customer collaboration over contract negotiation.
- Respond to changes over following a plan.
Agile software development methods are based on releases and iterations:
One release might consist of several iterations. Each iteration is like a small independent project. After being estimated and prioritization: Features, bug fixes, enhancements, and refactoring width are assigned to a release. And then assigned again to a specific iteration within the release, generally on a priority basis. At the end of each iteration, there should be tested working code. In each iteration, the team must focus on the outcomes of the previous iteration and learn from them. Having teams focused on shorter-term outcomes is that teams are also less likely to waste time over-engineering features. Or allowing unnecessary scope creep to occur.
Agile software development helps teams keep focused on business outcomes.
| Waterfall | Agile |
|---|---|
| Divided into distinct phases. | Separates the project development lifecycle into sprints. |
| It can be rigid. | Known for flexibility. |
| All project development phases, such as design, development, and test, are completed once. | It follows an iterative development approach so that each phase may appear more than once. |
| Define requirements at the start of the project with little change expected. | Requirements are expected to change and evolve. |
| Focus on completing the project. | Focus on meeting customers' demands. |
- divide teams according to the software architecture. In this example, the teams have been divided into the user interface, service-oriented architecture, and data teams:
- span the architecture and
- are aligned with skillsets or disciplines
Vertical teams have been shown to provide more good outcomes in Agile projects. Each product must have an identified owner.
Another key benefit of the vertical team structure is that scaling can occur by adding teams. In this example, feature teams have been created rather than just project teams:
For a successful DevOps transformation, the aim is to find team members with the following characteristics:
- They:
- already think there is a need to change.
- have previously shown an ability to innovate.
- are already well respected within the organization.
- have a broad knowledge of the organization and how it operates.
- already believe that DevOps practices are what is needed.
When they first start an agile transformation, many teams hire external coaches or mentors.
Agile coaches help teams or individuals to adopt agile methods or to improve the current techniques and practices.
They must be agents of change by helping people understand how they work and encouraging them to adopt new approaches.
Agile coaches typically work with more than one team and remove any roadblocks from inside or outside the organization.
There is more than one type of agile coach.
- Some coaches are technical experts who aim to show staff members how to apply specific concepts—for example, test-driven development and continuous integration or deployment. These coaches might do peer programming sessions with staff members.
- Other coaches are focused on agile processes, determining requirements, and managing work activities. They might help how to run effective stand-up and review meetings. Some coaches may themselves act as scrum masters. They might mentor staff in how to fill these roles. Over time, though, team members need to develop an ability to mentor each other. Teams should aim to be self-organizing. Team members are often expected to learn as they work and to acquire skills from each other. To make it effective, though, the work itself needs to be done collaboratively, not by individuals working by themselves.
Collaboration tooling Agile teams commonly use the following collaboration tools:
Teams (Microsoft): A group chat application from Microsoft. It provides a combined location with workplace chat, meetings, notes, and storage of file attachments. A user can be a member of many teams.
Slack: A commonly used tool for collaboration in Agile and DevOps teams. From a single interface, it provides a series of separate communication channels that can be organized by project, team, or topic. Conversations are kept and are searchable. It is straightforward to add both internal and external team members. Slack integrates with many third-party tools like GitHub for source code and DropBox for document and file storage.
Jira: A commonly used tool for planning, tracking, releasing, and reporting.
Asana: A standard tool designed to keep team plans, progress, and discussions in a single place. It has strong capabilities around timelines and boards.
Glip: An offering from Ring Central that provides chat, video, and task management.
Other standard tools with collaboration offerings include ProofHub, RedBooth, Trello, DaPulse, and many others.
Not all tools need to be digital tools. Many teams use whiteboards to collaborate on ideas, index cards for recording stories, and sticky notes for moving around tasks.
Even when digital tools are available, it might be more convenient to use these physical tools during stand-up and other meetings.
These tools usually include:
- Project planning and execution monitoring abilities (including how to respond to impediments).
- Automation for stand-up meetings.
- Management and tracking of releases.
- A way to record and work with the outcomes of retrospectives.
Many include Kanban boards and detailed sprint planning options.
As a complete CI/CD system, we have Azure DevOps and GitHub that includes:
Flexibility in Kanban boards. Traceability through Backlogs. Customizability in dashboards. Built-in scrum boards. Integrability directly with code repositories. Code changes can be linked directly to tasks or bugs.
It might seem odd to add screen recording tools to this list. Still, they are beneficial when:
- Work with remote team members.
- Recording bugs in action.
- Building walkthroughs and tutorials that demonstrate actual or potential features.
A screen recorder is built into Windows, but other common ones include SnagIt, Camtasia, OBS, and Loom.
This module explores Azure DevOps and GitHub tools and helps organizations define their work management tool and licensing strategy.
Azure DevOps is a Software as a service (SaaS) platform from Microsoft that provides an end-to-end DevOps toolchain for developing and deploying software.
Azure DevOps includes a range of services covering the complete development life cycle.
- Azure Boards: agile planning, work item tracking, visualization, and reporting tool.
- Azure Pipelines: a language, platform, and cloud-agnostic CI/CD platform-supporting containers or Kubernetes.
- Azure Repos: provides cloud-hosted private git repos.
- Azure Artifacts: provides integrated package management with support for Maven, npm, Python, and NuGet package feeds from public or private sources.
- Azure Test Plans: provides an integrated planned and exploratory testing solution.
GitHub is a Software as a service (SaaS) platform from Microsoft that provides Git-based repositories and DevOps tooling for developing and deploying software.
GitHub provides a range of services for software development and deployment.
- Codespaces: Provides a cloud-hosted development environment (based on Visual Studio Code) that can be operated from within a browser or external tools. Eases cross-platform development.
- Repos: Public and private repositories based upon industry-standard Git commands.
- Actions: Allows for the creation of automation workflows. These workflows can include environment variables and customized scripts.
- Packages: The majority of the world's open-source projects are already contained in GitHub repositories. GitHub makes it easy to integrate with this code and with other third-party offerings.
- Security: Provides detailed code scanning and review features, including automated code review assignment.
To protect and secure your data, you can use:
Microsoft account. GitHub account. Azure Active Directory (Azure AD).
Use personal access tokens (PAT) for tools that don't directly support Microsoft accounts or Azure AD for authentication. You can use it if you want them to integrate with Azure DevOps.
Personal access tokens are also helpful when establishing access to command-line tools, external tools, and tasks in build pipelines.
Azure DevOps is pre-configured with default security groups.
Default permissions are assigned to the default security groups. You can also configure access at the organization, collection, and project or object levels.
In the organization settings in Azure DevOps, you can configure app access policies. Based on your security policies, you might allow alternate authentication methods, enable third-party applications to access via OAuth, or even allow anonymous access to some projects.
For even tighter control, you can use Conditional Access policies. These offer simple ways to help secure resources such as Azure DevOps when using Azure Active Directory for authentication.
Conditional Access policies such as multifactor authentication can help to minimize the risk of compromised credentials.
As part of a Conditional Access policy, you might require:
- Security group membership.
- A location or network identity.
- A specific operating system.
- A managed device or other criteria.
Third-party organizations offer commercial tooling to assist with migrating other work management tools like:
Aha. BugZilla. ClearQuest. And others to Azure DevOps.
Azure Test Plans track manual testing for sprints and milestones, allowing you to follow when that testing is complete.
Azure DevOps also has a Test Feedback extension available in the Visual Studio Marketplace. The extension is used to help teams do exploratory testing and provide feedback.
Other helpful testing tools: Apache JMeter is open-source software written in Java and designed to load test, and measure performance.
Pester is a tool that can automate the testing of PowerShell code.
SoapUI is another testing framework for SOAP and REST testing.
If you are using Microsoft Test Manager, you should plan to migrate to Azure Test Plans instead.
When designing a license management strategy, you first need to understand your progress in the DevOps implementation phase.
If you have a draft of the architecture, you're planning for the DevOps implementation; you already know part of the resources to consume.
For example, you started with a version control-implementing Git and created some pipelines to build and release your code.
If you have multiple teams building their solutions, you don't want to wait in the queue to start building yours.
Probably, you want to pay for parallel jobs and make your builds run in parallel without depending on the queue availability.
To consider:
What phase are you in? How many people are using the feature? How long are you willing to wait if in the queue for pipelines? Is this urgent? Is this a validation only? Should all users access all features? Are they Stakeholders? Basic users? Do they already have a Visual Studio license? Do you have an advanced Package Management strategy? Maybe you need more space for Artifacts.
This module introduces you to GitHub Projects, GitHub Project Boards and Azure Boards. It explores ways to link Azure Boards and GitHub, configure GitHub Projects and Project views, and manage work with GitHub Projects.
During the application or project lifecycle, it's crucial to plan and prioritize work. With Project boards, you can control specific feature work, roadmaps, release plans, etc.
Project boards are made up of issues, pull requests, and notes categorized as cards you can drag and drop into your chosen columns. The cards contain relevant metadata for issues and pull requests, like labels, assignees, the status, and who opened it.
There are different types of project boards:
User-owned project boards: Can contain issues and pull requests from any personal repository. Organization-wide project boards: Can contain issues and pull requests from any repository that belongs to an organization. Repository project boards: Are scoped to issues and pull requests within a single repository.
| Templates | Description |
|---|---|
| Basic kanban | Track your tasks with: To do, In progress, and Done columns. |
| Automated kanban | Cards automatically move between: To do, In progress, and Done columns. |
| Automated kanban with review | Cards automatically move between: To do, In progress, and Done columns, with extra triggers for pull request review status. |
| Bug triage | Triage and prioritize bugs with: To do, High priority, Low priority, and Closed columns. |
Projects are a new, customizable and flexible tool version of projects for planning and tracking work on GitHub.
A project is a customizable spreadsheet in which you can configure the layout by filtering, sorting, grouping your issues and PRs, and adding custom fields to track metadata.
You can use different views such as Board or spreadsheet/table.
You can use custom fields in your tasks. For example:
A date field to track target ship dates. A number field to track the complexity of a task. A single select field to track whether a task is Low, Medium, or High priority. A text field to add a quick note. An iteration field to plan work week-by-week, including support for breaks.
is a customizable tool to manage software projects supporting Agile, Scrum, and Kanban processes by default. Track work, issues, and code defects associated with your project. Also, you can create your custom process templates and use them to create a better and more customized experience for your company.
You have multiple features and configurations to support your teams, such as calendar views, configurable dashboards, and integrated reporting.
The Kanban board is one of several tools that allows you to add, update, and filter user stories, bugs, features, and epics.
You can track your work using the default work item types such as user stories, bugs, features, and epics. It's possible to customize these types or create your own. Each work item provides a standard set of system fields and controls, including Discussion for adding and tracking comments, History, Links, and Attachments.
If you need to create reports or a list of work with specific filters, you can use the queries hub to generate custom lists of work items.
Queries support the following tasks:
Find groups of work items with something in common. Triage work to assign to a team member or sprint and set priorities. Perform bulk updates. View dependencies or relationships between work items. Create status and trend charts that you can optionally add to dashboards.
It's possible to create another view with deliverables and track dependencies across several teams in a calendar view using Delivery Plans.
Delivery plans are fully interactive, supporting the following tasks:
View up to 15 team backlogs, including a mix of backlogs and teams from different projects. View custom portfolio backlogs and epics. View work that spans several iterations. Add backlog items from a plan. View rollup progress of features, epics, and other portfolio items. View dependencies that exist between work items.
Use GitHub, track work in Azure Boards Use Azure Boards to plan and track your work and GitHub as source control for software development.
Connect Azure Boards with GitHub repositories, enabling linking GitHub commits, pull requests, and issues to work items in Boards.
Use GitHub, track work in Azure Boards Use Azure Boards to plan and track your work and GitHub as source control for software development.
Connect Azure Boards with GitHub repositories, enabling linking GitHub commits, pull requests, and issues to work items in Boards.
GitHub Command Palette - GitHub Docs
A Source control system (or version control system) allows developers to collaborate on code and track changes. Use version control to save your work and coordinate code changes across your team. Source control is an essential tool for multi-developer projects.
The version control system saves a snapshot of your files (history) so that you can review and even roll back to any version of your code with ease. Also, it helps to resolve conflicts when merging contributions from multiple sources.
For most software teams, the source code is a repository of invaluable knowledge and understanding about the problem domain that the developers have collected and refined through careful effort.
Source control protects source code from catastrophe and the casual degradation of human error and unintended consequences.
Version control is about keeping track of every change to software assets—tracking and managing the who, what, and when. Version control is the first step needed to assure quality at the source, ensure flow and pull value, and focus on the process. All of these create value not just for the software teams but ultimately for the customer.
Version control is a solution for managing and saving changes made to any manually created assets. If changes are made to the source code, you can go back in time and easily roll back to previous-working versions.
Version control also makes experimenting easy and, most importantly, makes collaboration possible. Without version control, collaborating over source code would be a painful operation.
There are several perspectives on version control.
For developers, it's a daily enabler for work and collaboration to happen. It's part of the daily job, one of the most-used tools.
For management, the critical value of version control is in:
IP security. Risk management. Time-to-market speed through Continuous Delivery, where version control is a fundamental enabler.
Source control is the fundamental enabler of continuous delivery."
Some of the advantages of using source control are,
Create workflows. Version control workflows prevent the chaos of everyone using their development process with different and incompatible tools. Version control systems provide process enforcement and permissions, so everyone stays on the same page. Work with versions. Every version has a description in the form of a comment. These descriptions help you follow changes in your code by version instead of by individual file changes. Code stored in versions can be viewed and restored from version control at any time as needed. It makes it easy to base new work on any version of code. Collaboration. Version control synchronizes versions and makes sure that your changes do not conflict with other changes from your team. Your team relies on version control to help resolve and prevent conflicts, even when people make changes simultaneously. Maintains history of changes. Version control keeps a record of changes as your team saves new versions of your code. This history can be reviewed to find out who, why, and when changes were made. The history gives you the confidence to experiment since you can roll back to a previous good version at any time. The history lets your base work from any code version, such as fixing a bug in an earlier release. Automate tasks. Version control automation features save your team time and generate consistent results. Automate testing, code analysis, and deployment when new versions are saved to version control.
Reusability – why do the same thing twice? Reuse of code is a common practice and makes building on existing assets simpler. Traceability – Audits are not just for fun; in many industries, it is a legal matter. All activities must be traced, and managers can produce reports when needed. Traceability also makes debugging and identifying root cause easier. Additionally, it helps with feature reuse as developers can link requirements to implementation. Manageability – Can team leaders define and enforce workflows, review rules, create quality gates and enforce QA throughout the lifecycle? Efficiency – are we using the right resources for the job, minimizing time and effort? This one is self-explanatory. Collaboration – When teams work together, quality tends to improve. We catch one another's mistakes and can build on each other's strengths. Learning – Organizations benefit when they invest in employees learning and growing. It is important for onboarding new team members, the lifelong learning of seasoned members, and the opportunity for workers to contribute to the bottom line and the industry.
- Make small changes. In other words, commit early and commit often. Be careful not to commit any unfinished work that could break the build.
- Do not commit personal files. It could include application settings or SSH keys. Often personal files are committed accidentally but cause problems later when other team members work on the same code.
- Update often and right before pushing to avoid merge conflicts.
- Verify your code change before pushing it to a repository; ensure it compiles and tests are passing.
- Pay close attention to commit messages, as it will tell you why a change was made. Consider committing messages as a mini form of documentation for the change.
- Link code changes to work items. It will concretely link what was created to why it was created—or modified by providing traceability across requirements and code changes.
- No matter your background or preferences, be a team player and follow agreed conventions and workflows. Consistency is essential and helps ensure quality, making it easier for team members to pick up where you left off, review your code, debug, and so on.
This module describes different source control systems, such as Git and Team Foundation Version Control (TFVC), and helps with the initial steps for Git utilization.
Centralized source control systems are based on the idea that there's a single "central" copy of your project somewhere (probably on a server). Programmers will check in (or commit) their changes to this central copy.
"Committing" a change means to record the difference in the central system. Other programmers can then see this change.
Also, it's possible to pull down the change. The version control tool will automatically update the contents of any files that were changed.
Most modern version control systems deal with "changesets," which are a group of changes (possibly too many files) that should be treated as a cohesive whole.
Programmers no longer must keep many copies of files on their hard drives manually. The version control tool can talk to the central copy and retrieve any version they need on the fly.
Some of the most common-centralized version control systems you may have heard of or used are Team Foundation Version Control (TFVC), CVS, Subversion (or SVN), and Perforce.
If working with a centralized source control system, your workflow for adding a new feature or fixing a bug in your project will usually look something like this:
- Get the latest changes other people have made from the central server.
- Make your changes, and make sure they work correctly.
- Check in your changes to the main server so that other programmers can see them.
"Distributed" source control or version control systems (DVCS for short) have become the most important.
The three most popular are:
- Git,
- Mercurial,
- and Bazaar.
These systems don't necessarily rely on a central server to store all the versions of a project's files. Instead, every developer clones a repository copy and has the project's complete history on their local storage. This copy (or "clone") has all the original metadata.
Getting new changes from a repository is called pulling. Moving your changes to a repository is called "pushing. You move changesets (changes to file groups as coherent wholes), not single-file diffs.
The act of cloning an entire repository gives distributed source control tools several advantages over centralized systems:
- Doing actions other than pushing and pulling changesets is fast because the tool only needs to access the local storage, not a remote server.
- Committing new changesets can be done locally without anyone else seeing them. Once you have a group of changesets ready, you can push all of them at once.
- Everything but pushing and pulling can be done without an internet connection. So, you can work on a plane, and you won't be forced to commit several bug fixes as one large changeset.
- Since each programmer has a full copy of the project repository, they can share changes with one, or two other people to get feedback before showing the changes to everyone.
There are only two major inherent disadvantages to using a distributed system:
- If your project contains many large, binary files that can't be efficiently compressed, the space needed to store all versions of these files can accumulate quickly.
- If your project has a long history (50,000 changesets or more), downloading the entire history can take an impractical amount of time and disk space.
Git is a distributed version control system. Each developer has a copy of the source repository on their development system. Developers can commit each set of changes on their dev machine.
Branches are lightweight. When you need to switch contexts, you can create a private local branch. You can quickly switch from one branch to another to pivot among different variations of your codebase. Later, you can merge, publish, or dispose of the branch.
Team Foundation Version Control (TFVC) is a centralized version control system.
Typically, team members have only one version of each file on their dev machines. Historical data is maintained only on the server. Branches are path-based and created on the server.
TFVC has two workflow models:
- Server workspaces - Before making changes, team members publicly check out files. Most operations require developers to be connected to the server. This system helps lock workflows. Other software that works this way includes Visual Source Safe, Perforce, and CVS. You can scale up to huge codebases with millions of files per branch—also, large binary files with server workspaces.
- Local workspaces - Each team member copies the latest codebase version with them and works offline as needed. Developers check in their changes and resolve conflicts as necessary. Another system that works this way is Subversion.
Developers would gain the following benefits by moving to Git:
- Community In many circles, Git has come to be the expected version control system for new projects.
If your team is using Git, odds are you will not have to train new hires on your workflow because they will already be familiar with distributed development.
-
Distributed development In TFVC, each developer gets a working copy that points back to a single central repository. Git, however, is a distributed version control system. Instead of a working copy, each developer gets their local repository, complete with an entire history of commits.
-
Trunk-based development One of the most significant advantages of Git is its branching capabilities. Unlike centralized version control systems, Git branches are cheap and easy to merge.
Trunk-based development provides an isolated environment for every change to your codebase. When developers want to start working on something—no matter how large or small—they create a new branch. It ensures that the main branch always contains production-quality code.
Using trunk-based development is more reliable than directly-editing production code, but it also provides organizational benefits.
They let you represent development work at the same granularity as your agile backlog.
For example, you might implement a policy where each work item is addressed in its feature branch.
-
Pull requests A pull request is a way to ask another developer to merge one of your branches into their repository.
It makes it easier for project leads to keep track of changes and lets developers start discussions around their work before integrating it with the rest of the codebase.
Since they are essentially a comment thread attached to a feature branch, pull requests are incredibly versatile.
When a developer gets stuck with a complex problem, they can open a pull request to ask for help from the rest of the team.
Instead, junior developers can be confident that they are not destroying the entire project by treating pull requests as a formal code review.
-
Faster release cycle A faster release cycle is the ultimate result of feature branches, distributed development, pull requests, and a stable community.
These capabilities promote an agile workflow where developers are encouraged to share more minor changes more frequently.
In turn, changes can get pushed down the deployment pipeline faster than the standard of the monolithic releases with centralized version control systems.
As you might expect, Git works well with continuous integration and continuous delivery environments.
Git hooks allow you to run scripts when certain events occur inside a repository, which lets you automate deployment to your heart’s content.
You can even build or deploy code from specific branches to different servers.
For example, you might want to configure Git to deploy the most recent commit from the develop branch to a test server whenever anyone merges a pull request into it.
Combining this kind of build automation with peer review means you have the highest possible confidence in your code as it moves from development to staging to production.
There are three common objections I often hear to migrating to Git:
-
I can overwrite history.
-
I have large files.
-
There is a steep learning curve.
-
Overwriting history Git technically does allow you to overwrite history - but like any helpful feature, if misused can cause conflicts.
If your teams are careful, they should never have to overwrite history.
If you are synchronizing to Azure Repos, you can also add a security rule that prevents developers from overwriting history by using the explicit "Force Push" permissions.
Every source control system works best when developers understand how it works and which conventions work.
While you cannot overwrite history with Team Foundation Version Control (TFVC), you can still overwrite code and do other painful things.
- Large files Git works best with repos that are small and do not contain large files (or binaries).
Every time you (or your build machines) clone the repo, they get the entire repo with its history from the first commit.
It is great for most situations but can be frustrating if you have large files.
Binary files are even worse because Git cannot optimize how they are stored.
That is why Git LFS was created.
It lets you separate large files of your repos and still has all the benefits of versioning and comparing.
Also, if you are used to storing compiled binaries in your source repos, stop!
Use Azure Artifacts or some other package management tool to store binaries for which you have source code.
However, teams with large files (like 3D models or other assets) can use Git LFS to keep the code repo slim and trimmed.
- Learning curve There is a learning curve. If you have never used source control before, you are probably better off when learning Git. I have found that users of centralized source control (TFVC or SubVersion) battle initially to make the mental shift, especially around branches and synchronizing.
Once developers understand how Git branches work and get over the fact that they must commit and then push, they have all the basics they need to succeed in Git.
Azure Repos is a set of version control tools that you can use to manage your code.
Azure Repos provides two types of version control:
- Git: distributed version control
- Team Foundation Version Control (TFVC): centralized version control
- Use free private Git repositories, pull requests, and code search: Get unlimited private Git repository hosting and support for TFVC that scales from a hobby project to the world’s largest repository.
- Support for any Git client: Securely connect with and push code into your Git repository from any IDE, editor, or Git client.
- Web hooks and API integration: Add validations and extensions from the marketplace or build your own-using web hooks and REST APIs.
- Semantic code search: Quickly find what you are looking for with a code-aware search that understands classes and variables.
- Collab to build better code: Do more effective Git code reviews with threaded discussion and continuous integration for each change. Use forks to promote collaboration with inner source workflows.
- Automation with built-in CI/CD: Set up continuous integration/continuous delivery (CI/CD) to automatically trigger builds, tests, and deployments. Including every completed pull request using Azure Pipelines or your tools.
- Protection of your code quality with branch policies: Keep code quality high by requiring code reviewer sign-out, successful builds, and passing tests before merging pull requests. Customize your branch policies to maintain your team’s high standards.
- Usage of your favorite tools: Use Git and TFVC repositories on Azure Repos with your favorite editor and IDE.
GitHub is a Git repository hosting service that adds many of its features.
GitHub is a Git repository hosting service that adds many of its features.
While Git is a command-line tool, GitHub provides a Web-based graphical interface.
It also provides access control and several collaboration features, such as wikis and essential task management tools for every project.
The process is simple:
- Create an empty Git repo (or multiple empty repos).
- Get-latest from TFS.
- Copy/reorganize the code into the empty Git repos.
- Commit and push, and you are there!
If you have shared code, you need to create builds of the shared code to publish to a package feed. And then consume those packages in downstream applications.
If you are on TFVC and in Azure DevOps, you have the option of a simple single-branch import.
- Click on the Import repository from the Azure Repos top-level drop-down menu to open the dialog. - Then enter the path to the branch you are migrating to (yes, you can only choose one branch).
- Select if you want history or not (up to 180 days).
- Add in a name for the repo, and the import will be triggered.
If you need to migrate more than a single branch and keep branch relationships
It's an open-source project built to synchronize Git and TFVC repositories.
GIT-TFS has the advantage that it can migrate multiple branches and preserve the relationships to merge branches in Git after you migrate.
You can quickly dry-run the migration locally, iron out any issues, and then do it for real. There are lots of flexibilities with this tool.
If you are on Subversion, you can use GIT-SVN to import your Subversion repo similarly to GIT-TFS.
If Chocolatey is already installed on your computer, run choco install gittfs
Add the GIT-TFS folder path to your PATH. You could also set it temporary (the time of your current terminal session) using: set PATH=%PATH%;%cd%\GitTfs\bin\Debug
You need .NET 4.5.2 and maybe the 2012 or 2013 version of Team Explorer (or Visual Studio). It depends on the version of Azure DevOps you want to target.
Clone the whole repository (wait for a while.) :
git tfs clone http://tfs:8080/tfs/DefaultCollection $/some_project
Codespaces is a cloud-based development environment that GitHub hosts. It is essentially an online implementation of Visual Studio Code.
Codespaces allows developers to work entirely in the cloud.
Codespaces even will enable developers to contribute from tablets and Chromebooks.
Because it is based on Visual Studio Code, the development environment is still rich with:
- Syntax highlighting.
- Autocomplete.
- Integrated debugging.
- Direct Git integration. Developers can create a codespace (or multiple codespaces) for a repository. Each codespace is associated with a specific branch of a repository.
A repository is simply a place where the history of your work is stored.
It often lives in a .git subdirectory of your working copy.
There are two philosophies on organizing your repos: Monorepo or multiple repos.
-
Monorepos is a source control pattern where all the source code is kept in a single repository. It's super simple to give all your employees access to everything in one shot. Just clone it down, and done.
-
Multiple repositories refer to organizing your projects into their separate repository.
The multiple repos view, in extreme form, is that if you let every subteam live in its repo. They have the flexibility to work in their area however they want, using whatever libraries, tools, development workflow, and so on, will maximize their productivity.
The cost is that anything not developed within a given repo must be consumed as if it was a third-party library or service. It would be the same even if it were written by someone sitting one desk over.
If you find a bug in your library, you must fix it in the appropriate repo. Get a new artifact published, and then return to your repo to change your code. In the other repo, you must deal with a different code base, various libraries, tools, or even a different workflow. Or maybe you must ask someone who owns that system to make the change for you and wait for them to get around to it.
In Azure DevOps, a project can contain multiple repositories. It's common to use one repository for each associated solution.
A changelog is a file that has a list of changes made to a project, usually in date order. The typical breakdown is to separate a list of versions, and then within each version, show:
- Added features
- Modified/Improved features
- Deleted features
Some teams will post changelogs as blog posts; others will create a CHANGELOG.md file in a GitHub repository.
The fundamental difference between the monorepo and multiple repos philosophies boils down to a difference about what will allow teams working together on a system to go fastest.
-
Using native GitHub commands The git log command can be useful for automatically creating content.
Example: create a new section per version:
git log [options] vX.X.X..vX.X.Y | helper-script > projectchangelogs/X.X.Ybash -
Git changelog - based on Python.
-
GitHub changelog generator - based on Gem.
When evaluating a workflow for your team, you must consider your team's culture. You want the workflow to:
-
enhance your team's effectiveness and
-
not be a burden that limits productivity. Some things to consider when evaluating a Git workflow are:
-
Does this workflow scale with team size?
-
Is it easy to undo mistakes and errors with this workflow?
-
Does this workflow impose any new unnecessary cognitive overhead on the team?
Most popular Git workflows will have some sort of centralized repo that individual developers will push and pull from.
Below is a list of some popular Git workflows
These comprehensive workflows offer more specialized patterns about managing branches for feature development, hotfixes, and eventual release.
-
Trunk-based development
Trunk-based development is a logical extension of Centralized Workflow.
The core idea behind the Feature Branch Workflow is that all feature development should take place in a dedicated branch instead of the main branch.
This encapsulation makes it easy for multiple developers to work on a particular feature without disturbing the main codebase.
It also means the main branch should never contain broken code, which is a huge advantage for continuous integration environments.
Encapsulating feature development also makes it possible to use pull requests, which are a way to start discussions around a branch. They allow other developers to sign out on a feature before it gets integrated into the official project. Or, if you get stuck in the middle of a feature, you can open a pull request asking for suggestions from your colleagues.
Pull requests make it incredibly easy for your team to comment on each other's work. Also, feature branches can (and should) be pushed to the central repository. It allows sharing a feature with other developers without touching any official code.
Since the main is the only "special" branch, storing several feature branches on the central repository doesn't pose any problems. It's also a convenient way to back up everybody's local commits.
The trunk-based development Workflow assumes a central repository, and the main represents the official project history.
Instead of committing directly to their local main branch, developers create a new branch every time they start work on a new feature.
Feature branches should have descriptive names, like new-banner-images or bug-91. The idea is to give each branch a clear, highly focused purpose.
Git makes no technical distinction between the main and feature branches, so developers can edit, stage, and commit changes to a feature branch.
-
Create a branch When you create a branch in your project, you're creating an environment where you can try out new ideas.
Changes you make on a branch don't affect the main branch, so you're free to experiment and commit changes, safe in the knowledge that your branch won't be merged until it's ready to be reviewed by someone you're collaborating with.
Your branch name should be descriptive (for example, refactor-authentication, user-content-cache-key, make-retina-avatars) so that others can see what is being worked on.
-
Add commits Whenever you add, edit, or delete a file, you're making a commit and adding them to your branch.
This process of adding commits keeps track of your progress as you work on a feature branch.
Commits also create a transparent history of your work that others can follow to understand what you've done and why.
Each commit has an associated commit message, which explains why a particular change was made.
Furthermore, each commit is considered a separate unit of change. It lets you roll back changes if a bug is found or you decide to head in a different direction.
Commit messages are essential, especially since Git tracks your changes and then displays them as commits once pushed to the server.
By writing clear commit messages, you can make it easier for other people to follow along and provide feedback.
-
Open a pull request The Pull Requests start a discussion about your commits. Because they're tightly integrated with the underlying Git repository, anyone can see exactly what changes would be merged if they accept your request.
You can open a Pull Request at any point during the development process when:
- You've little or no code but want to share some screenshots or general ideas.
- You're stuck and need help or advice.
- You're ready for someone to review your work. Using the @mention system in your Pull Request message, you can ask for feedback from specific people or teams.
Pull Requests help contribute to projects and for managing changes to shared repositories.
If you're using a Fork & Pull Model, Pull Requests provide a way to notify project maintainers about the changes you'd like them to consider.
If you're using a Shared Repository Model, Pull Requests help start code review and conversation about proposed changes before they're merged into the main branch.
-
Discuss and review your code
-
Deploy With Git, you can deploy from a branch for final testing in an environment before merging to the main.
Once your pull request has been reviewed and the branch passes your tests, you can deploy your changes to verify them. You can roll it back if your branch causes issues by deploying the existing main.
-
Merge Once your changes have been verified, it's time to merge your code into the main branch.
Once merged, Pull Requests preserve a record of the historical changes to your code. Because they're searchable, they let anyone go back in time to understand why and how a decision was made.
By incorporating specific keywords into the text of your Pull Request, you can associate issues with code. When your Pull Request is merged, the related issues can also close.
This workflow helps organize and track branches focused on business domain feature sets.
Other Git workflows, like the Git Forking Workflow and the Gitflow Workflow, are repo-focused and can use the Git Feature Branch Workflow to manage their branching models.
-
-
Forking workflow The Forking Workflow is fundamentally different than the other workflows.
Instead of using a single server-side repository to act as the "central" codebase, it gives every developer a server-side repository.
It means that each contributor has two Git repositories:
- A private local one.
- A public server-side one
Let's cover the principles of what we suggest:
-
The main branch:
- The main branch is the only way to release anything to production.
- The main branch should always be in a ready-to-release state.
- Protect the main branch with branch policies.
- Any changes to the main branch flow through pull requests only.
- Tag all releases in the main branch with Git tags.
-
The feature branch:
- Use feature branches for all new features and bug fixes.
- Use feature flags to manage long-running feature branches.
- Changes from feature branches to the main only flow through pull requests.
- Name your feature to reflect its purpose.
bugfix/description
features/feature-name
features/feature-area/feature-name
hotfix/description
users/username/description
users/username/workitem-
Pull requests:
- Review and merge code with pull requests.
- Automate what you inspect and validate as part of pull requests.
- Tracks pull request completion duration and set goals to reduce the time it takes.
This module presents pull requests for collaboration and code reviews using Azure DevOps and GitHub mobile for pull request approvals.
It helps understand how pull requests work and how to configure them.
Pull requests let you tell others about changes you've pushed to a GitHub repository.
Once a pull request is sent, interested parties can review the set of changes, discuss potential modifications, and even push follow-up commits if necessary.
Pull requests are commonly used by teams and organizations collaborating using the Shared Repository Model.
Everyone shares a single repository, and topic branches are used to develop features and isolate changes.
Many open-source projects on GitHub use pull requests to manage changes from contributors.
They help provide a way to notify project maintainers about changes one has made.
Also, start code review and general discussion about a set of changes before being merged into the main branch.
Pull requests combine the review and merge of your code into a single collaborative process.
Once you're done fixing a bug or new feature in a branch, create a new pull request.
Add the team members to the pull request so they can review and vote on your changes.
Use pull requests to review works in progress and get early feedback on changes.
There's no commitment to merge the changes as the owner can abandon the pull request at any time.
The common benefits of collaborating with pull requests are:
- Get your code reviewed,
- Give great feedback, and
- Protect branches with policies.
Branch policies give you a set of out-of-the-box policies that can be applied to the branches on the server.
Any changes being pushed to the server branches need to follow these policies before the changes can be accepted.
Policies are a great way to enforce your team's code quality and change-management standards.
The out-of-the-box branch policies include several policies, such as:
- build validation and
- enforcing a merge strategy.
Only focus on the branch policies needed to set up a code-review workflow in this recipe.
-
Open the branches view for the myWebApp Git repository in the parts-unlimited team portal. Select the main branch, and from the pull-down, context menu choose Branch policies
-
In the policies view, It presents out-of-the-box policies. Set the minimum number of reviewers to 1.
The Allow requestors to approve their own changes option allows the submitter to self-approve their changes.
It's OK for mature teams, where branch policies are used as a reminder for the checks that need to be performed by the individual.
- Use the review policy with the comment-resolution policy. It allows you to enforce that the code review comments are resolved before the changes are accepted. The requester can take the feedback from the comment and create a new work item and resolve the changes. It at least guarantees that code review comments aren't lost with the acceptance of the code into the main branch:
This module examines technical debt, complexity, quality metrics, and plans for effective code reviews and code quality validation.
There are five key traits to measure for higher quality.
- Reliability
- measures the probability that a system will run without failure over a specific period of operation.
- It relates to the number of defects and availability of the software.
- Several defects can be measured by running a static analysis tool. Software availability can be measured using the mean time between failures (MTBF).
Low defect counts are crucial for developing a reliable codebase.
-
Maintainability
- measures how easily software can be maintained. It relates to the codebase's size, consistency, structure, and complexity. Ensuring maintainable source code relies on several factors, such as testability and understandability. Some metrics you may consider to improve maintainability are the number of stylistic warni ngs and Halstead complexity measures. Both automation and human reviewers are essential for developing maintainable codebases.
-
Testability
- Testability measures how well the software supports testing efforts.
- It relies on how well you can control, observe, isolate, and automate testing, among other factors.
- can be measured based on how many test cases you need to find potential faults in the system.
- The size and complexity of the software can impact testability.
- applying methods at the code level such as cyclomatic complexity can help you improve the testability of the component.
-
Portability
- measures how usable the same software is in different environments. It relates to platform independence.
- There are several ways you can ensure portable code.
- It's essential to regularly test code on different platforms rather than waiting until the end of development.
- It's also good to:
- set your compiler warning levels as high as possible and
- use at least two compilers.
- Enforcing a coding standard also helps with portability.
-
Reusability
- measures whether existing assets—such as code—can be used again.
- Assets are more easily reused if they have modularity or loose coupling characteristics.
- The number of interdependencies can measure reusability.
- Running a static analyzer can help you identify these interdependencies.
Complexity metrics can help in measuring quality.
Another way to understand quality is through calculating Halstead complexity measures.
Cyclomatic complexity measures the number of linearly independent paths through a program's source code.
This measure:
- Program vocabulary.
- Program length.
- Calculated program length.
- Volume.
- Difficulty.
- Effort.
The following is a list of metrics that directly relate to the quality of the code being produced and the build and deployment processes.
- Failed builds percentage - Overall, what percentage of builds are failing?
- Failed deployments percentage - Overall, what percentage of deployments are failing?
- Ticket volume - What is the overall volume of customer or bug tickets?
- Bug bounce percentage - What percentage of customer or bug tickets are reopened?
- Unplanned work percentage - What percentage of the overall work is unplanned?
Technical debt is a term that describes the future cost that will be incurred by choosing an easy solution today instead of using better practices because they would take longer to complete.
So, how does it happen?
The most common excuse is tight deadlines.
There are many causes. For example, there might be a lack of technical skills and maturity among the developers or no clear product ownership or direction.
The organization might not have coding standards at all. So, the developers didn't even know what they should be producing. The developers might not have precise requirements to target. They might be subject to last-minute requirement changes.
Necessary-refactoring work might be delayed. There might not be any code quality testing, manual or automated. In the end, it just makes it harder and harder to deliver value to customers in a reasonable time frame and at a reasonable cost.
- Lack of coding style and standards.
- Lack of or poor design of unit test cases.
- Ignoring or not understanding object oriented design principles.
- Monolithic classes and code libraries.
- Poorly envisioned the use of technology, architecture, and approach. (Forgetting that all system attributes, affecting maintenance, user experience, scalability, and others, need to be considered).
- Over-engineering code (adding or creating code that isn't required, adding custom code when existing libraries are sufficient, or creating layers or components that aren't needed).
- Insufficient comments and documentation.
- Not writing self-documenting code (including class, method, and variable names that are descriptive or indicate intent). Taking shortcuts to meet deadlines. Leaving dead code in place.
One key way to minimize the constant acquisition of technical debt is to use automated testing and assessment.
Look at one of the common tools used to assess the debt: SonarCloud.
-
For .NET developers, a common tool is NDepend. NDepend is a Visual Studio extension that assesses the amount of technical debt a developer has added during a recent development period, typically in the last hour.
-
NDepend lets you create code rules expressed as C# LINQ queries, but it has many built-in rules that detect a wide range of code smells.
-
Resharper Code Quality Analysis Resharper can make a code quality analysis from the command line. Also, be set to fail builds when code quality issues are found automatically.
Rules can be configured for enforcement across teams.
The organizational culture must let all involved feel that the code reviews are more like mentoring sessions where ideas about improving code are shared than interrogation sessions where the aim is to identify problems and blame the author.
The knowledge-sharing that can occur in mentoring-style sessions can be one of the most important outcomes of the code review process. It often happens best in small groups (even two people) rather than in large team meetings. And it's important to highlight what has been done well, not just what needs improvement.
This module describes Git hooks and their usage during the development process, implementation, and behavior.
Git hooks are a mechanism that allows code to be run before or after certain Git lifecycle events.
For example, one could hook into the commit-msg event to validate that the commit message structure follows the recommended format.
The hooks can be any executable code, including shell, PowerShell, Python, or other scripts. Or they may be a binary executable. Anything goes!
The only criteria are that hooks must be stored in the .git/hooks folder in the repo root. Also, they must be named to match the related events (Git 2.x):
- applypatch-msg
- pre-applypatch
- post-applypatch
- pre-commit
- prepare-commit-msg
- commit-msg
- post-commit
- pre-rebase
- post-checkout
- post-merge
- pre-receive
- update
- post-receive
- post-update
- pre-auto-gc
- post-rewrite
- pre-push
Some examples of where you can use hooks to enforce policies, ensure consistency, and control your environment:
- In Enforcing preconditions for merging
- Verifying work Item ID association in your commit message
- Preventing you & your team from committing faulty code
- Sending notifications to your team's chat room (Teams, Slack, HipChat, etc.)
Let's start by exploring client-side Git hooks. Navigate to the repo .git\hooks directory – you'll find that there are a bunch of samples, but they're disabled by default.
Note If you open that folder, you'll find a file called precommit.sample. To enable it, rename it to pre-commit by removing the .sample extension and making the script executable.
The script is found and executed when you attempt to commit using git commit. You commit successfully if your pre-commit script exits with a 0 (zero). Otherwise, the commit fails. If you're using Windows, simply renaming the file won't work.
Git will fail to find the shell in the chosen path specified in the script.
The problem is lurking in the first line of the script, the shebang declaration:
#!/bin/sh
On Unix-like OSs, the #! Tells the program loader that it's a script to be interpreted, and /bin/sh is the path to the interpreter you want to use, sh in this case.
Windows isn't a Unix-like OS. Git for Windows supports Bash commands and shell scripts via Cygwin.
By default, what does it find when it looks for sh.exe at /bin/sh?
Nothing, nothing at all. Fix it by providing the path to the sh executable on your system. It's using the 64-bit version of Git for Windows, so the baseline looks like this:
#!C:/Program\ Files/Git/usr/bin/sh.exe
How could Git hooks stop you from accidentally leaking Amazon AWS access keys to GitHub?
You can invoke a script at pre-commit.
Using Git hooks to scan the increment of code being committed into your local repository for specific keywords:
Replace the code in this pre-commit shell file with the following code.
#!C:/Program\ Files/Git/usr/bin/sh.exe
matches=$(git diff-index --patch HEAD | grep '^+' | grep -Pi 'password|keyword2|keyword3')
if [ ! -z "$matches" ]
then
cat <<\EOT
Error: Words from the blocked list were present in the diff:
EOT
echo $matches
exit 1
fi
You don't have to build the complete keyword scan list in this script.
You can branch off to a different file by referring to it here to encrypt or scramble if you want to.
The Git diff-index identifies the code increment committed in the script. This increment is then compared against the list of specified keywords. If any matches are found, an error is raised to block the commit; the script returns an error message with the list of matches. The pre-commit script doesn't return 0 (zero), which means the commit fails.
The repo .git\hooks folder isn't committed into source control. You may wonder how you share the goodness of the automated scripts you create with the team.
The good news is that, from Git version 2.9, you can now map Git hooks to a folder that can be committed into source control.
You could do that by updating the global settings configuration for your Git repository:
Git config --global core.hooksPath '~/.githooks'
If you ever need to overwrite the Git hooks you have set up on the client-side, you can do so by using the no-verify switch:
Git commit --no-verify
So far, we've looked at the client-side Git Hooks on Windows. Azure Repos also exposes server-side hooks. Azure DevOps uses the exact mechanism itself to create Pull requests. You can read more about it at the Server hooks event reference.
This module explains how to use Git to foster inner sources across the organization, implement Fork and its workflows.
The fork-based pull request workflow is popular with open-source projects because it allows anybody to contribute to a project.
You don't need to be an existing contributor or write access to a project to offer your changes.
This workflow isn't just for open source: forks also help support inner source workflows within your company.
Before forks, you could contribute to a project-using Pull Requests.
The workflow is simple enough:
- push a new branch up to your repository,
- open a pull request to get a code review from your team, and
- have Azure Repos evaluate your branch policies.
- You can click one button to merge your pull request into main and deploy when your code is approved.
This workflow is great for working on your projects with your team. But what if you notice a simple bug in a different project within your company and you want to fix it yourself?
What if you're going to add a feature to a project that you use, but another team develops?
It's where forks come in; forks are at the heart of inner source practices.
Inner source – sometimes called internal open source – brings all the benefits of open-source software development inside your firewall.
It opens your software development processes so that your developers can easily collaborate on projects across your company.
It uses the same processes that are popular throughout the open-source software communities.
But it keeps your code safe and secure within your organization.
Microsoft uses the inner source approach heavily.
As part of the efforts to standardize a one-engineering system throughout the company – backed by Azure Repos – Microsoft has also opened the source code to all our projects to everyone within the company.
Before the move to the inner source, Microsoft was "siloed": only engineers working on Windows could read the Windows source code.
Only developers working on Office could look at the Office source code.
So, if you're an engineer working on Visual Studio and you thought that you found a bug in Windows or Office – or wanted to add a new feature – you're out of luck.
But by moving to offer inner sources throughout the company, powered by Azure Repos, it's easy to fork a repository to contribute back.
As an individual making the change, you don't need to write access to the original repository, just the ability to read it and create a fork.
A fork is a complete copy of a repository, including all files, commits, and (optionally) branches. Fork
- allows you to experiment with changes without affecting the original project freely.
- are used to propose changes to someone else's project. Or use someone else's project as a starting point for your idea.
- are a great way to support an Inner Source workflow You can create a fork to suggest changes when you don't have permission to write to the original project directly. Once you're ready to share those changes, it's easy to contribute them back-using pull requests.
A fork starts with all the contents of its upstream (original) repository.
You can include all branches or limit them to only the default branch when you create a fork.
None of the permissions, policies, or build pipelines are applied.
The new fork acts as if someone cloned the original repository, then pushed it to a new, empty repository.
After a fork has been created, new files, folders, and branches aren't shared between the repositories unless a Pull Request (PR) carries them along.
You can create PRs in either direction:
- from fork to upstream or
- upstream to fork.
The most common approach will be from fork to upstream.
The destination repository's permissions, policies, builds, and work items will apply to the PR.
For a small team (2-5 developers), we recommend working in a single repo.
Everyone should work in a topic branch, and the main should be protected with branch policies.
As your team grows more significant, you may find yourself outgrowing this arrangement and prefer to switch to a forking workflow.
We recommend the forking workflow if your repository has many casual or infrequent committees (like an open-source project).
Typically, only core contributors to your project have direct commit rights into your repository.
It would help if you asked collaborators from outside this core set of people to work from a fork of the repository.
Also, it will isolate their changes from yours until you've had a chance to vet the work.
- Create a fork.
- Clone it locally.
- Make your changes locally and push them to a branch.
- Create and complete a PR to upstream. Sync your fork to the latest from upstream.
- Navigate to the repository to fork and choose fork.
- Specify a name and choose the project where you want the fork to be created. If the repository contains many topic branches, we recommend you fork only the default branch.
- Choose the ellipsis, then Fork to create the fork.
Note You must have the Create Repository permission in your chosen project to create a fork. We recommend you create a dedicated project for forks where all contributors have the Create Repository permission. For an example of granting this permission, see Set Git repository permissions.
Once your fork is ready, clone it using the command line or an IDE like Visual Studio. The fork will be your origin remote.
For convenience, after cloning, you'll want to add the upstream repository (where you forked from) as a remote named upstream.
git remote add upstream {upstream_url}
It's possible to work directly in main - after all, this fork is your copy of the repo.
We recommend you still work in a topic branch, though.
It allows you to maintain multiple independent workstreams simultaneously.
Also, it reduces confusion later when you want to sync changes into your fork.
Make and commit your changes as you normally would. When you're done with the changes, push them to origin (your fork).
Important Anyone with the Read permission can open a PR to upstream. If a PR build pipeline is configured, the build will run against the code introduced in the fork.
When you've gotten your PR accepted into upstream, you'll want to make sure your fork reflects the latest state of the repo.
We recommend rebasing on upstream's main branch (assuming main is the main development branch).
git fetch upstream main
git rebase upstream/main
git push origin
The forking workflow lets you isolate changes from the main repository until you're ready to integrate them. When you're ready, integrating code is as easy as completing a pull request.
People fork repositories when they want to change the code in a repository that they don't have write access to.
You may find a better way of implementing the solution or enhancing the functionality by contributing to or improving an existing feature.
You can fork repositories in the following situations:
- I want to make a change.
- I think the project is exciting and may want to use it in the future.
- I want to use some code in that repository as a starting point for my project. Software teams are encouraged to contribute to all projects internally, not just their software projects.
Forks are a great way to foster a culture of inner open source.
This module explores how to work with large repositories, purge repository data and manage and automate release notes using GitHub.
While having a local copy of repositories in a distributed version control system is functional, that can be a significant problem when large repositories are in place.
There are two primary causes for large repositories:
- Long history
- Large binary files
If developers don't need all the available history in their local repositories, a good option is to implement a shallow clone.
It saves both space on local development systems and the time it takes to sync.
You can specify the depth of the clone that you want to execute:
git clone --depth [depth] [clone-url]
You can also reduce clones by filtering branches or cloning only a single branch.
VFS for Git helps with large repositories. It requires a Git LFS client.
Typical Git commands are unaffected, but the Git LFS works with the standard filesystem to download necessary files in the background when you need files from the server.
The Git LFS client was released as open-source. The protocol is a straightforward one with four endpoints similar to REST endpoints.
Scalar is a .NET Core application available for Windows and macOS. With tools and extensions for Git to allow very large repositories to maximize your Git command performance. Microsoft uses it for Windows and Office repositories.
If Azure Repos hosts your repository, you can clone a repository using the GVFS protocol.
It achieves by enabling some advanced Git features, such as:
- Partial clone: reduces time to get a working repository by not downloading all Git objects right away.
- Background prefetch: downloads Git object data from all remotes every hour, reducing the time for foreground git fetch calls.
- Sparse-checkout: limits the size of your working directory.
- File system monitor: tracks the recently modified files and eliminates the need for Git to scan the entire work tree.
- Commit-graph: accelerates commit walks and reachability calculations, speeding up commands like git log.
- Multi-pack-index: enables fast object lookups across many pack files.
- Incremental repack: Repacks the packed Git data into fewer pack files without disrupting concurrent commands using the multi-pack-index.
While one of the benefits of Git is its ability to hold long histories for repositories efficiently, there are times when you need to purge data.
The most common situations are where you want to:
-
Significantly reduce the size of a repository by removing history.
-
Remove a large file that was accidentally uploaded.
-
Remove a sensitive file that shouldn't have been uploaded. If you commit sensitive data (for example, password, key) to Git, it can be removed from history. Two tools are commonly used:
-
git filter-repo tool The git filter-repo is a tool for rewriting history. Its core filter-repo contains a library for creating history rewriting tools. Users with specialized needs can quickly create entirely new history rewriting tools.
-
BFG Repo-Cleaner BFG Repo-Cleaner is a commonly used open-source tool for deleting or "fixing" content in repositories. It's easier to use than the git filter-branch command. For a single file or set of files, use the --delete-files option:
$ bfg --delete-files file_I_should_not_have_committedThe following bash shows how to find all the places that a file called passwords.txt exists in the repository. Also, to replace all the text in it, you can execute the --replace-text option:$ bfg --replace-text passwords.txt
In the following modules, you'll see details about deploying a piece of software after packaging your code, binary files, release notes, and related tasks.
Releases in GitHub are based on Git tags. You can think of a tag as a photo of your repository's current state. If you need to mark an essential phase of your code or your following deliverable code is done, you can create a tag and use it during the build and release process to package and deploy that specific version. For more information, see Viewing your repository's releases and tags.
Also, you can:
- Publish an action from a specific release in GitHub Marketplace.
- Choose whether Git LFS objects are included in the ZIP files and tarballs GitHub creates for each release.
- Receive notifications when new releases are published in a repository.
To create a release, use the gh release create command.
Replace the tag with the desired tag name for the release and follow the interactive prompts.
gh release create tag
To create a prerelease with the specified title and notes
gh release create v1.2.1 --title
You can't edit Releases with GitHub CLI.
To edit, use the Web Browser:
- Navigate to the main repository page on GitHub.com.
- Click Releases to the right of the list of files.
- Click on the edit icon on the right side of the page, next to the release you want to edit.
- Edit the details for the release, then click Update release.
To delete a release, use the following command, replace the tag with the release tag to delete, and use the -y flag to skip confirmation.
gh release delete tag -y
After learning how to create and manage release tags in your repository, you'll learn how to configure the automatically generated release notes template from your GitHub releases.
You can generate an overview of the contents of a release, and you can also customize your automated release notes.
It's possible to use labels to create custom categories to organize pull requests you want to include or exclude specific labels and users from appearing in the output.
While configuring your release, you'll see the option Auto-generate release notes to include all changes between your tag and the last release. If you never created a release, it will consist of all changes from your repository.
Configuring automatically generated release notes template You can customize the auto-generate release notes template by using the following steps.
- Navigate to your repository and create a new file.
- You can use the name .github/release.yml to create the release.yml file in the .github directory.
- Specify in YAML the pull request labels and authors you want to exclude from this release. You can also create new categories and list the pull request labels in each. For more information about configuration options, see Automatically generated release notes - GitHub Docs.
Example configuration:
# .github/release.yml

changelog:
  exclude:
    labels:
    - ignore-for-release
    authors:
    - octocat
  categories:
    - title: Breaking Changes 🛠
      labels:
        - Semver-Major
        - breaking-change
    - title: Exciting New Features 🎉
      labels:
        - Semver-Minor
        - enhancement
    - title: Other Changes
      labels:
- *- Commit your new file.
- Try to create a new release and click + Auto-generate release notes to see the template structure.
Which of the following choices is the built-in Git command for removing files from the repository? Correct. git filter-branch command.
This module explored how to work with large repositories and purge repository data.
You learned how to describe the benefits and usage of:
- Understand large Git repositories.
- Explain Git Virtual File System (GVFS).
- Use Git Large File Storage (LFS).
- Purge repository data.
This module introduces Azure Pipelines concepts and explains key terms and components of the tool, helping you decide your pipeline strategy and responsibilities.
The core pipeline idea is to create a repeatable, reliable, and incrementally improving process.
Azure Pipelines is a fully featured service used to create cross-platform CI and CD
The core idea is to create a repeatable, reliable, and incrementally-improving process for taking software from concept to customer.
The goal is to enable a constant flow of changes into production via an automated software production line.
Think of it as a pipeline. The pipeline breaks down the software delivery process into stages.
Each stage aims to verify the quality of new features from a different angle to validate the new functionality and prevent errors from affecting your users.
The pipeline should provide feedback to the team. Also, visibility into the changes flows to everyone involved in delivering the new feature(s).
A delivery pipeline enables the flow of more minor changes more frequently, with a focus on flow.
Your teams can concentrate on optimizing the delivery of changes that bring quantifiable value to the business.
This approach leads teams to continuously monitor and learn where they're finding obstacles, resolve those issues, and gradually improve the pipeline's flow.
As the process continues, the feedback loop provides new insights into new issues and barriers to be resolved.
The pipeline is the focus of your continuous improvement loop.
A typical pipeline will include the following stages:
- build automation and continuous integration,
- test automation, and deployment automation.
The pipeline starts by building the binaries to create the deliverables passed to the following stages. New features implemented by the developers are integrated into the central code base, built, and unit tested. It's the most direct feedback cycle that informs the development team about the health of their application code.
The new version of an application is rigorously tested throughout this stage to ensure that it meets all wished system qualities. It's crucial that all relevant aspects—whether functionality, security, performance, or compliance—are verified by the pipeline. The stage may involve different types of automated or (initially, at least) manual activities.
A deployment is required every time the application is installed in an environment for testing, but the most critical moment for deployment automation is rollout time.
Since the preceding stages have verified the overall quality of the system, It's a low-risk step.
The deployment can be staged, with the new version being initially released to a subset of the production environment and monitored before being rolled out.
The deployment is automated, allowing for the reliable delivery of new functionality to users within minutes if needed.
The deployment pipeline is supported by platform provisioning and system configuration management. It allows teams to create, maintain, and tear down complete environments automatically or at the push of a button.
Automated platform provisioning ensures that your candidate applications are deployed to, and tests carried out against correctly configured and reproducible environments.
It also helps horizontal scalability and allows the business to try out new products in a sandbox environment at any time.
The multiple stages in a deployment pipeline involve different groups of people collaborating and supervising the release of the new version of your application.
Release and pipeline orchestration provide a top-level view of the entire pipeline, allowing you to define and control the stages and gain insight into the overall software delivery process.
By carrying out value stream mappings on your releases, you can
- highlight any remaining inefficiencies and hot spots and
- pinpoint opportunities to improve your pipeline.
These automated pipelines need infrastructure to run on. The efficiency of this infrastructure will have a direct impact on the effectiveness of the pipeline.
Azure Pipelines is a cloud service that automatically builds and tests your code project and makes it available to other users. It works with just about any language or project type.
Azure Pipelines combines continuous integration (CI) and continuous delivery (CD) to test and build your code and ship it to any target constantly and consistently.
Azure Pipelines is a fully featured cross-platform CI and CD service. It works with your preferred Git provider and can deploy to most major cloud services, including Azure services.
You can use many languages with Azure Pipelines, such as Python, Java, PHP, Ruby, C#, and Go.
Before you use continuous integration and continuous delivery practices for your applications, you must have your source code in a version control system. Azure Pipelines integrates with GitHub, GitLab, Azure Repos, Bitbucket, and Subversion.
You can use Azure Pipelines with most application types, such as Java, JavaScript, Python, .NET, PHP, Go, XCode, and C++.
Use Azure Pipelines to deploy your code to multiple targets. Targets including:
- Container registries.
- Virtual machines.
- Azure services, or any on-premises or cloud target such:
- Microsoft Azure.
- Google Cloud.
- Amazon Web Services (AWS).
To produce packages that others can consume, you can publish NuGet, npm, or Maven packages to the built-in package management repository in Azure Pipelines.
You also can use any other package management repository of your choice.
Implementing CI and CD pipelines help to ensure consistent and quality code that's readily available to users.
Azure Pipelines is a quick, easy, and safe way to automate building your projects and making them available to users.
Continuous integration is used to automate tests and builds for your project. It is the practice used by development teams to simplify the testing and building of code. CI helps to catch bugs or issues early in the development cycle when they're easier and faster to fix. Automated tests and builds are run as part of the CI process. The process can run on a schedule, whenever code is pushed, or both. Items known as artifacts are produced from CI systems. The continuous delivery release pipelines use them to drive automatic deployments.
Continuous delivery is used to automatically deploy and test code in multiple stages to help drive quality. It is a process by which code is built, tested, and deployed to one or more test and production stages. Deploying and testing in multiple stages helps drive quality. Continuous integration systems produce deployable artifacts, which include infrastructure and apps. Automated release pipelines consume these artifacts to release new versions and fixes to the target of your choice. Monitoring and alerting systems constantly run to drive visibility into the entire CD process. This process ensures that errors are caught often and early.
| Continuous integration (CI) | Continuous delivery (CD) |
|---|
Increase code coverage. | Automatically deploy code to production.
Build faster by splitting test and build runs. | Ensure deployment targets have the latest code.
Automatically ensure you don't ship broken code. | Use tested code from the CI process.
Run tests continually. | ''
There are several reasons to use Azure Pipelines for your CI and CD solution. You can use it to:
- Work with any language or platform.
- Deploy to different types of targets at the same time.
- Integrate with Azure deployments.
- Build on Windows, Linux, or macOS machines.
- Integrate with GitHub.
- Work with open-source projects.
-
Agent When your build or deployment runs, the system begins one or more jobs. An agent is installable software that runs a build or deployment job.
-
Artifact An artifact is a collection of files or packages published by a build. Artifacts are made available for the tasks, such as distribution or deployment.
-
Build A build represents one execution of a pipeline. It collects the logs associated with running the steps and the test results.
-
Deployment target A deployment target is a virtual machine, container, web app, or any service used to host the developed application. A pipeline might deploy the app to one or more deployment targets after the build is completed and tests are run.
-
Job A build contains one or more jobs. Most jobs run on an agent. A job represents an execution boundary of a set of steps. All the steps run together on the same agent. For example, you might build two configurations - x86 and x64. In this case, you have one build and two jobs.
-
Pipeline A pipeline defines the continuous integration and deployment process for your app. It's made up of steps called tasks.
It can be thought of as a script that describes how your test, build, and deployment steps are run.
-
Release When you use the visual designer, you can create a release or a build pipeline. A release is a term used to describe one execution of a release pipeline. It's made up of deployments to multiple stages.
-
Stage Stages are the primary divisions in a pipeline: "build the app," "run integration tests," and "deploy to user acceptance testing" are good examples of stages.
-
Task A task is the building block of a pipeline. For example, a build pipeline might consist of
- build and
- test tasks. A release pipeline consists of deployment tasks. Each task runs a specific job in the pipeline.
-
Trigger A trigger is set up to tell the pipeline when to run. You can configure a pipeline to run upon:
- a push to a repository at scheduled times or,
- completing another build. All these actions are known as triggers.
This module explores differences between Microsoft-hosted and self-hosted agents, detail job types, and introduces agent pools configuration. You will understand typical situations to use agent pools and how to manage its security. Also, it explores communication to deploy using Azure Pipelines to target servers.
To build your code or deploy your software, you generally need at least one agent.
As you add more code and people, you'll eventually need more.
When your build or deployment runs, the system begins one or more jobs.
An agent is an installable software that runs one build or deployment job at a time.
If your pipelines are in Azure Pipelines, then you've got a convenient option to build and deploy using a Microsoft-hosted agent.
With a Microsoft-hosted agent, maintenance and upgrades are automatically done.
Each time a pipeline is run, a new virtual machine (instance) is provided. The virtual machine is discarded after one use.
For many teams, this is the simplest way to build and deploy.
You can try it first and see if it works for your build or deployment. If not, you can use a self-hosted agent.
A Microsoft-hosted agent has job time limits.
An agent that you set up and manage on your own to run build and deployment jobs is a self-hosted agent.
You can use a self-hosted agent in Azure Pipelines. A self-hosted agent gives you more control to install dependent software needed for your builds and deployments.
You can install the agent on:
- Linux.
- macOS.
- Windows.
- Linux Docker containers. After you've installed the agent on a machine, you can install any other software on that machine as required by your build or deployment jobs.
A self-hosted agent doesn't have job time limits.
In Azure DevOps, there are four types of jobs available:
- Agent pool jobs. The most common types of jobs. The jobs run on an agent that is part of an agent pool.
- Container jobs. Similar jobs to Agent Pool Jobs run in a container on an agent part of an agent pool.
- Deployment group jobs. Jobs that run on systems in a deployment group.
- Agentless jobs. Jobs that run directly on the Azure DevOps. They don't require an agent for execution. It's also-often-called Server Jobs.
Instead of managing each agent individually, you organize agents into agent pools. An agent pool defines the sharing boundary for all agents in that pool.
In Azure Pipelines, pools are scoped to the entire organization so that you can share the agent machines across projects.
If you create an Agent pool for a specific project, only that project can use the pool until you add the project pool into another project.
When creating a build or release pipeline, you can specify which pool it uses, organization, or project scope.
To share an agent pool with multiple projects, use an organization scope agent pool and add them in each of those projects, add an existing agent pool, and choose the organization agent pool. If you create a new agent pool, you can automatically grant access permission to all pipelines.
Azure Pipelines provides a pre-defined agent pool-named Azure Pipelines with Microsoft-hosted agents.
It will often be an easy way to run jobs without configuring build infrastructure.
The following virtual machine images are provided by default:
- Windows Server 2022 with Visual Studio 2022.
- Windows Server 2019 with Visual Studio 2019.
- Ubuntu 20.04.
- Ubuntu 18.04.
- macOS 11 Big Sur.
- macOS X Catalina 10.15. By default, all contributors in a project are members of the User role on each hosted pool.
It allows every contributor to the author and runs build and release pipelines using a Microsoft-hosted pool.
Pools are used to run jobs.
If you've got many agents intended for different teams or purposes, you might want to create more pools, as explained below.
Here are some typical situations when you might want to create agent pools:
-
You're a project member, and you want to use a set of machines your team owns for running build and deployment jobs.
- First, make sure you're a member of a group in All Pools with the Administrator role.
- Next, create a New project agent pool in your project settings and select the option to Create a new organization agent pool. As a result, both an organization and project-level agent pool will be created.
- Finally, install and configure agents to be part of that agent pool.
-
You're a member of the infrastructure team and would like to set up a pool of agents for use in all projects.
- First, make sure you're a member of a group in All Pools with the Administrator role.
- Next, create a New organization agent pool in your admin settings and select Autoprovision corresponding project agent pools in all projects while creating the pool. This setting ensures all projects have a pool pointing to the organization agent pool. The system creates a pool for existing projects, and in the future, it will do so whenever a new project is created.
- Finally, install and configure agents to be part of that agent pool.
-
You want to share a set of agent machines with multiple projects, but not all of them.
- First, create a project agent pool in one of the projects and select the option to Create a new organization agent pool while creating that pool.
- Next, go to each of the other projects, and create a pool in each of them while selecting the option to Use an existing organization agent pool.
- Finally, install and configure agents to be part of the shared agent pool.
The agent communicates with Azure Pipelines to determine which job it needs to run and report the logs and job status.
The agent always starts this communication. All the messages from the agent to Azure Pipelines over HTTPS, depending on how you configure the agent.
This pull model allows the agent to be configured in different topologies, as shown below.
Here's a standard communication pattern between the agent and Azure Pipelines.
The user registers an agent with Azure Pipelines by adding it to an agent pool. You've to be an agent pool administrator to register an agent in that pool. The identity of the agent pool administrator is needed only at the time of registration. It isn't persisted on the agent, nor is it used to communicate further between the agent and Azure Pipelines.
Once the registration is complete, the agent downloads a listener OAuth token and uses it to listen to the job queue.
Periodically, the agent checks to see if a new job request has been posted in the job queue in Azure Pipelines. The agent downloads the job and a job-specific OAuth token when a job is available. This token is generated by Azure Pipelines for the scoped identity specified in the pipeline. That token is short-lived and is used by the agent to access resources (for example, source code) or modify resources (for example, upload test results) on Azure Pipelines within that job.
Once the job is completed, the agent discards the job-specific OAuth token and checks if there's a new job request using the listener OAuth token.
The payload of the messages exchanged between the agent, and Azure Pipelines are secured using asymmetric encryption. Each agent has a public-private key pair, and the public key is exchanged with the server during registration.
The server uses the public key to encrypt the job's payload before sending it to the agent. The agent decrypts the job content using its private key. Secrets stored in build pipelines, release pipelines, or variable groups are secured when exchanged with the agent.
When you use the agent to deploy artifacts to a set of servers, it must-have "line of sight" connectivity to those servers.
The Microsoft-hosted agent pools, by default, have connectivity to Azure websites and servers running in Azure.
Suppose your on-premises environments don't have connectivity to a Microsoft-hosted agent pool (because of intermediate firewalls). In that case, you'll need to manually configure a self-hosted agent on the on-premises computer(s).
The agents must have connectivity to the target on-premises environments and access to the Internet to connect to Azure Pipelines or Azure DevOps Server, as shown in the following diagram.
To register an agent, you need to be a member of the administrator role in the agent pool.
The identity of the agent pool administrator is only required at the time of registration. It's not persisted on the agent and isn't used in any following communication between the agent and Azure Pipelines.
Also, you must be a local administrator on the server to configure the agent.
Your agent can authenticate to Azure DevOps using one of the following methods:
- Personal access token (PAT)
Generate and use a PAT to connect an agent with Azure Pipelines. PAT is the only scheme that works with Azure Pipelines. Also, as explained above, this PAT is used only when registering the agent and not for succeeding communication.
-Interactive versus service You can run your agent as either a service or an interactive process. Whether you run an agent as a service or interactively, you can choose which account you use to run the agent.
It's different from your credentials when registering the agent with Azure Pipelines. The choice of agent account depends solely on:
- the needs of the tasks running in your build and deployment jobs.
For example, to run tasks that use Windows authentication to access an external service, you must run the agent using an account with access to that service.
However, if you're running UI tests such as Selenium or Coded UI tests that require a browser, the browser is launched in the context of the agent account.
After configuring the agent, we recommend you first try it in interactive mode to ensure it works. Then, we recommend running the agent in one of the following modes so that it reliably remains to run for production use. These modes also ensure that the agent starts automatically if the machine is restarted.
You can use the service manager of the operating system to manage the lifecycle of the agent. Also, the experience for auto-upgrading the agent is better when it's run as a service.
As an interactive process with autologon enabled. In some cases, you might need to run the agent interactively for production use, such as UI tests.
When the agent is configured to run in this mode, the screen saver is also disabled.
Some domain policies may prevent you from enabling autologon or disabling the screen saver.
In such cases, you may need to:
- seek an exemption from the domain policy or
- run the agent on a workgroup computer where the domain policies don't apply.
There are security risks when you enable automatic login or disable the screen saver. You allow other users to walk up to the computer and use the account that automatically logs on. If you configure the agent to run in this way, you must ensure the computer is physically protected; for example, located in a secure facility. If you use Remote Desktop to access the computer on which an agent is running with autologon, simply closing the Remote Desktop causes the computer to be locked, and any UI tests that run on this agent may fail. To avoid this, use the tscon command to disconnect from Remote Desktop.
Microsoft updates the agent software every few weeks in Azure Pipelines.
The agent version is indicated in the format {major}.{minor}. For instance, if the agent version is 2.1, the major version is 2, and the minor version is 1.
When a newer version of the agent is only different in minor versions, it's automatically upgraded by Azure Pipelines.
This upgrade happens when one of the tasks requires a newer version of the agent.
If you run the agent interactively or a newer major version of the agent is available, you must manually upgrade the agents. Also, you can do it from the agent pools tab under your project collection or organization.
You can view the version of an agent by navigating to Agent pools and selecting the Capabilities tab for the wanted agent.
Azure Pipelines: [https://dev.azure.com/{your_organization}/_admin/_AgentPool](https://dev.azure.com/{your_organization}/_admin/_AgentPool)
In many cases, yes. Specifically:
- If you use a self-hosted agent, you can run incremental builds.
For example, you define a CI build pipeline that doesn't clean the repo or do a clean build. Your builds will typically run faster.
- You don't get these benefits when using a Microsoft-hosted agent. The agent is destroyed after the build or release pipeline is completed.
- A Microsoft-hosted agent can take longer to start your build. While it often takes just a few seconds for your job to be assigned to a Microsoft-hosted agent, it can sometimes take several minutes for an agent to be allocated, depending on the load on our system.
Yes. This approach can work well for agents who run jobs that don't consume many shared resources. For example, you could try it for agents that run releases that mostly orchestrate deployments and don't do much work on the agent itself.
In other cases, you might find that you don't gain much efficiency by running multiple agents on the same machine.
For example, it might not be worthwhile for agents that run builds that consume many disks and I/O resources.
You might also have problems if parallel build jobs use the same singleton tool deployment, such as npm packages.
For example, one build might update a dependency while another build is in the middle of using it, which could cause unreliable results and errors.
Understanding how security works for agent pools helps you control sharing and use of agents.
In Azure Pipelines, roles are defined on each agent pool. Membership in these roles governs what operations you can do on an agent pool.
| Role on an organization agent pool | Purpose |
|---|
Reader | Members of this role can view the organization's agent pool and agents. You typically use it to add operators that are responsible for monitoring the agents and their health.
Service Account | Members of this role can use the organization agent pool to create a project agent pool in a project. If you follow the guidelines above for creating new project agent pools, you typically don't have to add any members here.
Administrator | Also, with all the above permissions, members of this role can register or unregister agents from the organization's agent pool. They can also refer to the organization agent pool when creating a project agent pool in a project. Finally, they can also manage membership for all roles of the organization agent pool. The user that made the organization agent pool is automatically added to the Administrator role for that pool.
The All agent pools node in the Agent Pools tab is used to control the security of all organization agent pools.
Role memberships for individual organization agent pools are automatically inherited from the 'All agent pools' node.
Roles are also defined on each organization's agent pool. Memberships in these roles govern what operations you can do on an agent pool.
| Role on a project agent pool | Purpose |
|---|---|
| Reader | Members of this role can view the project agent pool. You typically use it to add operators responsible for monitoring the build and deployment jobs in that project agent pool |
User | Members of this role can use the project agent pool when authoring build or release pipelines.
Administrator | Also, to all the above operations, members of this role can manage membership for all roles of the project agent pool. The user that created the pool is automatically added to the Administrator role for that pool.
The All agent pools node in the Agent pools tab controls the security of all project agent pools in a project.
Role memberships for individual project agent pools are automatically inherited from the 'All agent pools' node.
By default, the following groups are added to the Administrator role of 'All agent pools':
- Build Administrators,
- Release Administrators,
- Project Administrators.
YAML-based pipelines allow you to fully implement CI/CD as code, in which pipeline definitions reside in the same repository as the code that is part of your Azure DevOps project. YAML-based pipelines support a wide range of features that are part of the classic pipelines, such as pull requests, code reviews, history, branching, and templates.
Regardless of the choice of the pipeline style, to build your code or deploy your solution by using Azure Pipelines, you need an agent. An agent hosts compute resources that run one job at a time. Jobs can be run directly on the host machine of the agent or in a container. You have an option to run your jobs using Microsoft-hosted agents, which are managed for you, or implementing a self-hosted agent that you set up and manage on your own.
In this lab, you'll step through converting a classic pipeline into a YAML-based one and running it first by using a Microsoft-hosted agent and then performing the equivalent task using a self-hosted agent.
This module describes parallel jobs and how to estimate their usage. Also, it presents Azure Pipelines for open-source projects, explores Visual Designer and YAML pipelines.
Consider an organization that has only one Microsoft-hosted parallel job.
This job allows users in that organization to collectively run only one build or release job at a time.
When more jobs are triggered, they're queued and will wait for the previous job to finish.
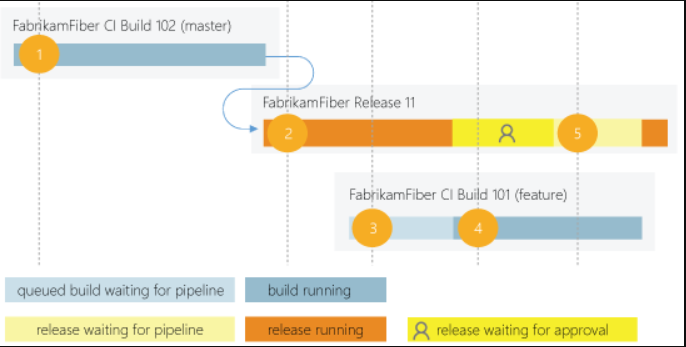
A release consumes a parallel job only when it's being actively deployed to a stage.
While the release is waiting for approval or manual intervention, it doesn't consume a parallel job.
- FabrikamFiber CI Build 102 (main branch) starts first.
- Deployment of FabrikamFiber Release 11 is triggered by the completion of FabrikamFiber CI Build 102.
- FabrikamFiber CI Build 101 (feature branch) is triggered. The build can't start yet because Release 11's deployment is active. So, the build stays queued.
- Release 11 waits for approvals. Fabrikam CI Build 101 starts because a release waiting for approvals doesn't consume a parallel job.
- Release 11 is approved. It resumes only after Fabrikam CI Build 101 is completed.
The term job can refer to multiple concepts, and its meaning depends on the context:
- When you define a build or release, you can define it as a collection of jobs. When a build or release runs, you can run multiple jobs as part of that build or release.
- Each job consumes a parallel job that runs on an agent. When there aren't enough parallel jobs available for your organization, then the jobs are queued up and run one after the other. You don't consume any parallel jobs when you run a server job or deploy to a deployment group.
You could begin by seeing if the free tier offered in your organization is enough for your teams.
When you've reached the 1,800 minutes per month limit for the free tier of Microsoft-hosted parallel jobs, you can start by buying one parallel job to remove this monthly time limit before deciding to purchase more.
As the number of queued builds and releases exceeds the number of parallel jobs you have, your build and release queues will grow longer.
When you find the queue delays are too long, you can purchase extra parallel jobs as needed.
A simple rule of thumb: Estimate that you'll need one parallel job for every four to five users in your organization.
In the following scenarios, you might need multiple parallel jobs:
- If you have multiple teams, and if each of them requires a CI build, you'll likely need a parallel job for each team.
- If your CI build trigger applies to multiple branches, you'll likely need a parallel job for each active branch.
- If you develop multiple applications by using one organization or server, you'll likely need more parallel jobs: one to deploy each application simultaneously.
Browse to Organization settings > Pipelines > Parallel jobs
URL example: https://{your_organization}/_settings/buildqueue?_a=concurrentJobs
View the maximum number of parallel jobs that are available in your organization.
Select View in-progress jobs to display all the builds and releases that are actively consuming an available parallel job or queued waiting for a parallel job to be available.
Parallel jobs are purchased at the organization level, and they're shared by all projects in an organization.
Currently, there isn't a way to partition or dedicate parallel job capacity to a specific project or agent pool. For example:
- You purchase two parallel jobs in your organization.
- You queue two builds in the first project, and both the parallel jobs are consumed.
- You queue a build in the second project. That build won't start until one of the builds in your first project is completed.
Azure DevOps offers developers a suite of DevOps capabilities, including Source control, Agile planning, Build, Release, Test, and more.
But to use Azure DevOps features requires the user to first sign in using a Microsoft or GitHub Account.
However, this blocks many engaging scenarios where you want to publicly share your code and artifacts or provide a wiki library or build status page for unauthenticated users.
With public projects, users can mark an Azure DevOps Team Project as public.
This will enable anonymous users to view the contents of that project in a read-only state enabling collaboration with anonymous (unauthenticated) users that wasn't possible before.
Anonymous users will essentially see the same views as authenticated users, with non-public functionality such as settings or actions (such as queue build) hidden or disabled.
Projects in Azure DevOps provide a repository for source code and a place for a group of developers and teams to plan, track progress, and collaborate on building software solutions.
One or more projects can be defined within an organization in Azure DevOps.
Users that aren't signed into the service have read-only access to public projects on Azure DevOps.
Private projects require users to be granted access to the project and signed in to access the services.
Non-members of a public project will have read-only access to a limited set of services, precisely:
- Browse the code base, download code, view commits, branches, and pull requests.
- View and filter work items.
- View a project page or dashboard.
- View the project Wiki.
- Do a semantic search of the code or work items.
Supporting open-source development is one of the most compelling scenarios for public projects. A good example is the .NET Core CLI.
Their source is hosted on GitHub, and they use Azure DevOps for their CI builds.
However, if you click on the build badges in their readme, you'll not see the build results unless you were one of the project's maintainers.
Since this is an open-source project, everybody should view the full results to see why a build failed and maybe even send a pull request to help fix it.
Thanks to public projects capabilities, the team will enable just that experience. Everyone in the community will have access to the same build results, whether they are a maintainer on the project.
Microsoft will automatically apply the free tier limits for public projects if you meet both conditions:
- Your pipeline is part of an Azure Pipelines public project. Your pipeline builds a public repository from - GitHub or the same public project in your Azure DevOps organization.
You can have as many users as you want when you're using Azure Pipelines. There's no per-user charge for using Azure Pipelines.
Users with both basic and stakeholder access can author as many builds and releases as they want. Are there any limits on the number of builds and release pipelines that I can create? No. You can create hundreds or even thousands of definitions for no charge. You can register any number of self-hosted agents for no cost.
Yes. Visual Studio Enterprise subscribers get one self-hosted parallel job in each Azure DevOps Services organization where they're a member.
If you run builds for more than 14 paid hours in a month, the per-minute plan might be less cost-effective than the parallel jobs model.
You can create and configure your build and release pipelines in the Azure DevOps web portal with the visual designer. (Often referred to as "Classic Pipelines"). Configure Azure Pipelines to use your Git repo.
- Use the Azure Pipelines visual designer to create and configure your build and release pipelines.
- Push your code to your version control repository. This action triggers your pipeline and runs tasks such as building or testing code.
- The build creates an artifact used by the rest of your pipeline to run tasks such as deploying to staging or production.
- Your code is now updated, built, tested, and packaged. It can be deployed to any target.
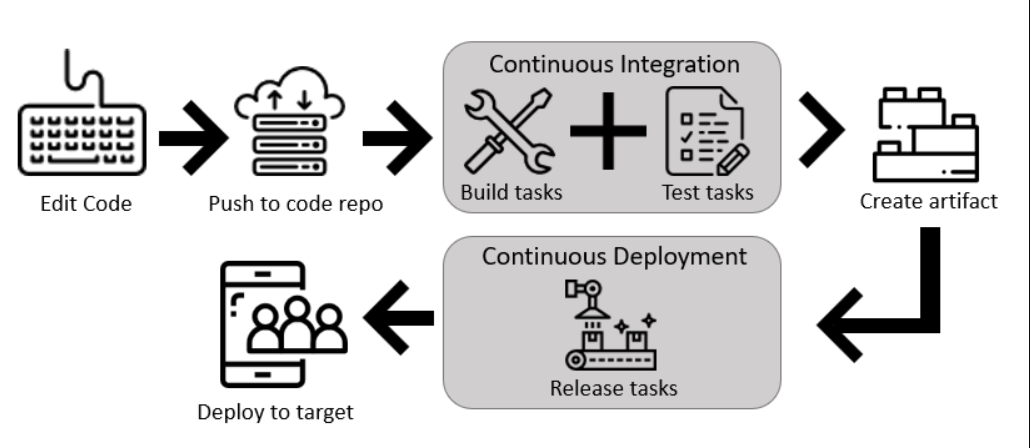
The visual designer is great for new users in continuous integration (CI) and continuous delivery (CD).
- The visual representation of the pipelines makes it easier to get started.
- The visual designer is in the same hub as the build results. This location makes it easier to switch back and forth and make changes. If you think the designer workflow is best for you, create your first pipeline using the visual designer.
Mirroring the rise of interest in infrastructure as code, there has been considerable interest in defining pipelines as code. However, pipeline as code doesn't mean executing a script that's stored in source control.
Codified pipelines use their programming model to simplify the setup and maximize reuse.
A typical microservice architecture will require many deployment pipelines that are identical. It's tedious to craft these pipelines via a user interface or SDK.
The ability to define the pipeline and the code helps apply all principles of code sharing, reuse, templatization, and code reviews. Azure DevOps offers you both experiences. You can either use YAML to define your pipelines or use the visual designer to do the same. You will, however, find that more product-level investments are being made to enhance the YAML pipeline experience.
When you use YAML, you define your pipeline mostly in code (a YAML file) alongside the rest of the code for your app. When using the visual designer, you define a build pipeline to build and test your code and publish artifacts.
You also specify a release pipeline to consume and deploy those artifacts to deployment targets.
-
Configure Azure Pipelines to use your Git repo.
-
Edit your azure-pipelines.yml file to define your build.
-
Push your code to your version control repository. This action kicks off the default trigger to build and deploy and then monitor the results.
-
Your code is now updated, built, tested, and packaged. It can be deployed to any target.
The pipeline is versioned with your code and follows the same branching structure. You get validation of your changes through code reviews in pull requests and branch build policies. Every branch you use can modify the build policy by adjusting the azure-pipelines.yml file. A change to the build process might cause a break or result in an unexpected outcome. Because the change is in version control with the rest of your codebase, you can more easily identify the issue.
If you think the YAML workflow is best for you, create your first pipeline by using YAML.
While there's a slightly higher learning curve and a higher degree of code orientation when defining pipelines with YAML, it's now the preferred method.
Continuous Integration is one of the key pillars of DevOps.
Once you have your code in a version control system, you need an automated way of integrating the code on an ongoing basis.
Azure Pipelines can be used to create a fully featured cross-platform CI and CD service.
It works with your preferred Git provider and can deploy to most major cloud services, including Azure.
This module details continuous integration practice and the pillars for implementing it in the development lifecycle, its benefits, and properties.
After completing this module, students and professionals can:
- Explain why Continuous Integration matters.
- Implement Continuous Integration using Azure Pipelines.
- Explain the benefits of Continuous Integration. Describe build properties.
Continuous integration (CI) is the process of automating the build and testing of code every time a team member commits changes to version control.
CI encourages developers to share their
- code and
- unit tests by merging their changes into a shared version control repository after every small task completion.
Committing code triggers an automated build system to grab the latest code from the shared repository and
- build,
- test, and
- validate the entire main branch (also known as the trunk or main).
The idea is to
- minimize the cost of integration by making it an early consideration.
Developers can discover conflicts at the boundaries between new and existing code early, while conflicts are still relatively easy to reconcile.
Once the conflict is resolved, work can continue with confidence that the new code honors the requirements of the existing codebase.
Integrating code frequently doesn't offer any guarantees about the quality of the new code or functionality.
In many organizations, integration is costly because manual processes ensure that the code meets standards, introduces bugs, and breaks existing functionality.
Frequent integration can create friction when the level of automation doesn't match the amount of quality assurance measures in place.
In practice, continuous integration relies on
- robust test suites and
- an automated system to run those tests to address this friction within the integration process.
When a developer merges code into the main repository, automated processes kick off a build of the new code.
Afterward, test suites are run against the new build to check whether any integration problems were introduced.
If either the build or the test phase fails, the team is alerted to work to fix the build.
The end goal of continuous integration is to make integration a
- simple,
- repeatable process part of the everyday development workflow to reduce integration costs and respond to early defects.
Working to make sure the system is
- robust,
- automated,
- and fast while cultivating a team culture that encourages frequent iteration and responsiveness to build issues is fundamental to the strategy's success.
Continuous integration relies on four key elements for successful implementation:
-
a Version Control System, manages changes to your source code over time.
- Git
- Apache Subversion
- Team Foundation Version Control
-
Package Management System, used to install, uninstall, and manage software packages.
- NuGet
- Node Package Manager (NPM)
- Chocolatey
- HomeBrew
- RPM
-
Continuous Integration System, merges all developer working copies to shared mainline several times a day.
- Azure DevOps
- TeamCity
- Jenkins
-
an Automated Build Process.creates a software build, including compiling, packaging, and running automated tests.
- Apache Ant
- NAnt
- Gradle
Continuous integration (CI) provides many benefits to the development process, including:
- Improving code quality based on rapid feedback
- Triggering automated testing for every code change
- Reducing build times for quick feedback and early detection of problems (risk reduction)
- Better managing technical debt and conducting code analysis
- Reducing long, complex, and bug-inducing merges
- Increasing confidence in codebase health long before production deployment
Possibly the most essential benefit of continuous integration is rapid feedback to the developer.
If the developer commits something and breaks the code, they'll know that immediately from the build, unit tests, and other metrics.
Suppose successful integration is happening across the team.
In that case, the developer will also know if their code change breaks something that another team member did to a different part of the codebase.
This process removes long, complex, and drawn-out bug-inducing merges, allowing organizations to deliver swiftly.
Continuous integration also enables tracking metrics to assess code quality over time. For example, unit test passing rates, code that breaks frequently, code coverage trends, and code analysis.
It can provide information on what has been changed between builds for traceability benefits. Also, introduce evidence of what teams do to have a global view of build results.
You may have noticed that in some demos, the build number was just an integer, yet in other demos, there's a formatted value that was based upon the date.
It is one of the items that can be set in the Build Options.
The example shown below is from the build options that were configured by the ASP.NET Web Application build template:
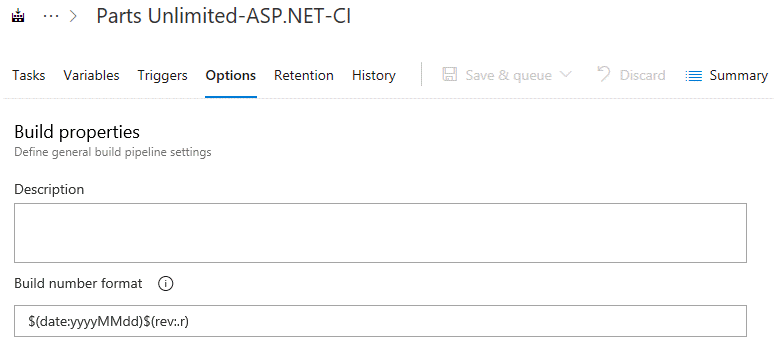
In this case, the date has been retrieved as a system variable, then formatted via yyyyMMdd, and the revision is then appended.
While we have been manually queuing each build, we'll soon see that builds can be automatically triggered.
It's a key capability required for continuous integration.
But there are times that we might not want the build to run, even if it's triggered.
It can be controlled with these settings:
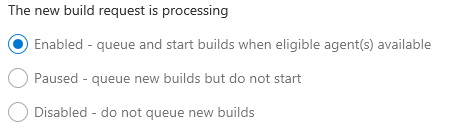
You can use the Paused setting to allow new builds to queue but to hold off then starting them.
You can configure properties for the build job as shown here:
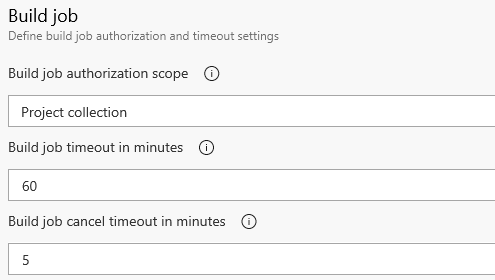
The authorization scope determines whether the build job is limited to accessing resources in the current project. Or accessing resources in other projects in the project collection.
The build job timeout determines how long the job can execute before being automatically canceled.
A value of zero (or leaving the text box empty) specifies that there's no limit.
The build job cancel timeout determines how long the server will wait for a build job to respond to a cancellation request.
Some development teams like to show the state of the build on an external monitor or website.
These settings provide a link to the image to use for it. Here's an example Azure Pipelines badge that has Succeeded:

This module describes pipeline strategies, configuration, implementation of multi-agent builds, and what source controls Azure Pipelines supports.
After completing this module, students and professionals can:
- Define a build strategy.
- Explain and configure demands.
- Implement multi-agent builds.
- Use different source control types available in Azure Pipelines.
Not all agents are the same. We've seen that they can be based on different operating systems, but they can also install different dependencies.
To describe it, every agent has a set of capabilities configured as name-value pairs. The capabilities such as machine name and operating system type that are automatically discovered are referred to as System capabilities. The ones that you define are called User-defined capabilities.
There's a tab for Capabilities on the Agent Pools page (at the Organization level) when you select an agent.
You can use it to see the available capabilities for an agent and to configure user capabilities.
Opening a configured self-hosted agent, you can see the capabilities on that tab:
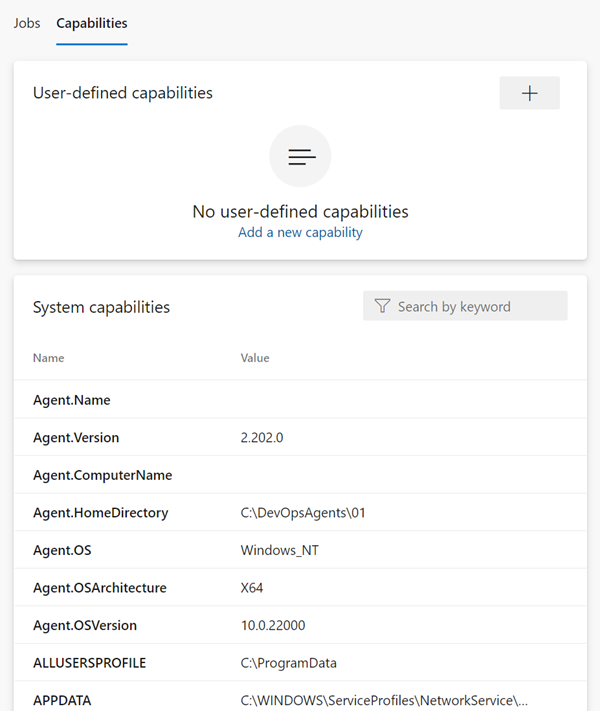
The capabilities such as
- Agent.
- Name
- Version
- HomeDirectory
- ComputerName
- OS
- OSArchitecture
- OSVersion
- ALLUSERSPROFILE
- APPDATA that is automatically discovered is referred to as system capabilities. The ones that you define such ContosoApplication.Path is called user capabilities.
When you configure a build pipeline and the agent pool to use, you can specify specific demands that the agent must meet on the Options tab.
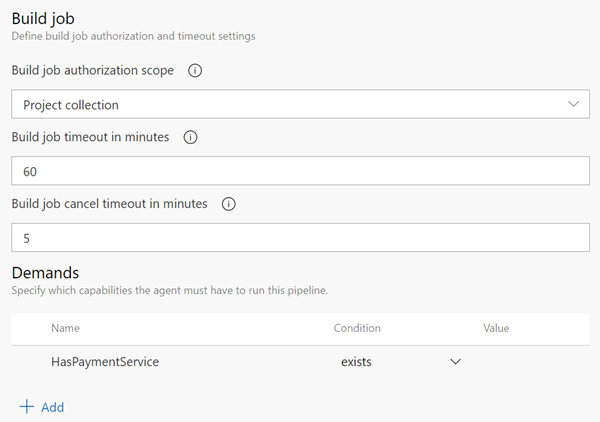
In the build job image, the HasPaymentService is required in the collection of capabilities. And an exists condition, you can choose that a capability equals a specific value.
For more information, see Capabilities.
You can use multiple build agents to support multiple build machines. Either
- distribute the load,
- run builds in parallel, or
- use different agent capabilities.
As an example, components of an application might require different incompatible versions of a library or dependency.
Adding multiple jobs to a pipeline lets you:
- Break your pipeline into sections that need different agent pools or self-hosted agents.
- Publish artifacts in one job and consume them in one or more subsequent jobs.
- Build faster by running multiple jobs in parallel.
- Enable conditional execution of tasks.
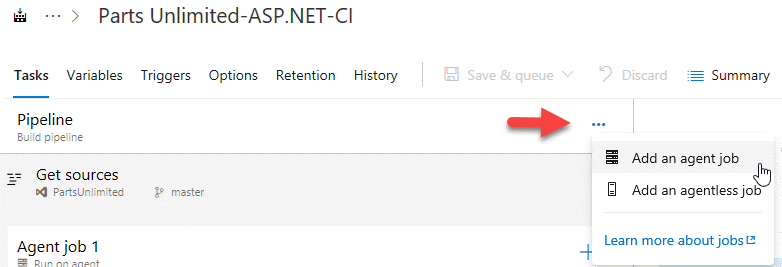
At the organization level, you can configure the number of parallel jobs that are made available.
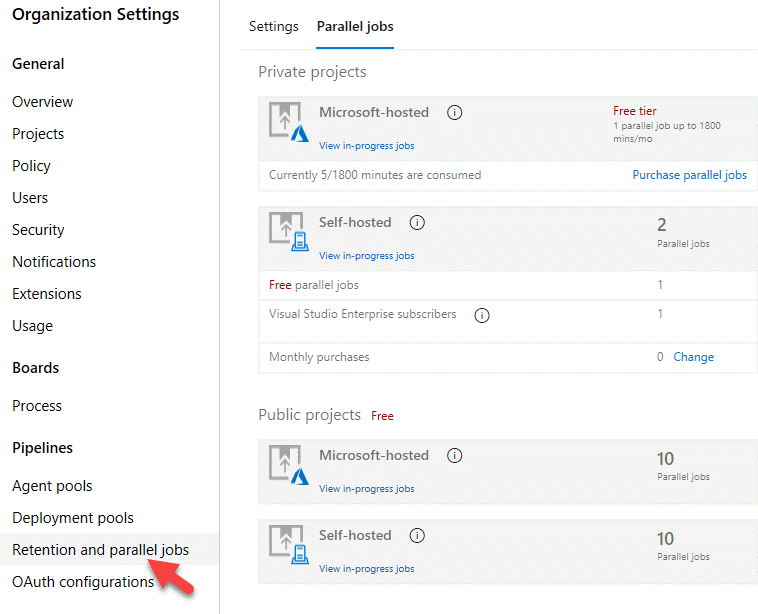
The free tier allows for one parallel job of up to 1800 minutes per month. The self-hosted agents have higher levels.
Note: You can define a build as a collection of jobs rather than as a single job. Each job consumes one of these parallel jobs that run on an agent. If there aren't enough parallel jobs available for your organization, the jobs will be queued and run sequentially.
Azure DevOps can be integrated with a wide range of existing tooling used for builds or associated with builds.
Azure Pipelines offers both
- YAML-based pipelines and
- the classic editor.
The table shows the repository types supported by both.
| Repository type | Azure Pipelines (YAML) | Azure Pipelines (classic editor) |
|---|
Azure Repos Git | Yes | Yes
Azure Repos TFVC | No | Yes
Bitbucket Cloud | Yes | Yes
Other Git (generic) | No | Yes
GitHub | Yes | Yes
GitHub Enterprise Server | Yes | Yes
Subversion | No | Yes
This module details Azure Pipelines anatomy and structure, templates, YAML resources, and how to use multiple repositories in your pipeline.
Also, it explores communication to deploy using Azure Pipelines to target servers.
After completing this module, students and professionals can:
- Describe advanced Azure Pipelines anatomy and structure.
- Detail templates and YAML resources.
- Implement and use multiple repositories.
- Explore communication to deploy using Azure Pipelines.
Azure Pipelines can automatically build and validate every pull request and commit to your Azure Repos Git repository.
Azure Pipelines can be used with Azure DevOps public projects and Azure DevOps private projects.
In future training sections, we'll also learn how to use Azure Repos with external code repositories such as GitHub.
Let's start by creating a hello world YAML Pipeline.
name: 1.0$(Rev:.r)

# simplified trigger (implied branch)
trigger:
  - main

# equivalents trigger
# trigger:
#  branches:
#    include:
#    - main

variables:
  name: John

pool:
  vmImage: ubuntu-latest

jobs:
  - job: helloworld
    steps:
      - checkout: self
      - script: echo "Hello, $(name)"
Most pipelines will have these components:
- Name – though often it's skipped (if it's skipped, a date-based name is generated automatically). The variable name is a bit misleading since the name is in the build number format. You'll get an integer number if you don't explicitly set a name format. A monotonically increasing number of runs triggered off this pipeline, starting at 1. This number is stored in Azure DevOps. You can make use of this number by referencing $(Rev).
To make a date-based number, you can use the format $(Date:yyyyMMdd) to get a build number like 20221003.
To get a semantic number like 1.0.x, you can use something like 1.0.$(Rev:.r).
- Trigger – more on triggers later, but without an explicit trigger. There's an implicit "trigger on every commit to any path from any branch in this repo." If there's no explicit triggers section, then it's implied that any commit to any path in any branch will trigger this pipeline to run.
However, you can be more precise by using filters such as branches or paths.
Let's consider this trigger:
trigger:
  branches:
    include:
- maintrigger:
branches:
exclude:
- mainYou can get the name of the branch from the variables Build.SourceBranch (for the full name like refs/heads/main) or Build.SourceBranchName (for the short name like main).
What about a trigger for any branch with a name that starts with topic/ and only if the change is in the webapp folder?
trigger:
  branches:
    include:
      - feature/*
  paths:
    include:
      - webapp/**
Tip: Don't forget one overlooked trigger: none. You can use none if you never want your pipeline to trigger automatically. It's helpful if you're going to create a pipeline that is only manually triggered.
There are other triggers for other events, such as:
-
Pull Requests (PRs) can also filter branches and paths.
-
Schedules allow you to specify cron expressions for scheduling pipeline runs.
-
Pipelines will enable you to trigger pipelines when other pipelines are complete, allowing pipeline chaining. You can find all the documentation on triggers here.
-
Variables – "Inline" variables (more on other types of variables later). Every variable is a key: value pair. The key is the variable's name, and it has a value.
To dereference a variable, wrap the key in $().
- Job – every pipeline must have at least one job. A job is a set of steps executed by an agent in a queue (or pool). Jobs are atomic – they're performed wholly on a single agent. You can configure the same job to run on multiple agents simultaneously, but even in this case, the entire set of steps in the job is run on every agent. You'll need two jobs if you need some steps to run on one agent and some on another.
A job has the following attributes besides its name:
- displayName – a friendly name.
- dependsOn - a way to specify dependencies and ordering of multiple jobs.
You can define dependencies between jobs using the dependsOn property. It lets you specify sequences and fan-out and fan-in scenarios.
A sequential dependency is implied if you don't explicitly define a dependency.
If you want jobs to run parallel, you need to specify dependsOn: [].
Let's look at a few examples. Consider this pipeline:
jobs:
  - job: A
    steps:
    # steps omitted for brevity

  - job: B
    steps:
    # steps omitted for brevity
Because no dependsOn was specified, the jobs will run sequentially: first A and then B.
To have both jobs run in parallel, we add dependsOn: [] to job B:
jobs:
  - job: A
    steps:
    # steps omitted for brevity

  - job: B
    dependsOn: [] # this removes the implicit dependency on previous stage and causes this to run in parallel
    steps:
    # steps omitted for brevity
If we want to fan out and fan in, we can do that too:
jobs:
  - job: A
    steps:
      - script: echo' job A.'

  - job: B
    dependsOn: A
    steps:
      - script: echo' job B.'

  - job: C
    dependsOn: A
    steps:
      - script: echo' job C.'

  - job: D
    dependsOn:
      - B
      - C
    steps:
      - script: echo' job D.'

  - job: E
    dependsOn:
      - B
      - D
    steps:
- script: echo' job E.'-
condition – a binary expression: if it evaluates to true, the job runs; if false, the job is skipped.
-
strategy - used to control how jobs are parallelized.
-
continueOnError - to specify if the rest of the pipeline should continue or not if this job fails.
-
pool – the name of the pool (queue) to run this job on.
-
workspace - managing the source workspace.
-
container - for specifying a container image to execute the job later.
-
variables – variables scoped to this job.
-
steps – the set of steps to execute.
-
timeoutInMinutes and cancelTimeoutInMinutes for controlling timeouts.
-
services - sidecar services that you can spin up.
-
Pool – you configure which pool (queue) the job must run on.
-
Checkout – the "checkout: self" tells the job which repository (or repositories if there are multiple checkouts) to check out for this job.
Classic builds implicitly checkout any repository artifacts, but pipelines require you to be more explicit using the checkout keyword:
- Jobs check out the repo they're contained in automatically unless you specify checkout: none.
- Deployment jobs don't automatically check out the repo, so you'll need to specify checkout: self for deployment jobs if you want access to files in the YAML file's repo.
Downloading artifacts requires you to use the download keyword. Downloads also work the opposite way for jobs and deployment jobs:
Jobs don't download anything unless you explicitly define a download.
Deployment jobs implicitly do a download: current, which downloads any pipeline artifacts created in the existing pipeline.
To prevent it, you must specify download: none.
What if your job requires source code in another repository? You'll need to use resources. Resources let you reference:
- other repositories
- pipelines
- builds (classic builds)
- containers (for container jobs)
- packages
To reference code in another repo, specify that repo in the resources section and then reference it via its alias in the checkout step:
resources:
  repositories:
    - repository: appcode
      type: git
      name: otherRepo

steps:
- checkout: appcode- Steps – the actual tasks that need to be executed: in this case, a "script" task (the script is an alias) that can run inline scripts.
Steps are the actual "things" that execute in the order specified in the job.
Each step is a task: out-of-the-box (OOB) tasks come with Azure DevOps. Many have aliases and tasks installed on your Azure DevOps organization via the marketplace.
Creating custom tasks is beyond the scope of this chapter, but you can see how to make your custom tasks here.
A pipeline is one or more stages that describe a CI/CD process.
A pipeline is one or more stages that describe a CI/CD process.
Stages are the primary divisions in a pipeline. The stages "Build this app," "Run these tests," and "Deploy to preproduction" are good examples.
A stage is one or more jobs, units of work assignable to the same machine.
You can arrange both stages and jobs into dependency graphs. Examples include "Run this stage before that one" and "This job depends on the output of that job."
A job is a linear series of steps. Steps can be tasks, scripts, or references to external templates.
This hierarchy is reflected in the structure of a YAML file like:
- Pipeline
- Stage A
- Job 1
- Step 1.1
- Step 1.2
- ...
- Job 2
- Step 2.1
- Step 2.2
- ...
- Job 1
- Stage B
- ...
- Stage A
Simple pipelines don't require all these levels. For example, you can omit the containers for stages and jobs in a single job build because there are only steps.
The schema for a pipeline:
name: string # build numbering format
resources:
  pipelines: [pipelineResource]
  containers: [containerResource]
  repositories: [repositoryResource]
variables: # several syntaxes
trigger: trigger
pr: pr
stages: [stage | templateReference]
If you have a single-stage, you can omit the stages keyword and directly specify the jobs keyword:
# ... other pipeline-level keywords
jobs: [job | templateReference]
If you've a single-stage and a single job, you can omit the stages and jobs keywords and directly specify the steps keyword:
# ... other pipeline-level keywords
steps: [script | bash | pwsh | powershell | checkout | task | templateReference]A stage is a collection of related jobs. By default, stages run sequentially. Each stage starts only after the preceding stage is complete.
Use approval checks to control when a stage should run manually. These checks are commonly used to
- control deployments to production environments.
Checks are a mechanism available to the resource owner. They
- control when a stage in a pipeline consumes a resource.
As an owner of a resource like an environment, you can define checks required before a stage that consumes the resource can start.
This example runs three stages, one after another. The middle stage runs two jobs in parallel.
stages:
  - stage: Build
    jobs:
      - job: BuildJob
        steps:
          - script: echo Building!
  - stage: Test
    jobs:
      - job: TestOnWindows
        steps:
          - script: echo Testing on Windows!
      - job: TestOnLinux
        steps:
          - script: echo Testing on Linux!
  - stage: Deploy
    jobs:
      - job: Deploy
        steps:
- script: echo Deploying the code!- a collection of steps run by an agent or on a server. Jobs can run conditionally and might depend on previous jobs.
jobs:
  - job: MyJob
    displayName: My First Job
    continueOnError: true
    workspace:
      clean: outputs
    steps:
- script: echo My first job- allow you to use specific techniques to deliver updates when deploying your application.
Techniques examples:
- Enable initialization.
- Deploy the update.
- Route traffic to the updated version.
- Test the updated version after routing traffic.
- If there's a failure, run steps to restore to the last known good version.
strategy:
    runOnce:
        preDeploy:
            pool: [ server | pool ] # See pool schema.
            steps:
            - script: [ script | bash | pwsh | powershell | checkout | task | templateReference ]
        deploy:
            pool: [ server | pool ] # See pool schema.
            steps: ...
        routeTraffic:
            pool: [ server | pool ]
            steps:
            ...
        postRouteTraffic:
            pool: [ server | pool ]
            steps:
            ...
        on:
            failure:
                pool: [ server | pool ]
                steps:
                ...
            success:
                pool: [ server | pool ]
                steps:
...A rolling deployment replaces instances of the previous version of an application with instances of the new version. It can be configured by specifying the keyword rolling: under the strategy: node.
strategy:
    rolling:
        maxParallel: [ number or percentage as x% ]
        preDeploy:
            steps:
            - script: [ script | bash | pwsh | powershell | checkout | task | templateReference ]
        deploy:
            steps:
            ...
        routeTraffic:
            steps:
            ...
        postRouteTraffic:
            steps:
            ...
        on:
            failure:
                steps:
                ...
            success:
                steps:
...Using this strategy, you can first roll out the changes to a small subset of servers. The canary deployment strategy is an advanced deployment strategy that helps mitigate the risk of rolling out new versions of applications.
As you gain more confidence in the new version, you can release it to more servers in your infrastructure and route more traffic to it.
strategy:
    canary:
        increments: [ number ]
        preDeploy:
            pool: [ server | pool ] # See pool schema.
            steps:
            - script: [ script | bash | pwsh | powershell | checkout | task | templateReference ]
        deploy:
            pool: [ server | pool ] # See pool schema.
            steps:
            ...
        routeTraffic:
            pool: [ server | pool ]
            steps:
            ...
        postRouteTraffic:
            pool: [ server | pool ]
            steps:
            ...
        on:
            failure:
                pool: [ server | pool ]
                steps:
                ...
            success:
                pool: [ server | pool ]
                steps:
...You can achieve the deployment strategies technique by using lifecycle hooks. Depending on the pool attribute, each resolves into an agent or server job.
Lifecycle hooks inherit the pool specified by the deployment job. Deployment jobs use the $(Pipeline.Workspace) system variable.
Available lifecycle hooks:
preDeploy: Used to run steps that initialize resources before application deployment starts.
- deploy: Used to run steps that deploy your application. Download artifact task will be auto-injected only in the deploy hook for deployment jobs. To stop downloading artifacts, use - download: none or choose specific artifacts to download by specifying Download Pipeline Artifact task.
- routeTraffic: Used to run steps that serve the traffic to the updated version.
- postRouteTraffic: Used to run the steps after the traffic is routed. Typically, these tasks monitor the health of the updated version for a defined interval.
- on: failure or on: success: Used to run steps for rollback actions or clean-up.
A step is a linear sequence of operations that make up a job. Each step runs its process on an agent and accesses the pipeline workspace on a local hard drive.
This behavior means environment variables aren't preserved between steps, but file system changes are.
steps:
  - script: echo This run in the default shell on any machine
  - bash: |
      echo This multiline script always runs in Bash.
      echo Even on Windows machines!

  - pwsh: |
      Write-Host "This multiline script always runs in PowerShell Core."
      Write-Host "Even on non-Windows machines!"
Tasks are the building blocks of a pipeline. There's a catalog of tasks available to choose from.
steps:
  - task: VSBuild@1
    displayName: Build
    timeoutInMinutes: 120
    inputs:
solution: '**\*.sln'You can export reusable sections of your pipeline to a separate file. These individual files are known as templates.
Azure Pipelines supports four types of templates:
- Stage
- Job
- Step
- Variable
You can also use templates to control what is allowed in a pipeline and define how parameters can be used.
- Parameter Templates themselves can include other templates. Azure Pipelines supports 50 individual template files in a single pipeline.
You can define a set of stages in one file and use it multiple times in other files.
In this example, a stage is repeated twice for two testing regimes. The stage itself is specified only once.
# File: stages/test.yml

parameters:
  name: ""
  testFile: ""

stages:
  - stage: Test_${{ parameters.name }}
    jobs:
      - job: ${{ parameters.name }}_Windows
        pool:
          vmImage: windows-latest
        steps:
          - script: npm install
          - script: npm test -- --file=${{ parameters.testFile }}

      - job: ${{ parameters.name }}_Mac
        pool:
          vmImage: macOS-latest
        steps:
          - script: npm install
          - script: npm test -- --file=${{ parameters.testFile }}
Templated pipeline
# File: azure-pipelines.yml

stages:
  - template: stages/test.yml # Template reference
    parameters:
      name: Mini
      testFile: tests/miniSuite.js

  - template: stages/test.yml # Template reference
    parameters:
      name: Full
testFile: tests/fullSuite.jsYou can define a set of jobs in one file and use it multiple times in other files.
In this example, a single job is repeated on three platforms. The job itself is specified only once.
# File: jobs/build.yml

parameters:
  name: ""
  pool: ""
  sign: false

jobs:
  - job: ${{ parameters.name }}
    pool: ${{ parameters.pool }}
    steps:
      - script: npm install
      - script: npm test

      - ${{ if eq(parameters.sign, 'true') }}:
          - script: sign
# File: azure-pipelines.yml
jobs:
- template: jobs/build.yml # Template reference
parameters:
name: macOS
pool:
vmImage: "macOS-latest"
- template: jobs/build.yml # Template reference
parameters:
name: Linux
pool:
vmImage: "ubuntu-latest"
- template: jobs/build.yml # Template reference
parameters:
name: Windows
pool:
vmImage: "windows-latest"
sign: true # Extra step on Windows onlyYou can define a set of steps in one file and use it multiple times in another.
# File: steps/build.yml

steps:
  - script: npm install
  - script: npm test
# File: azure-pipelines.yml
jobs:
- job: macOS
pool:
vmImage: "macOS-latest"
steps:
- template: steps/build.yml # Template reference
- job: Linux
pool:
vmImage: "ubuntu-latest"
steps:
- template: steps/build.yml # Template reference
- job: Windows
pool:
vmImage: "windows-latest"
steps:
- template: steps/build.yml # Template reference
- script: sign # Extra step on Windows onlyYou can define a set of variables in one file and use it multiple times in other files.
In this example, a set of variables is repeated across multiple pipelines. The variables are specified only once.
# File: variables/build.yml
variables:
  - name: vmImage
    value: windows-latest

  - name: arch
    value: x64

  - name: config
    value: debug
# File: component-x-pipeline.yml
variables:
- template: variables/build.yml # Template reference
pool:
vmImage: ${{ variables.vmImage }}
steps:
- script: build x ${{ variables.arch }} ${{ variables.config }}# File: component-y-pipeline.yml
variables:
- template: variables/build.yml # Template reference
pool:
vmImage: ${{ variables.vmImage }}
steps:
- script: build y ${{ variables.arch }} ${{ variables.config }}Resources in YAML represent sources of pipelines, repositories, and containers.
resources:
  pipelines: [pipeline]
  repositories: [repository]
containers: [container]If you have an Azure pipeline that produces artifacts, your pipeline can consume the artifacts by using the pipeline keyword to define a pipeline resource.
resources:
  pipelines:
    - pipeline: MyAppA
      source: MyCIPipelineA

    - pipeline: MyAppB
      source: MyCIPipelineB
      trigger: true

    - pipeline: MyAppC
      project: DevOpsProject
      source: MyCIPipelineC
      branch: releases/M159
      version: 20190718.2
      trigger:
        branches:
          include:
            - master
            - releases/*
          exclude:
            - users/*
Container jobs let you isolate your tools and dependencies inside a container. The agent launches an instance of your specified container then runs steps inside it. The container keyword lets you specify your container images.
Service containers run alongside a job to provide various dependencies like databases.
resources:
  containers:
    - container: linux
      image: ubuntu:16.04

    - container: windows
      image: myprivate.azurecr.io/windowsservercore:1803
      endpoint: my_acr_connection

    - container: my_service
      image: my_service:tag
      ports:
        - 8080:80 # bind container port 80 to 8080 on the host machine
        - 6379 # bind container port 6379 to a random available port on the host machine
      volumes:
- /src/dir:/dst/dir # mount /src/dir on the host into /dst/dir in the containerLet the system know about the repository if:
- If your pipeline has templates in another repository.
- If you want to use multi-repo checkout with a repository that requires a service connection.
The repository keyword lets you specify an external repository.
resources:
  repositories:
    - repository: common
      type: github
      name: Contoso/CommonTools
endpoint: MyContosoServiceConnectionYou might have micro git repositories providing utilities used in multiple pipelines within your project. Pipelines often rely on various repositories.
You can have different repositories with sources, tools, scripts, or other items that you need to build your code. By using multiple checkout steps in your pipeline, you can fetch and check out other repositories to the one you use to store your YAML pipeline.
Previously Azure Pipelines hasn't offered support for using multiple code repositories in a single pipeline. Using artifacts or directly cloning other repositories via script within a pipeline, you can work around it. It leaves access management and security down to you.
Repositories are now first-class citizens within Azure Pipelines. It enables some exciting use cases, such as checking out specific repository parts and checking multiple repositories.
There's also a use case for not checking out any repository in the pipeline. It can be helpful in cases where you're setting up a pipeline to do a job that has no dependency on any repository.
Repositories can be specified as a repository resource or in line with the checkout step. Supported repositories are Azure Repos Git, GitHub, and BitBucket Cloud.
The following combinations of checkout steps are supported.
- If there are no checkout steps, the default behavior is checkout: self is the first step.
- If there's a single checkout: none step, no repositories are synced or checked out.
- If there's a single checkout: self step, the current repository is checked out.
- If there's a single checkout step that isn't self or none, that repository is checked out instead of self.
- If there are multiple checkout steps, each named repository is checked out to a folder named after the repository. Unless a different path is specified in the checkout step, use checkout: self as one of the checkout steps.
If your repository type requires a service connection or other extended resources field, you must use a repository resource.
Even if your repository type doesn't require a service connection, you may use a repository resource.
For example, you have a repository resource defined already for templates in a different repository.
In the following example, three repositories are declared as repository resources. The repositories and the current self-repository containing the pipeline YAML are checked out.
resources:
  repositories:
    - repository: MyGitHubRepo # The name used to reference this repository in the checkout step.
      type: github
      endpoint: MyGitHubServiceConnection
      name: MyGitHubOrgOrUser/MyGitHubRepo

    - repository: MyBitBucketRepo
      type: bitbucket
      endpoint: MyBitBucketServiceConnection
      name: MyBitBucketOrgOrUser/MyBitBucketRepo

    - repository: MyAzureReposGitRepository
      type: git
      name: MyProject/MyAzureReposGitRepo

trigger:
  - main

pool:
  vmImage: "ubuntu-latest"

steps:
  - checkout: self
  - checkout: MyGitHubRepo
  - checkout: MyBitBucketRepo
  - checkout: MyAzureReposGitRepository

- script: dir $(Build.SourcesDirectory)If your repository doesn't require a service connection, you can declare it according to your checkout step.
steps:
  - checkout: git://MyProject/MyRepo # Azure Repos Git repository in the same organization
- checkout: git://MyProject/MyRepo@features/tools # checks out the features/tools branch
- checkout: git://MyProject/MyRepo@refs/heads/features/tools # also checks out the features/tools branch.
- checkout: git://MyProject/MyRepo@refs/tags/MyTag # checks out the commit referenced by MyTag.Azure Pipelines can automatically build and validate every pull request and commit to your GitHub repository.
When creating your new pipeline, you can select a GitHub repository and then a YAML file in that repository (self repository). By default, this is the repository that your pipeline builds.
Azure Pipelines must be granted access to your repositories to trigger their builds and fetch their code during builds.
There are three authentication types for granting Azure Pipelines access to your GitHub repositories while creating a pipeline.
- GitHub App.
- OAuth.
- Personal access token (PAT).
You can create a continuous integration (CI) trigger to run a pipeline whenever you push an update to the specified branches or push selected tags.
YAML pipelines are configured by default with a CI trigger on all branches.
trigger:
  - main
  - releases/*
You can configure complex triggers that use exclude or batch.
# specific branches build
trigger:
  branches:
    include:
      - master
      - releases/*
    exclude:
      - releases/old*
Also, it's possible to configure pull request (PR) triggers to run whenever a pull request is opened with one of the specified target branches or when updates are made to such a pull request.
You can specify the target branches when validating your pull requests.
To validate pull requests that target main and releases/* and start a new run the first time a new pull request is created, and after every update made to the pull request:
pr:
  - main
  - releases/*
You can specify the full name of the branch or a wildcard.
For more information and guidance about GitHub integration, see Build GitHub repositories
GitHub Actions are the primary mechanism for automation within GitHub.
They can be used for a wide variety of purposes, but one of the most common is to implement Continuous Integration.
In this module, you will learn what GitHub Actions, action flow, and its elements are. Understand what events are, explore jobs and runners, and how to read console output from actions.
After completing this module, students and professionals can:
- Explain GitHub Actions and workflows.
- Create and work with GitHub Actions and Workflows.
- Describe Events, Jobs, and Runners.
- Examine the output and release management for actions.
Actions are the mechanism used to provide workflow automation within the GitHub environment.
They're often used to build continuous integration (CI) and continuous deployment (CD) solutions.
However, they can be used for a wide variety of tasks:
- Automated testing.
- Automatically responding to new issues, mentions.
- Triggering code reviews.
- Handling pull requests.
- Branch management. They're defined in YAML and stay within GitHub repositories.
Actions are executed on "runners," either hosted by GitHub or self-hosted.
Contributed actions can be found in the GitHub Marketplace.
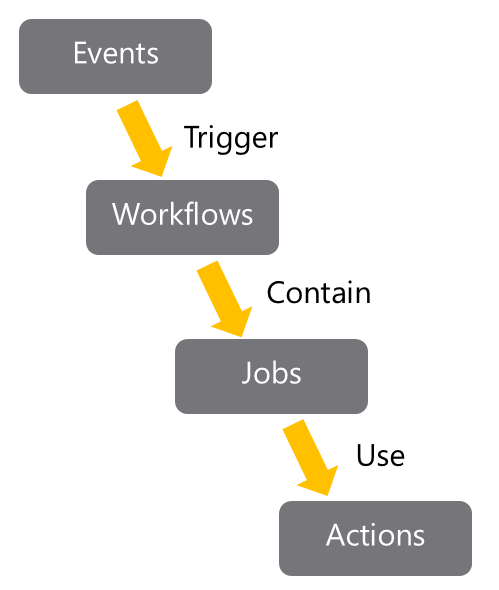
GitHub tracks events that occur. Events can trigger the start of workflows.
Workflows can also start on cron-based schedules and can be triggered by events outside of GitHub.
They can be manually triggered.
Workflows are the unit of automation. They contain Jobs.
Jobs use Actions to get work done.
Workflows define the automation required. It details the events that should trigger the workflow.
Also, define the jobs that should run when the workflow is triggered.
The job defines the location in which the actions will run, like which runner to use.
Workflows are written in YAML and live within a GitHub repository at the place .github/workflows.
Example workflow:
# .github/workflows/build.yml
name: Node Build.

on: [push]

jobs:
  mainbuild:
    runs-on: ${{ matrix.os }}

  strategy:
    matrix:
      node-version: [12.x]
      os: [windows-latest]

  steps:
    - uses: actions/checkout@v1
    - name: Run node.js on latest Windows.
      uses: actions/setup-node@v1
      with:
        node-version: ${{ matrix.node-version }}

    - name: Install NPM and build.
      run: |
        npm ci
        npm run build
You can find a set of starter workflows here: Starter Workflows.
You can see the allowable syntax for workflows here: Workflow syntax for GitHub Actions.
Workflows include several standard syntax elements.
- Name: is the name of the workflow. It's optional but is highly recommended. It appears in several places within the GitHub UI.
- On: is the event or list of events that will trigger the workflow.
- Jobs: is the list of jobs to be executed. Workflows can contain one or more jobs.
- Runs-on: tells Actions which runner to use.
- Steps: It's the list of steps for the job. Steps within a job execute on the same runner.
- Uses: tells Actions, which predefined action needs to be retrieved. For example, you might have an action that installs node.js.
- Run: tells the job to execute a command on the runner. For example, you might execute an NPM command.
Events are implemented by the on clause in a workflow definition.
There are several types of events that can trigger workflows.
With this type of trigger, a cron schedule needs to be provided.
on:
  schedule:
    - cron: "0 8-17 * * 1-5"
Cron schedules are based on five values:
- Minute (0 - 59)
- Hour (0 - 23)
- Day of the month (1 - 31)
- Month (1 - 12)
- Day of the week (0 - 6) Aliases for the months are JAN-DEC and for days of the week are SUN-SAT.
A wild card means any. (* is a special value in YAML, so the cron string will need to be quoted)
So, in the example above, the schedule would be 8 AM - 5 PM Monday to Friday.
Code events will trigger most actions. It occurs when an event of interest occurs in the repository.
The event below would fire when a pull request occurs.
on: pull_requeston: [push, pull_request]The event shows how to be specific about the section of the code that is relevant.
In this case, it will fire when a pull request is made in the develop branch.
on:
  pull_request:
    branches:
- developThere's a unique event that is used to trigger workflow runs manually. You should use the workflow_dispatch event.
Your workflow must be in the default branch for the repository.
Workflows can be executed when a GitHub webhook is called.
on: gollumThis event would fire when someone updates (or first creates) a Wiki page.
Events can be on repository_dispatch. That allows events to fire from external systems.
For more information on events, see Events that trigger workflows.
Workflows contain one or more jobs. A job is a set of steps that will be run in order on a runner.
Steps within a job execute on the same runner and share the same filesystem.
The logs produced by jobs are searchable, and artifacts produced can be saved.
By default, if a workflow contains multiple jobs, they run in parallel.
jobs:
  startup:
    runs-on: ubuntu-latest
    steps:
      - run: ./setup_server_configuration.sh
  build:
    steps:
      - run: ./build_new_server.sh
Sometimes you might need one job to wait for another job to complete.
You can do that by defining dependencies between the jobs.
jobs:
  startup:
    runs-on: ubuntu-latest
    steps:
      - run: ./setup_server_configuration.sh
  build:
    needs: startup
    steps:
      - run: ./build_new_server.sh
If the startup job in the example above fails, the build job won't execute.
For more information on job dependencies, see the section Creating Dependent Jobs at Managing complex workflows.
When you execute jobs, the steps execute on a Runner.
The steps can be the execution of a shell script or the execution of a predefined Action.
GitHub provides several hosted runners to avoid you needing to spin up your infrastructure to run actions.
Now, the maximum duration of a job is 6 hours, and for a workflow is 72 hours.
For JavaScript code, you have implementations of node.js on:
- Windows
- macOS
- Linux If you need to use other languages, a Docker container can be used. Now, the Docker container support is only Linux-based.
These options allow you to write in whatever language you prefer.
JavaScript actions will be faster (no container needs to be used) and more versatile runtime.
The GitHub UI is also better for working with JavaScript actions.
If you need different configurations to the ones provided, you can create a self-hosted runner.
GitHub has published the source code for self-hosted runners as open-source, and you can find it here: https://github.com/actions/runner.
It allows you to customize the runner completely. However, you then need to maintain (patch, upgrade) the runner system.
Self-hosted runners can be added at different levels within an enterprise:
- Repository-level (single repository).
- Organizational-level (multiple repositories in an organization).
- Enterprise-level (multiple organizations across an enterprise).
Doing it would be a significant security risk, as you would allow someone (potentially) to run code on your runner within your network.
For more information on self-hosted runners, see: About self-hosted runners.
Actions will often produce console output. You don't need to connect directly to the runners to retrieve that output.
The console output from actions is available directly from within the GitHub UI.
Select Actions on the top repository menu to see a list of executed workflows to see the output.
Next, click on the job's name to see the steps' output.
Console output can help debug. If it isn't sufficient, you can also enable more logging. See: Enabling debug logging.
While you might be happy to retrieve the latest version of the action, there are many situations where you might want a specific version of the action.
You can request a specific release of action in several ways:
Tags allow you to specify the precise versions that you want to work.
steps:
-uses: actions/install-timer@v2.0.1You can specify a requested SHA-based hash for an action. It ensures that the action hasn't changed. However, the downside to this is that you also won't receive updates to the action automatically either.
steps:
  -uses: actions/install-timer@327239021f7cc39fe7327647b213799853a9eb98
Branches A common way to request actions is to refer to the branch you want to work with. You'll then get the latest version from that branch. That means you'll benefit from updates, but it also increases the chance of code-breaking.
steps:
-uses: actions/install-timer@developGitHub offers several learning tools for actions.
GitHub Actions: hello-world You'll see a basic example of how to:
- Organize and identify workflow files.
- Add executable scripts.
- Create workflow and action blocks.
- Trigger workflows.
- Discover workflow logs.
This module details continuous integration using GitHub Actions and describes environment variables, artifacts, best practices, and how to secure your pipeline using encrypted variables and secrets.
After completing this module, students and professionals can:
- Implement Continuous Integration with GitHub Actions.
- Use environment variables.
- Share artifacts between jobs and use Git tags.
- Create and manage secrets.
It's an example of a basic continuous integration workflow created by using actions:
name: dotnet Build

on: [push]

jobs:
    build:
        runs-on: ubuntu-latest
        strategy:
            matrix:
                node-version: [10.x]
        steps:

        - uses: actions/checkout@main
        - uses: actions/setup-dotnet@v1
            with:
                dotnet-version: '3.1.x'

- run: dotnet build awesomeproject- On: Specifies what will occur when code is pushed.
- Jobs: There's a single job called build.
- Strategy: It's being used to specify the Node.js version.
- Steps: Are doing a checkout of the code and setting up dotnet.
- Run: Is building the code.
When using Actions to create CI or CD workflows, you'll typically need to pass variable values to the actions. It's done by using Environment Variables.
GitHub provides a series of built-in environment variables.
It all has a GITHUB_ prefix.
Note: Setting that prefix for your variables will result in an error.
Examples of built-in environment variables are:
GITHUB_WORKFLOW is the name of the workflow.
GITHUB_ACTION is the unique identifier for the action.
GITHUB_REPOSITORY is the name of the repository (but also includes the name of the owner in owner/repo format)
Variables are set in the YAML workflow files. They're passed to the actions that are in the step.
jobs:
  verify-connection:
    steps:
      - name: Verify Connection to SQL Server
      - run: node testconnection.js
    env:
      PROJECT_SERVER: PH202323V
      PROJECT_DATABASE: HAMaster
For more information on environment variables, including a list of built-in environment variables, see Environment variables.
When using Actions to create CI or CD workflows, you'll often need to pass artifacts created by one job to another.
The most common ways to do it are by using the upload-artifact and download-artifact actions.
This action can upload one or more files from your workflow to be shared between jobs.
You can upload a specific file:
- uses: actions/upload-artifact
  with:
    name: harness-build-log
    path: bin/output/logs/harness.log
You can upload an entire folder:
- uses: actions/upload-artifact
  with:
    name: harness-build-logs
    path: bin/output/logs/
You can use wildcards:
- uses: actions/upload-artifact
  with:
    name: harness-build-logs
    path: bin/output/logs/harness[ab]?/*
You can specify multiple paths:
- uses: actions/upload-artifact
  with:
    name: harness-build-logs
    path: |
      bin/output/logs/harness.log
      bin/output/logs/harnessbuild.txt
For more information on this action, see upload-artifact.
There's a corresponding action for downloading (or retrieving) artifacts
- uses: actions/download-artifact
  with:
    name: harness-build-log
If no path is specified, it's downloaded to the current directory.
For more information on this action, see download-artifact.
A default retention period can be set for the repository, organization, or enterprise.
You can set a custom retention period when uploading, but it can't exceed the defaults for the repository, organization, or enterprise.
- uses: actions/upload-artifact
  with:
    name: harness-build-log
    path: bin/output/logs/harness.log
retention-days: 12You can delete artifacts directly in the GitHub UI.
For details, you can see: Removing workflow artifacts.
Badges can be used to show the status of a workflow within a repository.
They show if a workflow is currently passing or failing. While they can appear in several locations, they typically get added to the README.md file for the repository.
Badges are added by using URLs. The URLs are formed as follows:
https://github.com/<OWNER>/<REPOSITORY>/actions/workflows/<WORKFLOW_FILE>/badge.svg
Where:
- AAAAA is the account name.
- RRRRR is the repository name.
- WWWWW is the workflow name.
They usually indicate the status of the default branch but can be branch-specific. You do this by adding a URL query parameter:
?branch=BBBBB
where:
- BBBBB is the branch name. For more information, see: Adding a workflow status badge.
It's essential to follow best practices when creating actions:
- Create chainable actions. Don't create large monolithic actions. Instead, create smaller functional actions that can be chained together. Version your actions like other code. Others might take dependencies on various versions of your actions. Allow them to specify versions.
- Provide the latest label. If others are happy to use the latest version of your action, make sure you provide the latest label that they can specify to get it.
- Add appropriate documentation. As with other codes, documentation helps others use your actions and can help avoid surprises about how they function.
- Add details action.yml metadata. At the root of your action, you'll have an action.yml file. Ensure it has been populated with author, icon, expected inputs, and outputs.
- Consider contributing to the marketplace. It's easier for us to work with actions when we all contribute to the marketplace. Help to avoid people needing to relearn the same issues endlessly.
Releases are software iterations that can be packed for release.
In Git, releases are based on Git tags. These tags mark a point in the history of the repository. Tags are commonly assigned as releases are created.
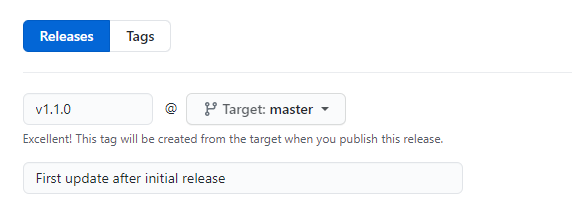
Often these tags will contain version numbers, but they can have other values.
Tags can then be viewed in the history of a repository.
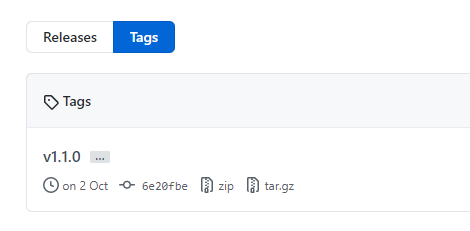
For more information on tags and releases, see: About releases.
Actions often can use secrets within pipelines. Common examples are passwords or keys.
In GitHub actions, It's called Secrets.
Secrets are similar to environment variables but encrypted. They can be created at two levels:
- Repository
- Organization If secrets are created at the organization level, access policies can limit the repositories that can use them.
To create secrets for a repository, you must be the repository's owner. From the repository Settings, choose Secrets, then New Secret.
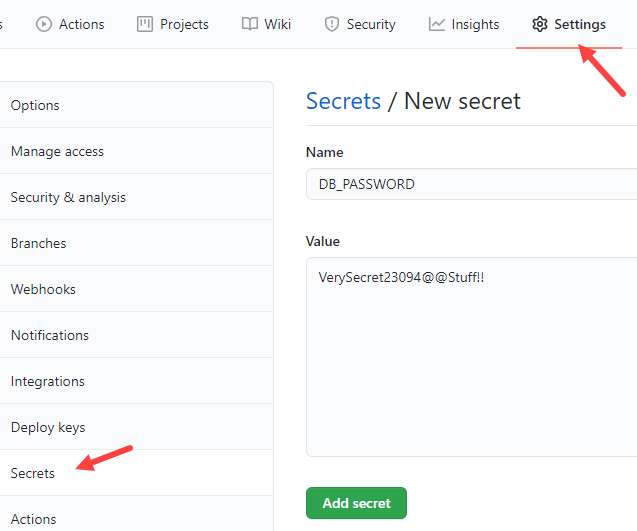
For more information on creating secrets, see Encrypted secrets.
Secrets aren't passed automatically to the runners when workflows are executed.
Instead, when you include an action that requires access to a secret, you use the secrets context to provide it.
steps:
  - name: Test Database Connectivity
    with:
      db_username: ${{ secrets.DBUserName }}
db_password: ${{ secrets.DBPassword }}Secrets shouldn't be passed directly as command-line arguments as they may be visible to others. Instead, treat them like environment variables:
steps:
  - shell: pwsh
    env:
      DB_PASSWORD: ${{ secrets.DBPassword }}
    run: |
db_test "$env:DB_PASSWORD"Workflows can use up to 100 secrets, and they're limited to 64 KB in size.
For more information on creating secrets, see Encrypted secrets.
Containers are the third computing model, after
- bare metal and
- virtual machines
Unlike a VM, which provides hardware virtualization, a container provides operating-system-level virtualization by abstracting the "user space," not the entire operating system. The operating system level architecture is being shared across containers. It's what makes containers so lightweight.
Docker gives you a simple platform for running apps in containers. Either old or new apps on Windows and Linux, and that simplicity is a powerful enabler for all aspects of modern IT.
Containers aren't only faster and easier to use than VMs; they also make far more efficient use of computing hardware. Also, they have provided engineering teams with dramatically more flexibility for running cloud-native applications.
Containers package up the application services and make them portable across different computing environments for dev/test and production use.
With containers, it's easy to ramp application instances to match spikes in demand quickly. And because containers draw on resources of the host OS, they're much lighter weight than virtual machines. It means containers make highly efficient use of the underlying server infrastructure.
Though the container runtime APIs are well suited to managing individual containers, they're woefully inadequate for managing applications that might comprise hundreds of containers spread across multiple hosts.
You need to manage and connect containers to the outside world for
- scheduling,
- load balancing, and
- distribution. It's where a container orchestration tool like Azure Kubernetes Services (AKS) comes into its own.
AKS handles the work of scheduling containers onto a compute cluster and manages the workloads to ensure they run as the user intended.
AKS is an open-source system for deploying, scaling and managing containerized applications. Instead of bolting operations as an afterthought, AKS brings software development and operations together by design.
AKS enables an order-of-magnitude increase in the operability of modern software systems. With declarative, infrastructure-agnostic constructs to describe how applications are composed. Also how they interact and how they're managed.
Containers are portable. A container will run wherever Docker is supported.
Containers allow you to have a consistent development environment. For example, a SQL Server 2019 CU2 container that one developer is working with will be identical to another developer.
Containers can be lightweight. A container may be only tens of megabytes in size, but a virtual machine with its entire operating system may be several gigabytes. Because of it, a single server can host far more containers than virtual machines.
Containers can be efficient: fast to deploy, fast to boot, fast to patch, and quick to update.
If you're a programmer or techie, you've at least heard of Docker: a helpful tool for packing, shipping, and running applications within "containers."
There's a difference between containers and Docker. A container is a thing that runs a little program package, while Docker is the container runtime and orchestrator.
Containers are a solution to the problem of how to get the software to run reliably when moved from one computing environment to another.
It could be from a developer's laptop to a test environment, from a staging environment to production. Also, from a physical machine in a data center to a VM in a private or public cloud.
Problems arise when the supporting software environment isn't identical.
For example, say you'll develop using Python 3, but when it gets deployed to production, it will run on Python 2.7. It's likely to cause several issues.
It's not limited to the software environment; you're likely to come across issues in production if there are differences in the networking stack between the two environments.
A container consists of an entire runtime environment:
- An application, plus all its dependencies.
- Libraries and other binaries.
- Configuration files needed to run it, bundled into one package. You can resolve it by containerizing the application platform and its dependencies. Also, differences in OS distributions and underlying infrastructure are abstracted.
Containers and VMs are similar in their goals: to isolate an application and its dependencies into a self-contained unit that can run anywhere. They remove the need for physical hardware, allowing for:
- More efficient use of computing resources.
- Energy consumption.
- Cost-effectiveness.
The main difference between containers and VMs is in their architectural approach.
Let's take a closer look.
A VM is essentially an emulation of a real computer that executes programs like a real computer. VMs run on top of a physical machine using a "hypervisor."
As you can see in the diagram, VMs package up the virtual hardware, a kernel (OS), and user space for each new VM.
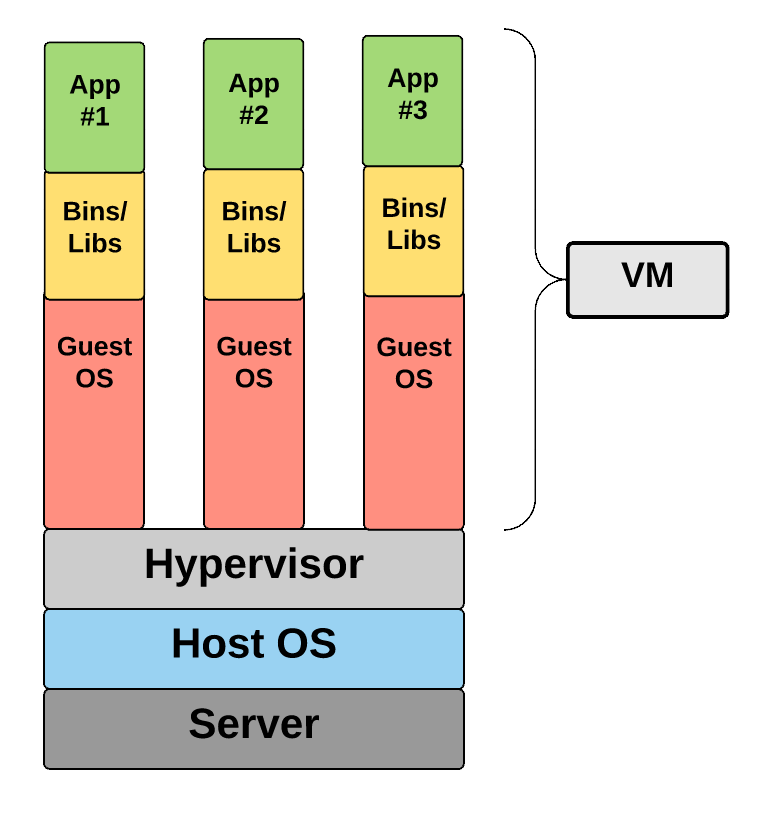
Unlike a VM, which provides hardware virtualization, a container provides operating-system-level virtualization by abstracting the "user space."
This diagram shows that containers package up just the user space, not the kernel or virtual hardware like a VM does. Each container gets its isolated user space to allow multiple containers to run on a single host machine. We can see that all the operating system-level architecture is being shared across containers. The only parts that are created from scratch are the bins and libs. It's what makes containers so lightweight.
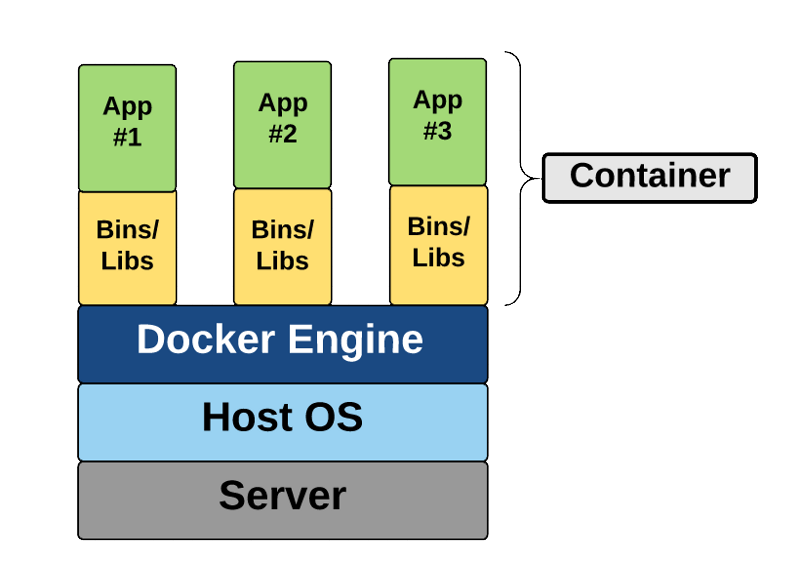
The standard steps when working with containers are:
Docker build - You create an image by executing a Dockerfile.
Docker pull - You retrieve the image, likely from a container registry.
Docker run - You execute the container. An instance is created of the image.
You can often execute the docker run without needing first to do the docker pull.
In that case, Docker will pull the image and then run it. Next time, it won't need to pull it again.
Dockerfiles are text files that contain the commands needed by docker build to assemble an image.
Here's an example of a basic Dockerfile:
FROM ubuntu
LABEL maintainer="johndoe@contoso.com"
ADD appsetup /
RUN /bin/bash -c 'source $HOME/.bashrc; \
echo $HOME'
CMD ["echo", "Hello World from within the container"]
The first line refers to the parent image based on which this new image will be based.
Generally, all images will be based on another existing image. In this case, the Ubuntu image would be retrieved from either a local cache or from DockerHub.
An image that doesn't have a parent is called a base image. In that rare case, the FROM line can be omitted, or FROM scratch can be used instead.
The second line indicates the email address of the person who maintains this file. Previously, there was a MAINTAINER command, but that has been deprecated and replaced by a label.
The third line adds a file to the root folder of the image. It can also add an executable.
The fourth and fifth lines are part of a RUN command. Note the use of the backslash to continue the fourth line onto the fifth line for readability. It's equivalent to having written it instead:
``RUN /bin/bash -c 'source $HOME/.bashrc; echo $HOME'`
The RUN command is run when the docker build creates the image. It's used to configure items within the image.
By comparison, the last line represents a command that will be executed when a new container is created from the image; it's run after container creation.
For more information, you can see the Dockerfile reference
Multi-stage builds give the benefits of the builder pattern without the hassle of maintaining three separate files.
Let us look at a multi-stage Dockerfile.
FROM mcr.microsoft.com/dotnet/core/aspnetcore:3.1 AS base
WORKDIR /app
EXPOSE 80
EXPOSE 443

FROM mcr.microsoft.com/dotnet/core/sdk:3.1 AS build
WORKDIR /src
COPY ["WebApplication1.csproj", ""]
RUN dotnet restore "./WebApplication1.csproj"
COPY . .
WORKDIR "/src/."
RUN dotnet build "WebApplication1.csproj" -c Release -o /app/build

FROM build AS publish
RUN dotnet publish "WebApplication1.csproj" -c Release -o /app/publish

FROM base AS final
WORKDIR /app
COPY --from=publish /app/publish .
ENTRYPOINT ["dotnet", "WebApplication1.dll"]
At first, it simply looks like several dockerfiles stitched together. Multi-stage Dockerfiles can be layered or inherited.
When you look closer, there are a couple of key things to realize.
Notice the third stage.
FROM build AS publish
build isn't an image pulled from a registry.
It's the image we defined in stage 2, where we named the result of our-build (SDK) image "builder."
Docker build will create a named image we can later reference.
We can also copy the output from one image to another.
It's the real power to compile our code with one base SDK image (mcr.microsoft.com/dotnet/core/sdk:3.1) while creating a production image based on an optimized runtime image (mcr.microsoft.com/dotnet/core/aspnet:3.1).
Notice the line.
COPY --from=publish /app/publish .
It takes the /app/publish directory from the published image and copies it to the working directory of the production image.
The first stage provides the base of our optimized runtime image. Notice it derives from mcr.microsoft.com/dotnet/core/aspnet:3.1.
We would specify extra production configurations, such as registry configurations, MSIexec of other components. You would hand off any of those environment configurations to your ops folks to prepare the VM.
The second stage is our build environment. mcr.microsoft.com/dotnet/core/sdk:3.1
This includes everything we need to compile our code. From here, we have compiled binaries we can publish or test—more on testing in a moment.
The third stage derives from our build stage. It takes the compiled output and "publishes" them in .NET terms.
Publish means taking all the output required to deploy your "app/publish/service/component" and placing it in a single directory. It would include your compiled binaries, graphics (images), JavaScript, and so on.
The fourth stage takes the published output and places it in the optimized image we defined in the first stage.
You'll likely want to run unit tests to verify your compiled code. Or the aggregate of the compiled code from multiple developers being merged continues to function as expected.
You could place the following stage between builder and publish to run unit tests.
Copy
FROM build AS test
WORKDIR /src/Web.test
RUN dotnet test
If your tests fail, the build will stop to continue.
You could argue it's simply the logical flow. We first define the base runtime image. Get the compiled output ready, and place it in the base image.
However, it's more practical. While debugging your applications under Visual Studio Container Tools, VS will debug your code directly in the base image.
When you hit F5, Visual Studio will compile the code on your dev machine. The first stage then volume mounts the output to the built runtime image.
You can test any configurations you have made to your production image, such as registry configurations or otherwise.
When the docker build --target base is executed, docker starts processing the dockerfile from the beginning through the stage (target) defined.
Since the base is the first stage, we take the shortest path, making the F5 experience as fast as possible.
If the base were after compilation (builder), you would have to wait for all the next steps to complete.
One of the perf optimizations we make with VS Container Tools is to take advantage of the Visual Studio compilations on your dev machine.
-
Avoid container modularity Try to avoid creating overly complex container images that couple together several applications.
Instead, use multiple containers and try to keep each container to a single purpose.
The website and the database for a web application should likely be in separate containers.
There are always exceptions to any rule but breaking up application components into separate containers increases the chances of reusing containers.
It also makes it more likely that you could scale the application.
For example, in the web application mentioned, you might want to add replicas of the website container but not for the database container.
-
Avoid unnecessary packages To help minimize image sizes, it's also essential to avoid including packages that you suspect might be needed but aren't yet sure if they're required.
Only include them when they're required.
-
Choose an appropriate base While optimizing the contents of your Dockerfiles is essential, it's also crucial to choose the appropriate parent (base) image. Start with an image that only contains packages that are required.
-
Avoid including application data While application data can be stored in the container, it will make your images more prominent.
It would be best to consider using docker volume support to maintain the isolation of your application and its data. Volumes are persistent storage mechanisms that exist outside the lifespan of a container.
Azure provides a wide range of services that help you work with containers.
Here are the essential services that are involved:
-
Azure Container Instances (ACI)
Running your workloads in Azure Container Instances (ACI) allows you to create your applications rather than provisioning and managing the infrastructure that will run the applications.
ACIs are simple and fast to deploy, and when you're using them, you gain the security of hypervisor isolation for each container group. It ensures that your containers aren't sharing an operating system kernel with other containers.
-
Azure Kubernetes Service (AKS)
Kubernetes has quickly become the de-facto standard for container orchestration. This service lets you quickly deploy and manage Kubernetes, to scale and run applications while maintaining overall solid security.
This service started life as Azure Container Services (ACS) and supported Docker Swarm and Mesos/Mesosphere DC/OS at release to manage orchestrations. These original ACS workloads are still supported in Azure, but Kubernetes support was added.
It quickly became so popular that Microsoft changed the acronym for Azure Container Services to AKS and later changed the name of the service to Azure Kubernetes Service (also AKS).
-
Azure Container Registry (ACR)
This service lets you store and manage container images in a central registry. It provides you with a Docker private registry as a first-class Azure resource.
All container deployments, including DC/OS, Docker Swarm, and Kubernetes, are supported. The registry is integrated with other Azure services such as the App Service, Batch, Service Fabric, and others.
Importantly, it allows your DevOps team to manage the configuration of apps without being tied to the configuration of the target-hosting environment.
-
Azure Container Apps
Azure Container Apps allows you to build and deploy modern apps and microservices using serverless containers. It deploys containerized apps without managing complex infrastructure.
You can write code using your preferred programming language or framework and build microservices with full support for Distributed Application Runtime (Dapr). Scale dynamically based on HTTP traffic or events powered by Kubernetes Event-Driven Autoscaling (KEDA).
-
Azure App Service
Azure Web Apps provides a managed service for both Windows and Linux-based web applications and provides the ability to deploy and run containerized applications for both platforms. It provides autoscaling and load balancing options and is easy to integrate with Azure DevOps.
Long release cycles, numerous tests, code freezes, night and weekend work, and many people ensure that everything works.
But the more we change, the more risk it leads to, and we're back at the beginning, on many occasions resulting in yet another document or process that should be followed.
It's what I call silo-based development.
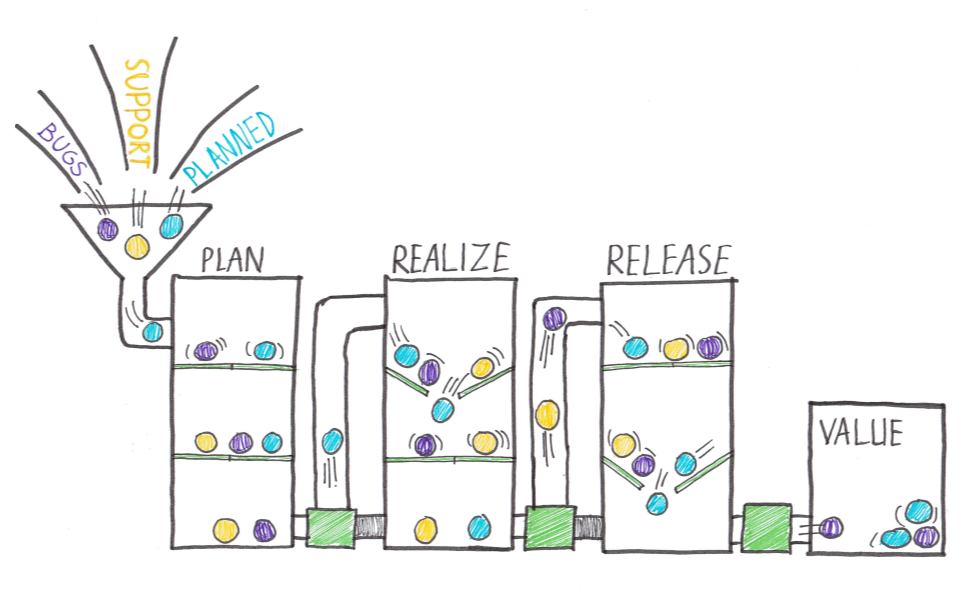
If we look at this picture of a traditional, silo-based value stream, we see Bugs and Unplanned work, necessary updates or support work, and planned (value-adding) work, all added to the teams' backlog.
Everything is planned, and the first "gate" can be opened. Everything drops to the next phase. All the work, and so all the value, moves in piles to the next stage.
It moves from the Plan phase to a Realize phase where all the work is developed, tested, and documented, and from here, it moves to the release phase.
All the value is released at the same time. As a result, the release takes a long time.
Continuous delivery (CD) is a set of processes, tools, and techniques for rapid, reliable, and continuous software development and delivery.
It means that continuous delivery goes beyond the release of software through a pipeline. The pipeline is a crucial component and the focus of this course, but continuous delivery is more.
To explain a bit more, look at the eight principles of continuous delivery:
- The process for releasing/deploying software must be repeatable and reliable.
- Automate everything!
- If something is difficult or painful, do it more often.
- Keep everything in source control.
- Done means "released."
- Build quality in!
- Everybody has responsibility for the release process.
- Improve continuously.
To deploy more often, we need to reconsider our:
- Software architecture (monoliths are hard to deploy).
- Testing strategy (manual tests don't scale well).
- Organization (separated business and IT departments don't work smoothly), and so forth.
This module will focus on the release management part of continuous delivery but be aware of the other changes you might find.
Find the next bottleneck in your process, solve it, learn from it, and repeat it forever.
Continuous delivery is an enabler for DevOps. DevOps focuses on organizations and bringing people together to build and run their software products.
Continuous delivery is a practice. It's being able to deliver software on-demand. Not necessarily 1000 times a day. Deploying every code change to production is what we call continuous deployment.
To do it, we need automation and a strategy.
But times have changed, and we need to deal with a new normal. Our customers demand working software, and they wanted it yesterday.
If we can't deliver, they go to a competitor. And competition is fierce. With the Internet, we always have global competition.
We have competitors on our stack that deliver a best-of-breed tool for one aspect of the software we built.
We need to deliver fast, and the product we make must be good. And we should do this with our software production being cheap and quality being high.
To achieve this, we need something like Continuous Delivery.
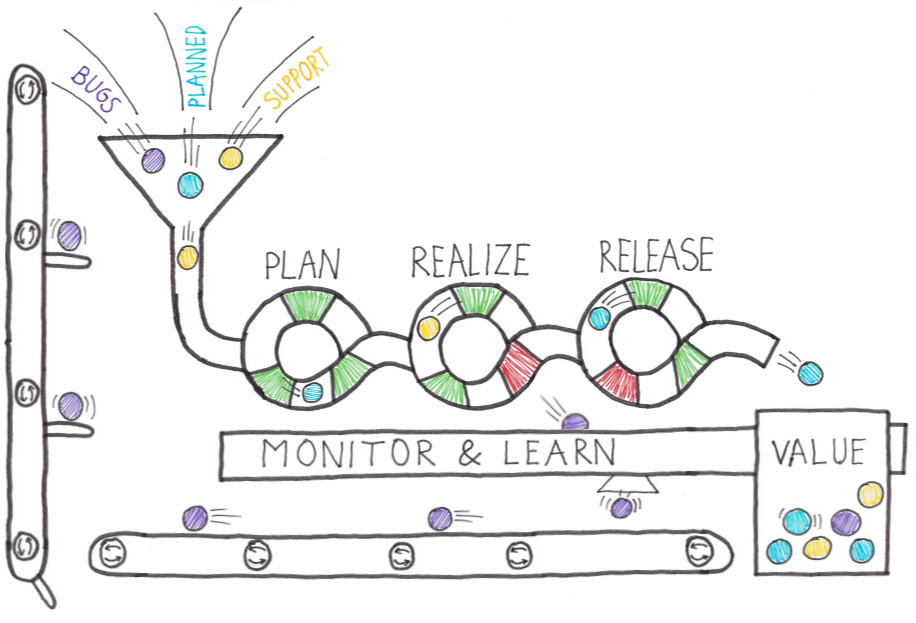
We need to move towards a situation where the value isn't piled up and released all at once but flows through a pipeline.
Just like in the picture, a piece of work is a marble. And only one part of the work can flow through the pipeline at once.
So, work must be prioritized in the right way. As you can see, the pipeline has green and red outlets.
These are the feedback loops or quality gates that we want to have in place. A feedback loop can be different things:
- A unit test to validate the code.
- An automated build to validate the sources.
- An automated test on a Test environment.
- Some monitor on a server.
- Usage instrumentation in the code.
If one of the feedback loops is red, the marble can't pass the outlet, and it will end up in the Monitor and Learn tray.
It's where the learning happens. The problem is analyzed and solved so that the next time a marble passes the outlet, it's green.
Every single piece of workflow through the pipeline until it ends up in the tray of value.
The more that is automated, the faster value flows through the pipeline.
Companies want to move toward Continuous Delivery.
- They see the value.
- They hear their customers.
- Companies wish to deliver their products as fast as possible.
- Quality should be higher.
- The move to production should be faster.
- Technical Debt should be lower.
A great way to improve your software development practices was the introduction of Agile and Scrum.
Last year around 80% of all companies claimed that they adopted Scrum as a software development practice.
Using Scrum, many teams can produce a working piece of software after a sprint of maybe two or three weeks.
But creating working software isn't the same as delivering working software.
The result is that all "done" increments are waiting to be delivered in the next release, which is coming in a few months.
We see now that Agile teams within a non-agile company are stuck in a delivery funnel.
The bottleneck is no longer the production of working software, but the problem has become the delivery of working software.
The finished product is waiting to be delivered to the customers to get business value, but it doesn't happen.
Continuous Delivery needs to solve this problem.
One of the essential steps in moving software more quickly to production is changing how we deliver software to production.
It's common to have teams that need to do overtime on the weekend to install and release new software in our industry.
It's caused by the fact that we have two parts of the release process bolted together. As soon as we deploy new software, we also release new features to the end users.
The best way to safely move your software to production while maintaining stability is by separating these two concerns. So, we separate deployments from our release.
It can also be phrased as separating your functional release from your technical release (deployment).
A release is a package or container containing a versioned set of artifacts specified in a release pipeline in your CI/CD process.
It includes a snapshot of all the information required to carry out all the tasks and actions in the release pipeline, such as:
- The stages or environments.
- The tasks for each one.
- The values of task parameters and variables.
- The release policies such as triggers, approvers, and release queuing options. There can be multiple releases from one release pipeline (or release process).
Deployment is the action of running the tasks for one stage, which results in a tested and deployed application and other activities specified for that stage.
Starting a release starts each deployment based on the settings and policies defined in the original release pipeline.
There can be multiple deployments of each release, even for one stage.
When a release deployment fails for a stage, you can redeploy the same release to that stage.
When we want to separate the technical and functional release, we need to start with our software itself.
The software needs to be built so that new functionality or features can be hidden from end users while it's running.
A common way to do this is the use of Feature Toggles. The simplest form of a Feature Toggle is an if statement that either executes or doesn't execute a certain piece of code.
By making the if-statement configurable, you can implement the Feature Toggle. We'll talk about Feature Toggles in Module 3 in more detail.
See also: Explore how to progressively expose your features in production for some or all users.
Once we've prepared our software, we must ensure that the installation won't expose any new or changed functionality to the end user.
When the software has been deployed, we need to watch how the system behaves. Does it act the same as it did in the past?
If the system is stable and operates the same as before, we can decide to flip a switch. It might reveal one or more features to the end user or change a set of routines part of the system.
The whole idea of separating deployment from release (exposing features with a switch) is compelling and something we want to incorporate in our Continuous Delivery practice.
It helps us with more stable releases and better ways to roll back when we run into issues when we have a new feature that produces problems.
We switch it off again and then create a hotfix. By separating deployment from the release of a feature, you make the opportunity to deploy any time of the day since the new software won't affect the system that already works.
- Does your organization need Continuous Delivery?
- Do you use Agile/Scrum?
- Is everybody involved or only the Dev departments?
- Can you deploy your application multiple times per day? Why or why not?
- What is the main bottleneck for Continuous Delivery in your organization?
- The Organization
- Application Architecture
- Skills
- Tooling
- Tests
- Other things?
Before diving into high-quality release pipelines, we must consider the difference between release and release processes. Or, when you talk about tooling, a release pipeline.
We start with defining a release process or release pipeline. The release pipeline contains all the steps you walk through when you move your artifact from one of the artifact sources discussed earlier through the stages or environments.
The stage can be a development stage, a test stage, a production stage, or a stage where a specific user can access the application.
Part of your pipeline is the people who approve the release or the deployment to a specific stage. Also, triggers or schedules on which the releases execute, and the release gates, the automatic approvals of the process.
The release itself is something different. The release is an instance of the release pipeline. You can compare it with object instantiation.
A release is a package or container that holds a versioned set of artifacts specified in a release pipeline in your CI/CD process.
In Object Orientation, a class contains the blueprint or definition of an object. But the object itself is an instance of that blueprint.
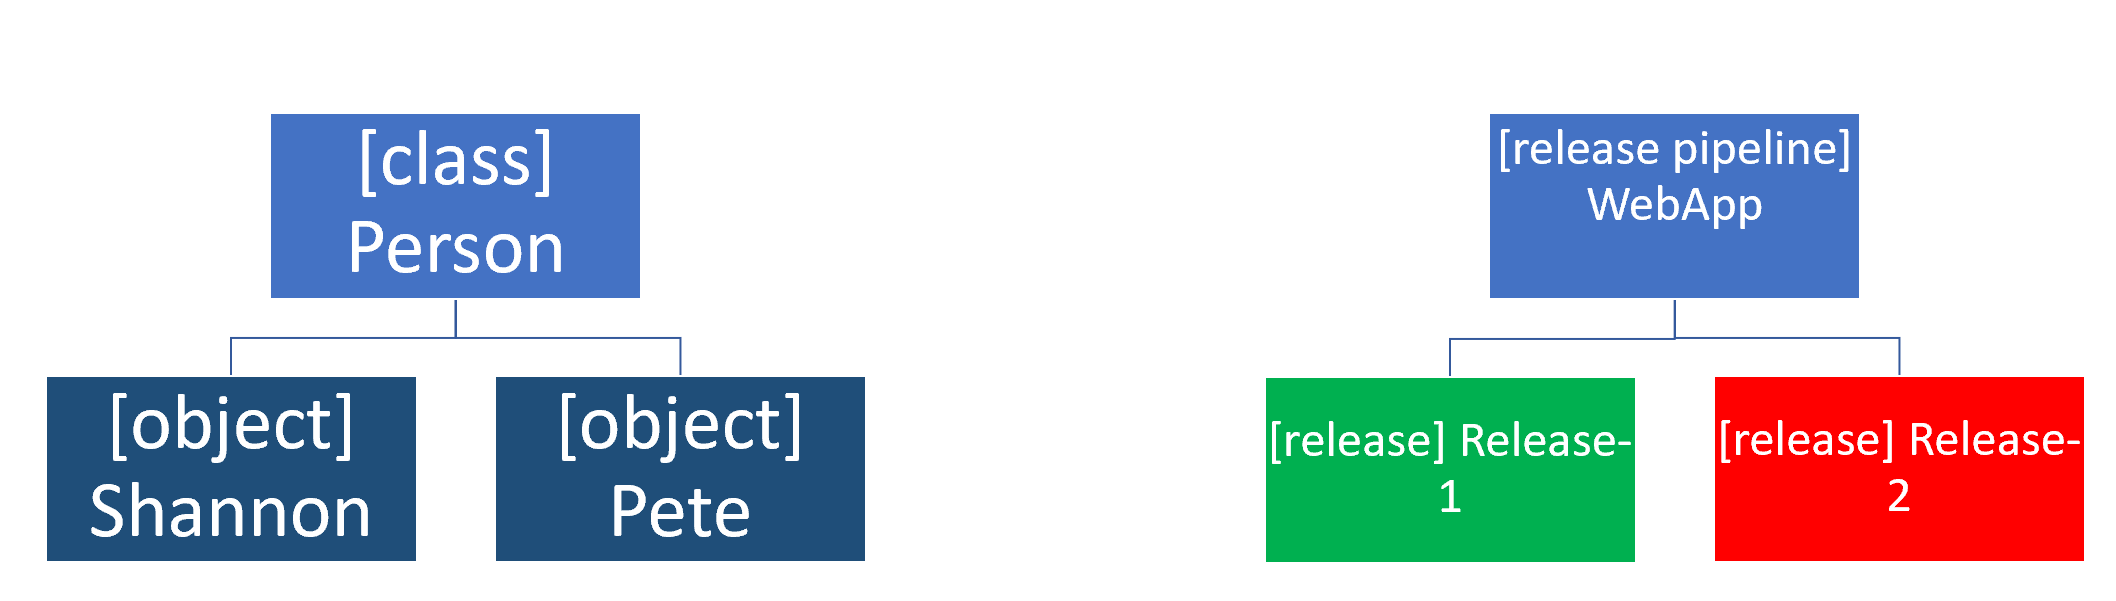
Azure DevOps has extended support for pipelines as code (also called YAML pipelines) for continuous deployment and started introducing various release management capabilities into pipelines as code.
The existing UI-based release management solution in Azure DevOps is referred to as classic release.
You'll find a list of capabilities and availability in YAML pipelines vs. classic build and release pipelines in the following table.
| Feature | YAML | Classic Build | Classic Release | Notes |
|---|---|---|---|---|
| Agents | Yes | Yes | Yes | Specifies a required resource on which the pipeline runs. |
| Approvals | Yes | No | Yes | Defines a set of validations required before completing a deployment stage. |
| Artifacts | Yes Yes Yes | Supports publishing or consuming different package types. | ||
| Caching | Yes | Yes | No | Reduces build time by allowing outputs or downloaded dependencies from one run to be reused in later runs. In Preview, available with Azure Pipelines only. |
| Conditions | Yes Yes Yes Specifies conditions to be met before running a job. | |||
| Container jobs | Yes No No Specifies jobs to run in a container. | |||
| Demands | Yes Yes Yes Ensures pipeline requirements are met before running a pipeline stage. Requires self-hosted agents. | |||
| Dependencies | Yes Yes Yes Specifies a requirement that must be met to run the next job or stage. | |||
| Deployment groups | Yes | No | Yes | Defines a logical set of deployment target machines. |
| Deployment group jobs | No | No | Yes | Specifies a job to release to a deployment group. |
| Deployment jobs | Yes No | No | Defines the deployment steps. Requires Multi-stage pipelines experience. | |
| Environment | Yes | No | No | Represents a collection of resources targeted for deployment. Available with Azure Pipelines only. |
| Gates | No | No | Yes | Supports automatic collection and evaluation of external health signals before completing a release stage. Available with Azure Pipelines only. |
| Jobs | Yes | Yes | Yes | Defines the execution sequence of a set of steps. |
| Service connections | Yes | Yes | Yes | Enables a connection to a remote service that is required to execute tasks in a job. |
| Service containers | Yes | No | No | Enables you to manage the lifecycle of a containerized service. |
| Stages | Yes | No | Yes | Organizes jobs within a pipeline. |
| Task groups | No | Yes | Yes | Encapsulates a sequence of tasks into a single reusable task. If using YAML, see templates. |
| Tasks | Yes | Yes | Yes | Defines the building blocks that make up a pipeline. |
| Templates | Yes No | No | Defines reusable content, logic, and parameters. | |
| Triggers | Yes Yes | Yes | Defines the event that causes a pipeline to run. | |
| Variables | Yes | Yes | Yes | Represents a value to be replaced by data to pass to the pipeline. |
| Variable groups | Yes | Yes | Yes | Use to store values that you want to control and make available across multiple pipelines. |
A release pipeline takes artifacts and releases them through stages and finally into production.
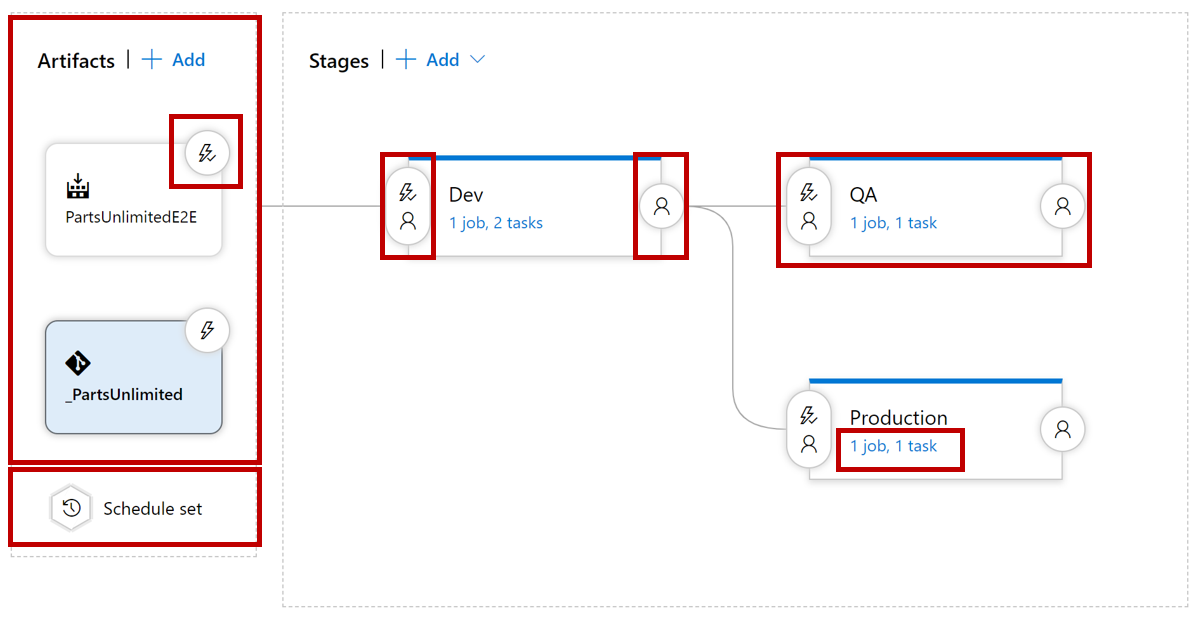
Let us quickly walk through all the components step by step.
The first component in a release pipeline is an artifact:
- Artifacts can come from different sources.
- The most common source is a package from a build pipeline.
- Another commonly seen artifact source is, for example, source control.
Furthermore, a release pipeline has a trigger: the mechanism that starts a new release.
A trigger can be:
- A manual trigger, where people start to release by hand.
- A scheduled trigger, where a release is triggered based on a specific time.
- A continuous deployment trigger, where another event triggers a release. For example, a completed build.
Another vital component of a release pipeline is stages or sometimes called environments. It's where the artifact will be eventually installed. For example, the artifact contains the compiled website installed on the webserver or somewhere in the cloud. You can have many stages (environments); part of the release strategy is finding the appropriate combination of stages.
Another component of a release pipeline is approval.
People often want to sign a release before installing it in the environment.
In more mature organizations, this manual approval process can be replaced by an automatic process that checks the quality before the components move on to the next stage.
Finally, we have the tasks within the various stages. The tasks are the steps that need to be executed to install, configure, and validate the installed artifact.
The components that make up the release pipeline or process are used to create a release. There's a difference between a release and the release pipeline or process.
See also Release pipelines.
What is an artifact? An artifact is a deployable component of your application. These components can then be deployed to one or more environments.
In general, the idea about build and release pipelines and Continuous Delivery is to build once and deploy many times.
It means that an artifact will be deployed to multiple environments. The artifact should be a stable package if you want to achieve it.
The configuration is the only thing you want to change when deploying an artifact to a new environment.
The contents of the package should never change. It's what we call immutability. We should be 100% sure that the package that we build, the artifact, remains unchanged.
How do we get an artifact? There are different ways to create and retrieve artifacts, and not every method is appropriate for every situation.
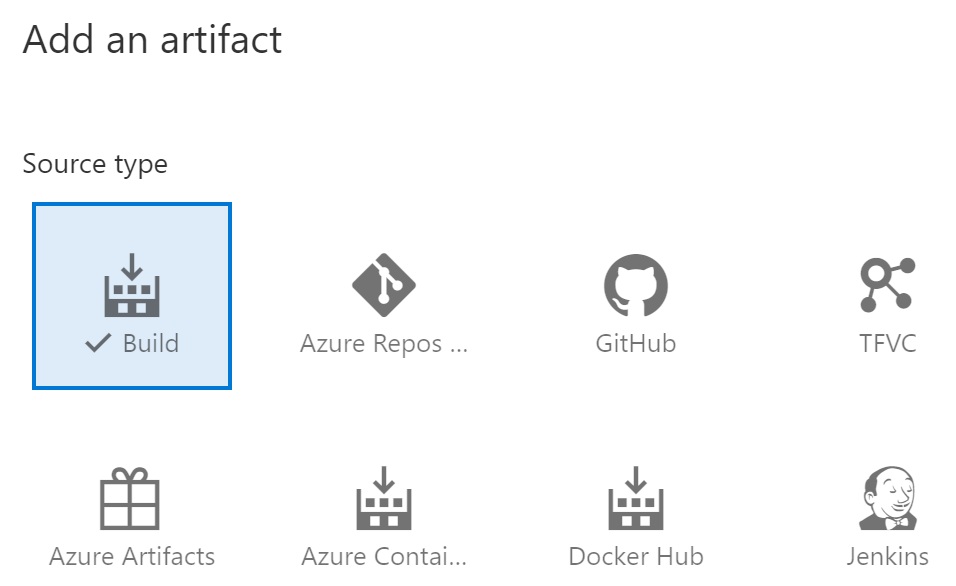
Part of this article has been plagiarized by Microsoft. Congratulations!
https://learn.microsoft.com/en-us/training/modules/learn-continuous-integration-github-actions/5-examine-workflow-badges